Do you have a question about the Honeywell IntelliDoX and is the answer not in the manual?
Provides an overview of the IntelliDoX Docking Module's features and capabilities.
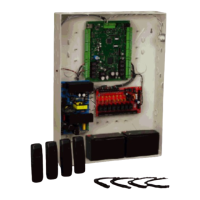
Lists the components included in the IntelliDoX Docking Module package and the Enabler Kit.
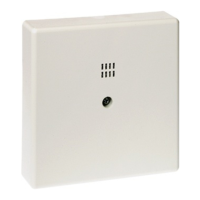
Illustrates and labels the key components and ports of the IntelliDoX docking module.
Explains the function of single-inlet and multi-inlet keys for gas cylinder connections.
Details the IntelliDoX LCD screen layout, status indicators, and screen color meanings.
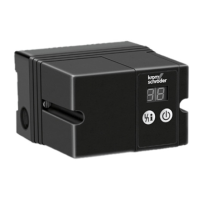
Describes the functions of the IntelliDoX keypad buttons for navigation and operation.
Step-by-step guide for assembling a single IntelliDoX docking module for first-time use.
Instructions for connecting and preparing up to five IntelliDoX modules into a group.
Procedures for detaching and reattaching the back panel to use it as a stand.
Detailed steps for connecting multiple IntelliDoX modules together and disconnecting them.
Guidance on selecting a location and securely mounting the IntelliDoX module to a wall.
Instructions for installing the IntelliDoX module onto parallel top hat DIN rails.
Instructions for attaching and securing the end plate to the module before connecting power or gas.
Steps for connecting the exhaust tubing to the module's exhaust outlet.
Guidance on connecting inlet filters to the purge and unused gas inlets for protection.
Instructions for inserting inlet plugs into unused gas inlets to protect the module from dust.
Steps for connecting the power supply and AC power cord to activate the module.
Procedures for connecting the IntelliDoX module to a computer network via an Ethernet cable.
How to access the menu for adjusting module settings like brightness, date/time, and gas inlets.
Steps to adjust the brightness of the IntelliDoX module's LCD screen.
Manual adjustment of the module's time and date settings via the settings menu.
Procedure for configuring gas blends, types, and concentrations for attached calibration gas cylinders.
Steps to change the docking station's display language from the settings menu.
How to view summary information about the module, including serial number and firmware versions.
Instructions for inserting a compatible detector into the docking module and initial recognition.
Navigating the menu that appears after a detector is recognized and procedures are completed.
Information and guidelines for performing bump tests on detectors using the IntelliDoX module.
Details on performing an accelerated compliance test (FastBump) for compatible detectors.
Procedures for performing a standard bump test, including automatic procedures on insertion.
Explanation of the calibration process and guidelines for ensuring accurate measurements.
Methods for transferring data logs from a detector to the module, manually or automatically.
Instructions for charging compatible detectors with rechargeable batteries using the IntelliDoX module.
How to configure a passcode to control access to certain module operations using software.
Adjusting module time and date settings automatically via Safety Suite Device Configurator software.
Steps to configure IntelliDoX and connected devices using Safety Suite software for various operations.
General instructions for creating and transferring configuration files to modules/detectors using the software.
Process of transferring configuration files from PC to modules using Safety Suite Device Configurator.
Method for transferring configuration files from a PC to modules using a USB flash drive.
Using the software to set the time zone for the IntelliDoX module and synchronize time.
Configuring the module and detector clocks to automatically adjust for daylight saving time.
Instructions for creating configuration files to activate hibernation on insertion.
Detailed steps to create a hibernation configuration file using Safety Suite software.
Transferring hibernation config files to modules using Safety Suite Device Configurator.
Transferring hibernation config files to modules using a USB flash drive.
Process of activating detector hibernation once the module is configured.
How modules store and retain detailed data related to tests and configuration events.
Procedures for importing data files from modules using Safety Suite Device Configurator software.
Steps for manually transferring data files from modules to a PC using a USB flash drive.
Information on updating module firmware and downloading the latest versions from Honeywell's site.
Procedures for updating firmware for compatible detectors, either via USB or software.
Transferring module firmware updates to selected modules via Safety Suite Device Configurator.
Process of updating detector firmware using Safety Suite when a new version is available.
How to upgrade the IntelliDoX system to support different detectors by replacing cradles/inserts.
Step-by-step instructions for removing and installing a replacement detector cradle.
Procedures for removing the old calibration insert and installing a new one.
Basic maintenance procedures, including cleaning the exterior and checking inlet filters.
Information on approved calibration gases, accessories, and regulator requirements.
Detailed specifications for the IntelliDoX Docking Module, including dimensions, weight, power, and ports.
Explains Honeywell's product warranty terms and limitations of liability.
Troubleshooting steps for common failures during bump tests or calibrations, like sensor tests or alarm failures.
Solutions for issues related to detector firmware updates, time synchronization, and daylight saving time.
Troubleshooting common module issues such as assembly, power connection, gas smell, and pump errors.
Guidance for resolving issues related to the login web page not displaying or network connectivity.
Specific troubleshooting steps for PID sensor calibration scenarios based on configuration.
Information regarding error code 0x0A07 related to the real-time clock battery.
Recommendations for secure firmware upgrades, preferring Safety Suite over manual USB methods.
Guidelines for creating and using strong passwords for network settings and module access.
| Data Logging | Yes |
|---|---|
| Calibration | Automatic |
| Bump Testing | Automatic |
| Instrument Management | Yes |
| Input Voltage | 100-240 VAC, 50/60 Hz |
| Enclosure Rating | IP20 |
| Connectivity | Ethernet, USB |
| Operating Temperature | 0°C to 40°C (32°F to 104°F) |
| Humidity Range | 10% to 90% (non-condensing) |
| Communication Protocol | Modbus TCP/IP |