88
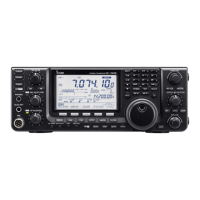
SET MODE
1
2
3
4
5
6
7
8
9
11
12
13
15
16
17
18
19
20
21
10
10
14
MIC Up/Down Speed 27. (Default: HIGH)
Set the rate at which frequencies are scanned while
holding down the microphone [UP]/[DN] switches.
•LOW:Lowspeed(25tuningsteps/second)
•HIGH:Highspeed(50tuningsteps/second)
Quick RIT Clear 28. (Default: OFF)
Select the RIT/∂TX frequency offset clearing opera-
tion with [CLEAR].
•OFF:Holdingdown[CLEAR]for1secondclearsthe
RIT and ∂TX frequency offset.
•ON :Pushing[CLEAR]instantlyclearstheRITand
∂TX frequency offset.
[NOTCH] SW (SSB) 29.
(Default: Auto/Manual)
Select the Auto, Manual or Auto/Manual notch filter to
be used for SSB mode operation.
•Auto :
Only the Auto notch filter can be used.
•Manual :Onlythe Manual notchfilter can be
used.
•Auto/Manual:BoththeAutoandManualnotchlters
can be used.
[NOTCH] SW (AM) 30.
(Default: Auto/Manual)
Select the Auto, Manual or Auto/Manual notch filter
used for AM mode operation.
•Auto :
Only the Auto notch filter can be used.
•Manual :Onlythe Manual notchfilter can be
used.
•Auto/Manual:BoththeAutoandManualnotchlters
can be used.
MN-Q Popup (MN ON) 31. (Default: ON)
Turn the manual notch filter width display ON or OFF.
When this item set to ON, and the manual notch filter
is selected with [NOTCH], the manual notch filter width
appears on the function display.
BW Popup (PBT) 32. (Default: ON)
Turn the IF filter passband width and shift value dis-
play ON or OFF.
When this item set to ON, and the [TWIN PBT] control
is rotated, the passband width and shifting value ap-
pear on the function display.
BW Popup (FIL) 33. (Default: ON)
Turn the IF filter passband width and shift value dis-
play ON or OFF.
When this item set to ON, and [FILTER] is pushed,
the passband width and shifting value appear on the
function display.
SSB/CW Sync Tuning 34. (Default: OFF)
Turn the Displayed Frequency Shift function ON or
OFF.
When this function is turned ON, the audio pitch or
tones of the received signal will remain the same, even
when the operating mode is changed between SSB
and CW.
The amount of frequency shift may differ, depending
on the CW pitch setting.
•OFF:Thedisplayedfrequencydoesnotshift.
•ON :Thedisplayedfrequencyshiftswhentheop-
erating mode is changed between SSB and
CW.
CW Normal Side 35. (Default: LSB)
Select the sideband used to receive CW in the CW
normal mode between LSB and USB.
KEYER 1st Menu 36. (Default: KEYER-Root)
In the CW mode, select KEYER-Root or KEYER-
SEND as the menu that appears first after pushing
[KEY](F-4) in the “M1” screen (Menu 1).
•KEYER-Root :Memorykeyermenuappearsrst.
•KEYER-SEND:KeyerSENDmenuappearsrst.
External Keypad 37. (Default: OFF)
Turn the external keypad ON or OFF for keyer mem-
ory transmission.
See page 18 for the equivalent circuit of an external
keypad and connection.
•OFF :Theexternalkeypaddoesnotfunc-
tion.
•KEYERSEND :In the CW mode, pushing one of
external keypad switches transmits
the desired keyer memory con-
tents.