3.4.2 Configuring the network interface
If the topside unit is to be accessed via the web interface, the network interface needs to be set
up.
Note: The Config Port is only for the web interface and not for communication with subsea
equipment. The subsea equipment configurations are accessed via the Ethernet ports on
the back of the topside unit (C1, C2 and C3).
Wired connection
Connect the topside unit to an Ethernet network via the Config Port on the back of the unit.
If the network has a DHCP server, the unit will receive IP address automatically. Review the
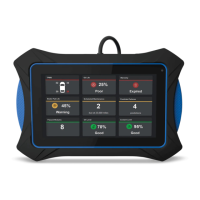
settings by pressing the "SETUP" button on the left side of the touch screen.
If DHCP is not available the default host name and IP address is MATRIX and
192.168.50.<serial no>, respectively.
The web interface is available by typing the IP address into the address field of your web
browser on a computer connected to the same network as the Matrix.
Wired Network settings.
Network settings can be changed by pressing the “SETUP” button on the left side of the touch
screen. The SETUP screen has the following settings:
IP ADDRESS : Shows the IP address provided by the DHCP server. If DHCP is off, touch
the field to set IP address manually
SUBNET MASK : Shows the subnet mask provided by the DHCP server. If DHCP is off,
touch the field to set the value manually.
GATEWAY IP : Shows the default gateway IP address provided by the DHCP server. If
DHCP is off, touch this field to set the value manually.
DHCP ON/OFF : Touch to enable/disable the DHCP client. The button is green when DHCP
is on. Default is on.
SAVING: If the settings are changed manually, reboot the system for the changes to take effect.
This is done by pressing the POWER button for 2 seconds to turn the system off, and then
pressing the button 2 seconds again to turn the system on.
NOTE: The serial number of the topside can be found on the left hand side of the bottom plate.
 Loading...