4-17
TAIKO Service Manual
CHAPTER
4
© 2006 Japan Cash Machine Co.Ltd. All rights reserved.
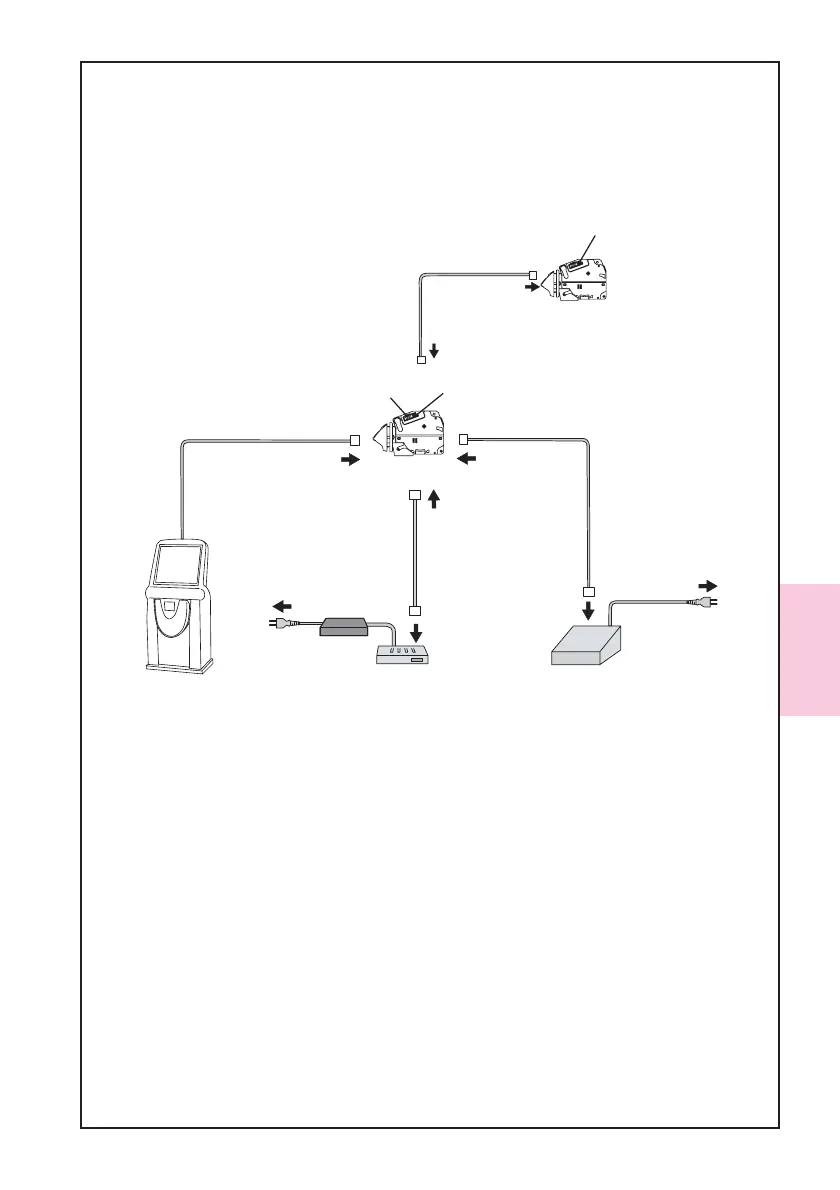
4-5-2. Cloning Procedures
Follow the steps below to clone.
1. Connect the tool (the Master TAIKO, the Slave TAIKO and the Power Supply Unit)
and the harness as the following illustration indicates.
2. Set the DIP switch of the Master TAIKO Unit No. 1, 2, 7 and 8 ON and the DIP switch
of the Slave TAIKO Unit No. 1, 7 and 8 ON.
3. Confirm the LED lamp of the Master TAIKO Unit is flashing withe, the LED lamp of
the Slave TAIKO Unit is flashing green.
4. Set the DIP switch of the Master TAIKO Unit No. 1 OFF to start cloning.
5. When starting cloning, the LED lamp of the Master TAIKO Unit lights pink, the LED
of the Slave TAIKO Unit lights yellow.
6. When the LED lamp of the Slave TAIKO Unit lights blue (or flashes green), the clon-
ing is complete. (Approx. 15 minutes)
7. Set the DIP switch of the Master TAIKO Unit No.1 ON.
8. When producing another clone TAIKO, turn off the power, connect another Slave
TAIKO Unit and perform from the step 2.
Slave TAIKO Unit
Clone Harness
(Part#:3280-05-52
EDP#:124528)
Without JCM Power Supply Unit
or
equivalent
ID-003/MDB/Pulse/ccTalk
ID-001
Host Machine
A1:JCM Power Supply Unit
(Part#:VM-30, EDP#:116125)
or
equivalent
B1:JCM Power Supply Unit
(Part#:VM-450, EDP#:059307)
or
equivalent
AC Power
AC Powe
ID-003/ccTalk/HII
Connector
ID-001
Connector
A2:TAIKO Harness A
(Part#:3280-05-54,EDP#:127527)
B2:VM-450 Connection Harness
(Part#:3280-05-102,EDP#:N/A)
Interface
Connector
Interface
Connector
TAIKO Unit
Interface
Connector(10Pin)
Maintenance
Connector(4Pin)
Maintenance
Connector
Maintenance
Connector
Maintenance
Connector