4-4
PC2/PC2X Disassembly/Assembly
Opening the PC2/PC2X
Removing the Top Enclosure
1. Depending on the unit you are servicing, follow the procedures described on page 4-2 for
the PC2 bottom or page 4-3 for the PC2X bottom.
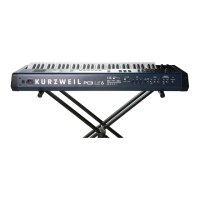
2. Refer to Figure 4-3.
Note: Figure 4-3 is an illustration of the PC2 rear panel. An illustration of the PC2X has
not been included because the difference between the two is minimal. The quantity and
position of the endcap screws is identical.
3. Remove the four screws that secure the endcaps to the rear panel.
Figure 4-3 PC2 rear panel
Caution: The following steps describe removing the left and right endcaps. To avoid
damage to the endcaps, be sure to hold onto each endcap when removing the screws.
When the endcap screws are removed, the endcap is free of the unit.
4. Refer to Figure 4-1 for the PC2 or Figure 4-2 for the PC2X. Move the unit so that one end
hangs over the edge of your work surface. Remove the four endcap screws from the
bottom enclosure. One of these screws secures the endcap locking bracket. When you
remove the endcap locking bracket screw, the bracket remains loosely in the endcap
assembly. Set the endcap safely aside. Repeat for the other endcap.
5. Refer to Figure 4-4. The bottom edge of the rear panel and back edge of the bottom
enclosure connect to form a lip. The rear panel screws secure the lip.
Note: Figure 4-4 is an illustration of the PC2. An illustration of the PC2X has not been
included because the difference between the two is minimal. The only difference is the
spacing and quantity of the rear panel screws. If you are servicing a PC2, there are seven
screws securing the rear panel portion of the top enclosure to the bottom enclosure. If you
are servicing a PC2X, there are nine screws.
PC2
Thru / Out
Thru / Out
In
Digital
Contrast
LCD
Out
Switch
Out
1
Continuous
132
Breath
2 Right
Ribbon
Left Headphones
Power MIDI Pedals Inputs Audio Outs
I / 0
Adapter In
9.0V 2.0A
14.0V~0.25A
THIS DEVICE COMPLIES WITH PART 15 OF THE FCC RULES. OPERATION IS SUBJECT TO THE FOLLOWING TWO CONDITIONS: (1) THIS DEVICE MAY NOT CAUSE HARMFUL
INTERFERENCE, AND (2) THIS DEVICE MUST ACCEPT ANY INTERFERENCE RECEIVED, INCLUDING INTERFERENCE THAT MAY CAUSE UNDESIRED OPERATION.
Manufacturer: Young Chang Co., LTD.
Made in ROK Serial No.
Endcap screws
Endcap screws
 Loading...


