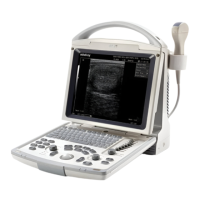
12-26 Probes and Biopsy
◼ Select biopsy bracket angle
If the needle-guided bracket supports more than one biopsy angle, you can select the
angle from the drop-down list.
◼ Select Dot size
Move the cursor onto [Dot Size], press <Set> to select the dot size among Small,
Medium and Big.
Tips:
⚫ The guide line is a dot line which consists of two kinds of dots, the distance between
two dots is depth dependent. Move the cursor onto the big dot, a numeral, which
represents the biopsy depth, is displayed.
⚫ The biopsy guidezone adjusts along with image adjustments, such as image
inversion/rotations, zoom and depth changes.
⚫ When the imaging depth and area are changed, the guide line will be adjusted.
◼ Display or hide the guide line
Set [Biopsy Kit] on the menu to “Off” to hide the guide line.
Or, press <Biopsy> on the control panel to display or hide the guide line.
◼ In B mode image menu, you can also display, hide or select the needle-guide bracket
via [Biopsy Kit] item.
12.2.5 Verify Biopsy Guide Line
For bi-planar probe applied biopsy, the verification is performed on the first
guide line, the other guide lines can move together with the first one in
parallel.
1. Confirm that the needle-guided bracket has been installed securely in the correct
position.
2. Prepare a container filled with sterile water.
3. Place the head of the transducer in the sterile water, and get a biopsy needle into the
needle guide.
4. When the biopsy needle appears on the image, please adjust the parameters of the
menu on the screen to make the biopsy needle is displayed at almost the same position
as the selected needle mark.