Get Started
13
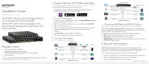
S350 Series 8-Port Gigabit Ethernet Smart Managed Pro Switch Models GS308T and GS310TP
7. Select your switch by clicking the line that displays the switch.
8. Click the Web Browser Access button.
The Smart Control Center launches a browser that displays the login page of the selected
device.
Use your web browser to manage your switch. The default password is password. For
more information about the page layout and options, see
Navigation Tabs, Configuration
Menus, and Page Menu on page 21.
Discover a Switch in a Network Without a DHCP Server
This section describes how to use the Smart Control Center to set up your switch in a
network without a DHCP server. If your network does not include a DHCP service, you must
assign a static IP address to your switch.
If you prefer, you can assign the switch a static IP address even if your network does include
a DHCP server.
Note: For more information about the Smart Control Center (SCC) program,
see the SCC user manual, which you can download by visiting
netgear.com/support/download/.
To assign a static IP address:
1. Connect the switch to your existing network.
2. Power on the switch by connecting its power cord.
3. Install the Smart Control Center on your computer.
4. Start the Smart Control Center.
5. Click the Discover button for the Smart Control Center to find your switch.
The utility broadcasts Layer 2 discovery packets within the broadcast domain to discover
the switch.
6. Select the switch, and then click the Configure Device button.
The page expands to display additional fields at the bottom.
7. Select the Disabled radio button.
DHCP is disabled.
8. Enter the static switch IP address, gateway IP address, and subnet mask for the switch.