13
G9SP-series Controllers Section 2-1
*1 The USB cable must be 3 m or less in length.
*2 The baud rate can be set on this DIP switch pin with unit version 2.0 or
later.
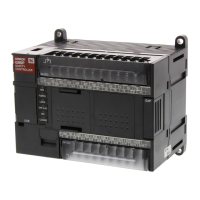
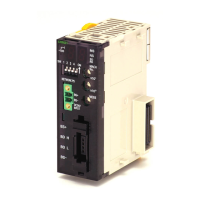
No. Name Function
1 Operation Indicators These indicators can be used to check the operating status of the G9SP-series Control-
ler.
2
USB Port
*1
Connect a USB cable to this port to connect to a computer to set up and monitor the
G9SP-series Controller from the G9SP Configurator. A commercially available USB
cable can be used. The G9SP-series Controller end of the USB cable must be a B-type
male connector.
5-2-2 Installing the USB Driver
3 Push Switch This switch is used for the following operations.
1. Backing up data to a Memory Cassette and restoring data from a Memory Cassette
2. Displaying the current configuration ID on the I/O indicators
SECTION 11 Backup and Restore Data Using Memory Cassette
4 DIP Switch The DIP switch is used to back up data to a Memory Cassette and to set the serial com-
munications baud rate.
No. Name Description Default
Pin 1 Do not use. Leave set to OFF OFF
Pin 2
Do not use. Leave set to OFF
OFF
Pin 3
Baud rate
*2
OFF: 9,600 bps
ON: 115,200 bps
OFF
Pin 4 Backup from
G9SP-series
Controller to
Memory Cas-
sette
If the G9SP-series Controller is
started while this pin is ON, the
data will be backed up from the
G9SP-series Controller to the
Memory Cassette (MC).
Leave this pin turned OFF during
normal operation.
OFF
5 Memory Cassette Slot The Memory Cassette is mounted in this slot. A slot cover is attached when the G9SP-
series Controller is shipped from the factory.
1-1-2 Basic System and Configuration Devices
2-3 Option Units
SECTION 11 Backup and Restore Data Using Memory Cassette
6 Option Board Slot One Option Board can be mounted in this slot.
1-1-2 Basic System and Configuration Devices
2-3 Option Units
7 Expansion I/O Unit Con-
nector
Up to two CP-series Expansion I/O Units can be connected.
1-1-2 Basic System and Configuration Devices
2-2 Expansion I/O Units
8 I/O Indicators These indicators show the status of the built-in I/O terminals.
9 Terminal Block Connect the power supply and I/O devices to the terminal block.
 Loading...