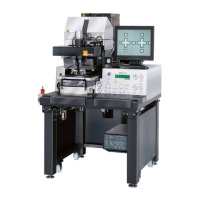
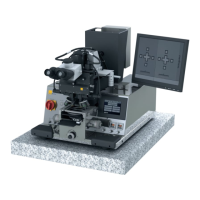
OPERATION OF THE MACHINE
MA6 / MA8 - 1. Operation of the Machine - Rev.05 07-06
1
22
1. Adjust Parameters
– select mask loading type: F1 key
Make secure that no mask is loaded before select
mask loading manual (default).
– select alignment microscope
Deactivate BSA MICROSCOPE key (LED off).
– select exposure mode: SELECT PROGRAM key
Press SELECT PROGRAM key (310). Toggle
through the menu and confirm the selection soft
contact by pressing SELECT PROGRAM key
again.
– edit parameter: EDIT PARAMETER key
Press EDIT PARAMETER key (311) to edit the pa-
rameter exposure time, alignment gap and WEC-
type. Change all necessary value and confirm by
pressing EDIT PARAMETER key again.
– save all settings: EDIT PROGRAM key
This function is an optional possibility to save this
parameter set for the future. Toggle with the X-
ARROW keys to "SAVE Pgm.". Select with the Y-
ARROW keys a program number. Prior saved
programs to the same number will be overwritten
without warning. Save the settings by the EDIT
PROGRAM key (312). Existing programs can be
loaded from here.
2. Load Mask
Watch out for the microscope
movement!
– start mask loading sequence: CHANGE MASK
key
You have to take out the mask holder, flip it 180°
and put it on the tray left. If a mask is loaded,
press ENTER to toggle the mask vacuum off, re
-
tract the mechanical mask clamp and remove the
mask.
– load mask and fix it: ENTER key
Place the mask onto the mask holder against the
stop pins. Toggle the mask vacuum on by press
-
ing the ENTER key. Activate the mechanical mask
clamp by pressing on the leaf spring.
– Slide the mask holder back into the machine and
clamp it: CHANGE MASK key
Flip the mask holder 180° back and move it into
the machine. Lock the mask holder by pressing
CHANGE MASK key again.
3. Load Wafer
– pull out transport slide and load wafer: LOAD key
The machine instructs: "pull slide and load sub-
strate onto chuck". Pull out the transport slide
completely. Insert the proper chuck and place the
wafer against the prealignment pins. Confirm with
ENTER key. Now the wafer is hold by vacuum.
– move slide in: ENTER key
The machine instructs: "move slide into machine
and confirm with ENTER"
Watch out for the microscope
movement!
– wedge error compensation
WEC starts automatically after the last action is
completed. The wafer is adjusted parallel to the
mask and moves to the alignment gap. The mi
-
croscope moves down to start the alignment.
4. Microscope Alignment
– set the TSA to meet your requirements (see
3.2.4): SPLITFIELD switch
For the M3xx microscope only, an actual TSA-mi-
croscope image on the monitor is enabled by
turning the SPLITFIELD switch (214) to LEFT.
Toggle BSA MICROSCOPE key (322) off. This key
switch also the controlled manipulator motors
from BSA to TSA. If no camera and monitor ex
-
ists, use the microscope eyepieces.
– microscope illumination: ILLUMINATION to TSA
Turn ILLUMINATION switch (210) to TSA and se-
lect the light intensity by the potentiometer under
this switch. Separate intensity selection for the
left/right objective is possible with the aperture lo
-
cated at the left/right microscope front.
– focus on the mask plane: TOP/BOTTOM key
Coarse focus is possible by using the TSA Z-
MOVEMENT knob (402) placed behind the TSA-
microscope. Make secure the TOP/BOTTOM key
LED (326) is on and adjust the fine focus sepa
-
rately using the TOP SUBSTRATE LEFT/RIGHT
(215) regulators. If no motorized focus exist, use
the OBJECTIVE FOCUS FINE MANUAL (404 ) on
the microscope.
– adjust microscope to the mask alignment marks
Move the left/right objective to the left/right mask
alignment mark by the OBJECTIVE X-SEPARA
-
TION knobs (405).
– grab image: GRAB IMAGE key (option)
First keystroke grabs the image. The objectives
move the focal plane to the wafer and theTOP/
BOTTOM key LED (326) goes off. The motor con
-
trol of the microscope manipulator is disabled at
this time. Second keystroke delete the stored im
-
age and enables the manipulator again.