ES
COSTURA DE CREMALLERAS - PUNTADA RECTA
COSER BOTONES
PIE PARA INSERCIÓN DE CREMALLERAS
1. Ponga el pie adecuado para cremalleras.
2. Coloque la cremallera sobre la tela a la
que se va a coser, y a continuación las dos
superficies bajo el pie prensatelas.
3. Al coser la parte izquierda de la cremallera,
el pie debe encontrase al. lado derecho de
la aguja.
4. Coloque el pie prensatelas de forma que la
puntada se realice lo más cerca posible de
los dientes de la cremallera.
5. Coloque el pie prensatelas al lado
izquierdo, de forma que se pueda coser
el lado derecho de la cremallera. Cosa
igualmente esta parte lo más cerca posible
de los dientes de la cremallera.
6. Levante el prensatelas y deslice la
cremallera hasta que el pie llegue al. cierre
de la cremallera.
PRENSATELAS - PARA APLICACIÓN DE BOTONES
1. Ponga el pie para aplicación de botones.
2. Desconecte los dientes del transportador moviendo
la palanca de transporte inferior hacia la derecha, de
modo que la palanca coincida con el dibujo.
3. Coloque la tela y el botón bajo el pie prensatelas.
Coloque los agujeros del botón alineados con la
abertura del prensatelas, debiendo estar el agujero
izquierdo justo debajo de la punta de la aguja.
4. Seleccione el ancho de puntada, a continuación,
baje el prensatelas y asegúrese de que el ancho
corresponde a los rificios del botón: gire lentamente
el volante hasta que la punta de la aguja esté
directamente encima del agujero derecho del botón. Si lo necesita, regule la anchura del
zigzag.
5. Realiza unas 6-7 puntadas (10 en materiales gruesos) a bajas revoluciones y levante la aguja
hasta su posición más alta.
6. Tire del hilo superior hacia el lado interior de la tela y ate los dos hilos, inferior y superior.
Dependiendo de si se cose el lado derecho
o izquierdo de la cremallera, el prensatelas
debe encontrarse siempre en el tejido
junto a los dientes de la cremallera.
18
UTILITY STITCHES
Helpful hint:
During zipper inserting, ensure that the
needle do not touch the zipper. Otherwise
it will cause needle break or even injury.
Buttonhole stitch
Zipper application
Tips:
Slightly reduce the upper tension to
produce better results.
Use backing material for fine or
stretchy materials.
We recommend placing a pin across
the end of the buttonhole as a
precaution against cutting the stitches
with the seam ripper.
It is advisable to use gimp cord for
stretch or knit fabrics. The zigzag
should sew over the gimp.
The lines on the button
hole foot can be
used guides when sewing multiple
buttonholes.
1. Lift the presser foot, pull the gimp cord and come round the protruding point on back of the
buttonhole foot.
2. Pull the gimp cord under the foot to the front.
3. Fix the gimp cord to the protruding point on front of foot.
4. Turn the needle down to the starting position on fabric, put down the presser foot.
5. Sew the buttonhole according to page 17.
6. Pull the gimp cord straightly.
7. Cut the gimp cord.
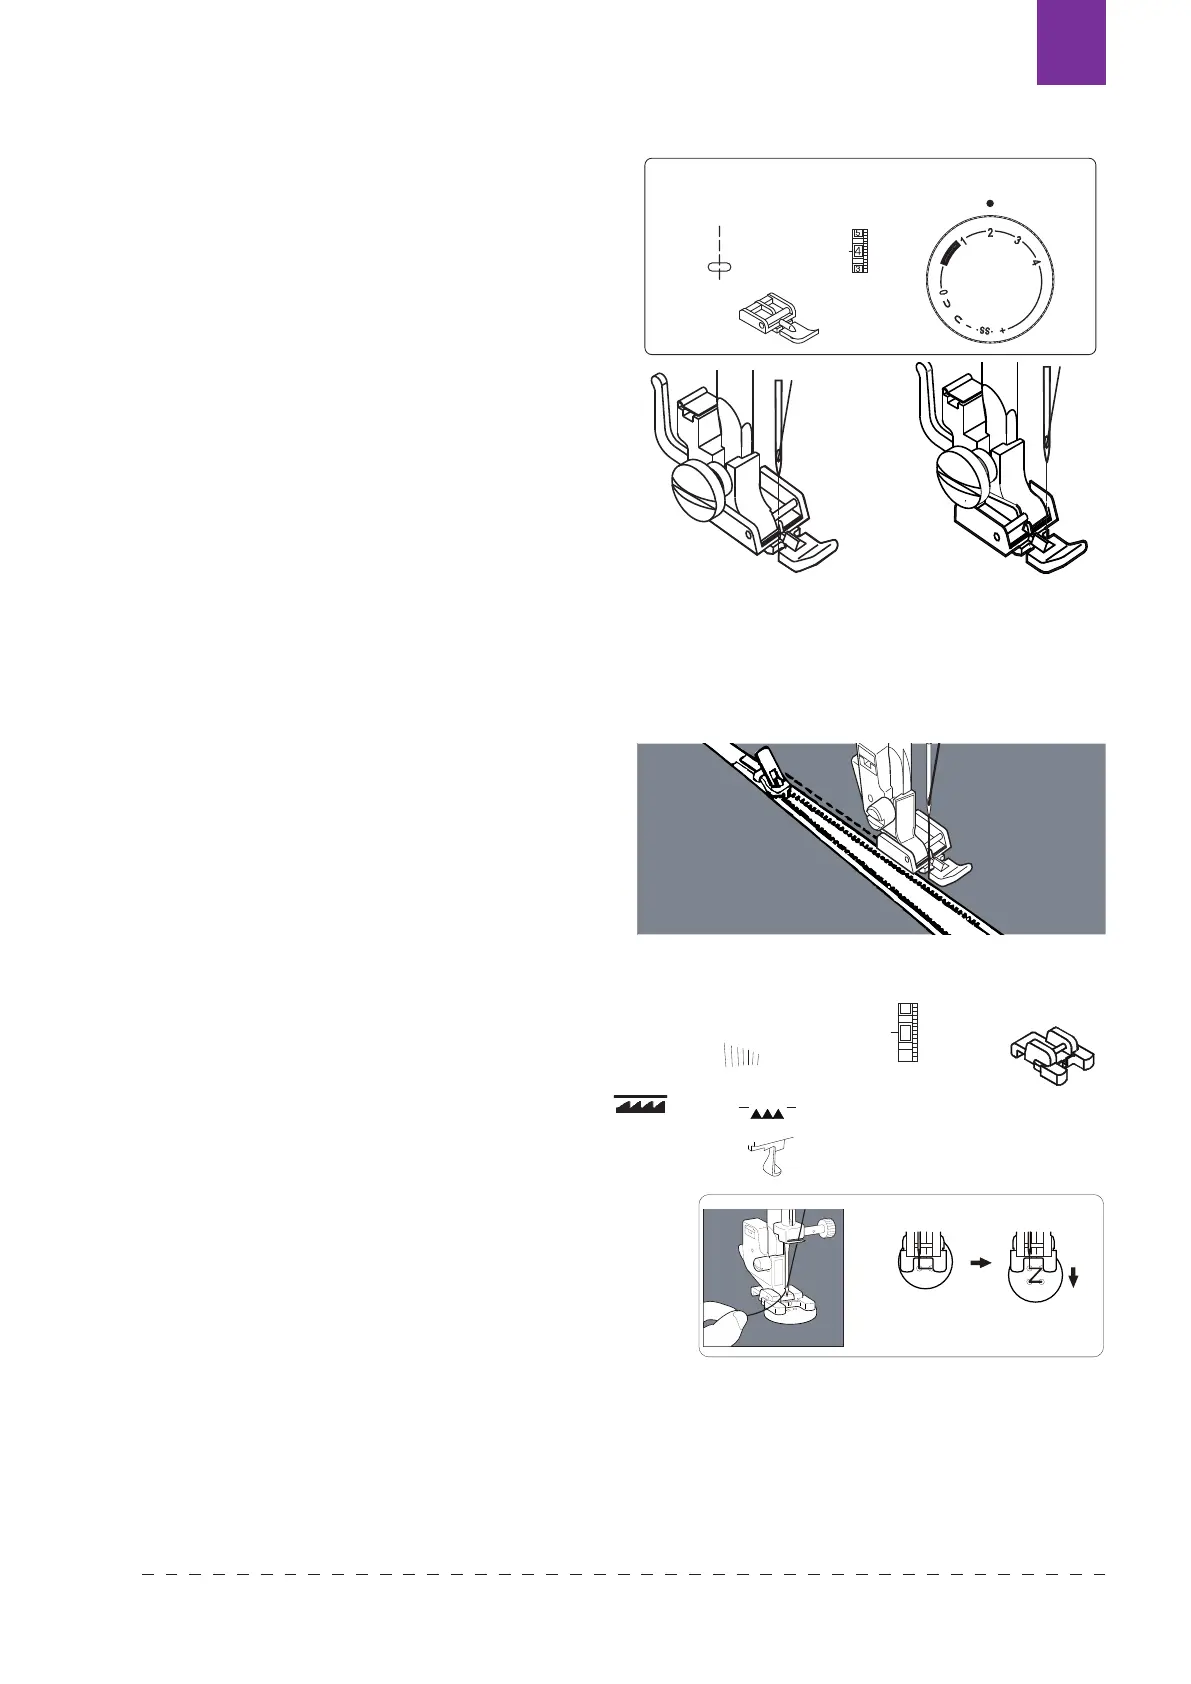
Attach the zipper foot.
When sewing the right side of the zipper, attach the
zipper foot as the illustration in right.
When sewing the le
ft side of the zipper, attach the
zipper foot as the illustration in right.
Sew the right side
of the zipper.
Sew the left side
of the zipper.
A
3~6
2
Machine Setting
18
UTILITY STITCHES
Helpful hint:
During zipper inserting, ensure that the
needle do not touch the zipper. Otherwise
it will cause needle break or even injury.
Buttonhole stitch
Zipper application
Tips:
Slightly reduce the upper tension to
produce better results.
Use backing material for fine or
stretchy materials.
We recommend placing a pin across
the end of the buttonhole as a
precaution against cutting the stitches
with the seam ripper.
It is advisable to use gimp cord for
stretch or knit fabrics. The zigzag
should sew over the gimp.
The lines on the button
hole foot can be
used guides when sewing multiple
buttonholes.
1. Lift the presser foot, pull the gimp cord and come round the protruding point on back of the
buttonhole foot.
2. Pull the gimp cord under the foot to the front.
3. Fix the gimp cord to the protruding point on front of foot.
4. Turn the needle down to the starting position on fabric, put down the presser foot.
5. Sew the buttonhole according to page 17.
6. Pull the gimp cord straightly.
7. Cut the gimp cord.
Attach the zipper foot.
When sewing the right side of the zipper, attach the
zipper foot as the illustration in right.
When sewing the le
ft side of the zipper, attach the
zipper foot as the illustration in right.
Sew the right side
of the zipper.
Sew the left side
of the zipper.
A
3~6
2
Machine Setting
16
UTILITY STITCHES
Sewing buttons
To secure thread, cut the upper thread with 25cm of excess, wind it
around the thread between the button and the fabric, and then tie it
tightly.
Position your fabric and button under the presser foot. Lower presser foot. Turn the
handwheel to make sure needle clears both left and right openings of button. Adjust
width if required. Sew 10 stitches across.
When attaching four-hole buttons, first sew the two holes closest to you. Then,
slide the
button so that the needle goes into the two holes toward the rear of the sewing machine,
and then sew th
em in the same way.
1
2
3
C~B
Machine Setting
1~3
NOTE: 1. Drop the feed dog (Refer to page 4) .
After you finish sewing, set the drop feed
lever to the original position.
2. You do not have to adjust the stitch length dial.
Dropthefeeddog
Texi Fox 25 107

 Loading...


