PL
DŹWIGNIA SZYCIA WSTECZ
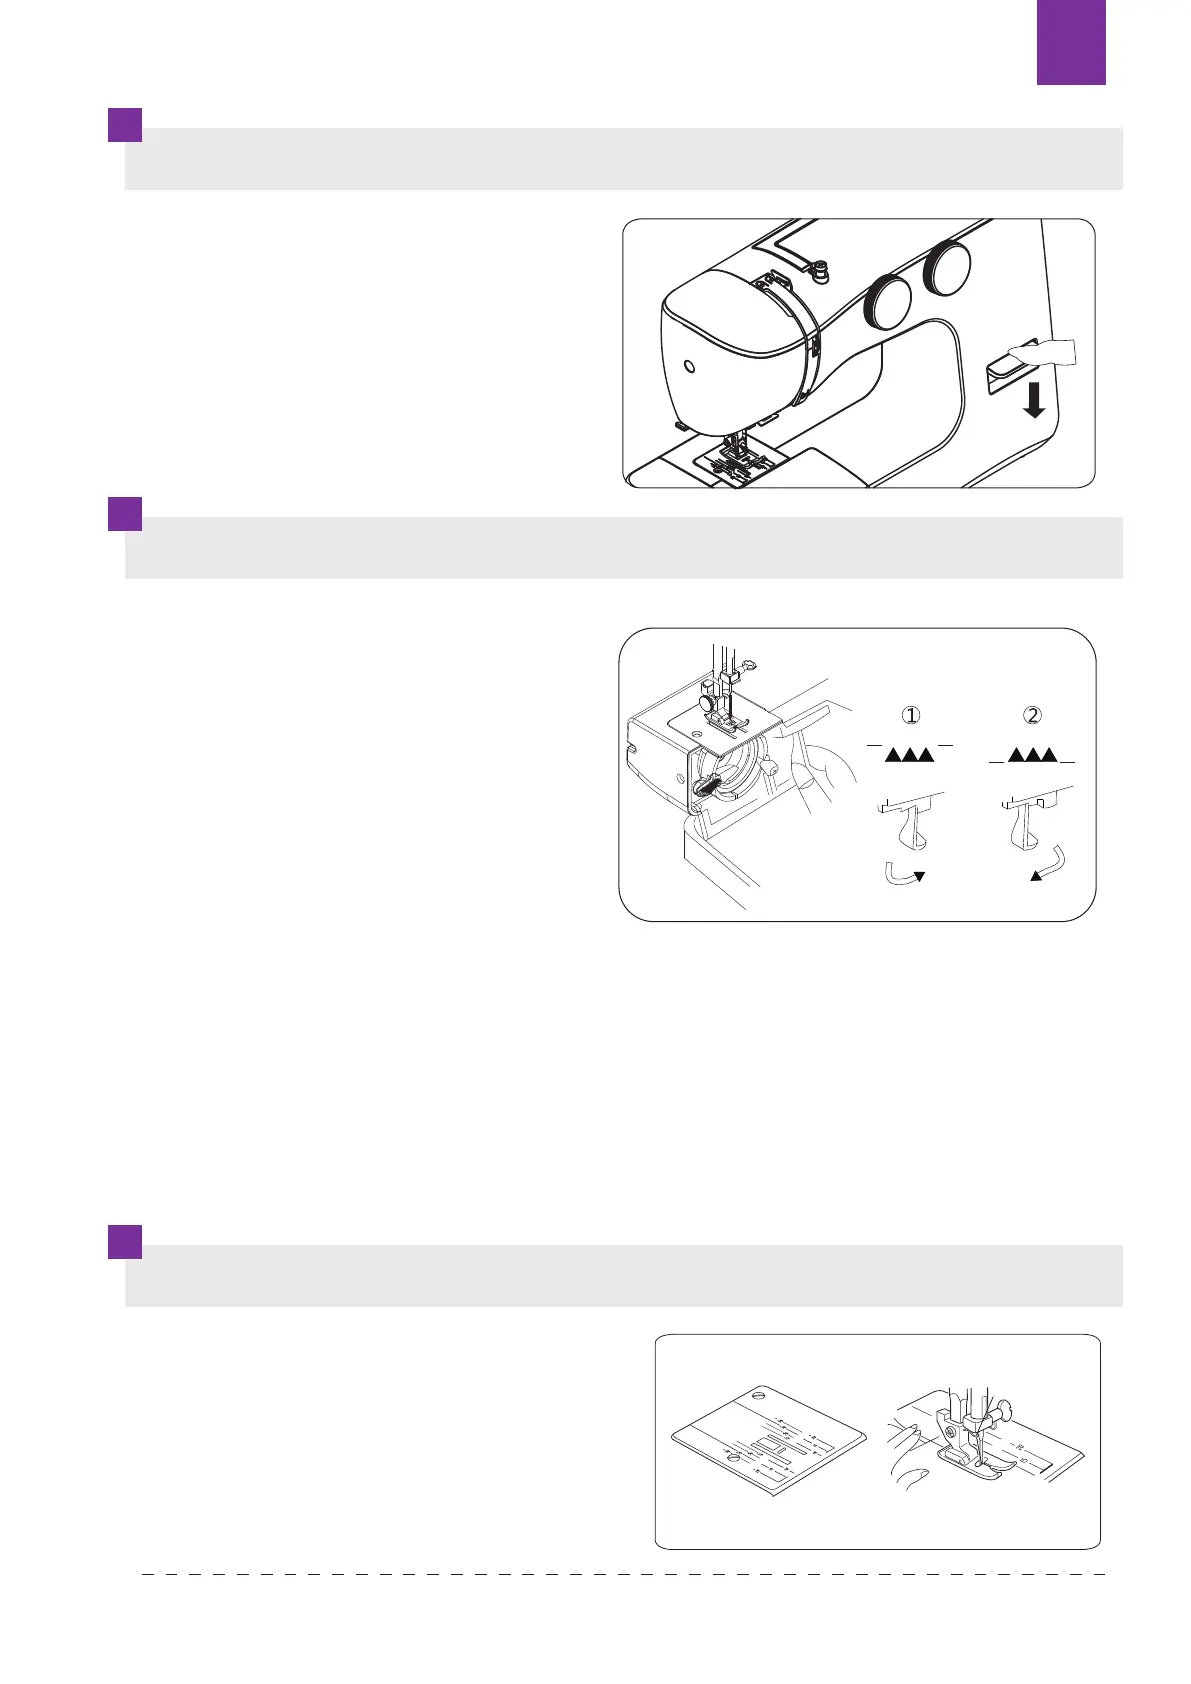
WYŁĄCZENIE ZĄBKÓW TRANSPORTERA
OZNACZENIA NA PŁYTCE ŚCIEGOWEJ
Aby wzmocnić początek lub koniec
szwu należy przeszyć kilka ściegów
do tyłu – w tym celu naciśnij dźwignię
szycia wstecznego. Maszyna będzie
szyła wstecz tak długo, jak dźwignia
będzie przyciskana. Aby znów szyć do
przodu, po prostu zwolnij dźwignię.
Linie na płytce ściegowej pomagają
zachować właściwą odległość ściegu
od krawędzi materiału (a konkretnie
odcentralnego uderzenia igły). Wartości
liczbowe pokazane są zarówno w calach
(ztyłu płytki), jak i w milimetrach (z przodu
płytki).
Dźwignia wyłączania transportera
znajduje się za pokrywą bębenka
ichwytacza.
1. Otwórz pokrywę chwytacza
ibębenka.
2. W celu wyłączenia transportera
pociągnij w dół dźwignię
iprzesuń w prawo, aż wejdzie
ona w otwór po prawej stronie (1).
Transporter musi być wyłączony
przy wykonywaniu prac, w trakcie
których materiał nie powinien się
przesuwać (np. przy przyszywaniu guzików, haftowaniu, cerowaniu).
3. W celu włączenia transportera pociągnij dźwignię w dół i przesuń w lewo
dopozycji wyjściowej jak pokazano na rysunku 2.
Wyłączenie transportera jest wykorzystywane podczas cerowania i haftowania.
Wprzypadku normalnej pracy maszyny, ząbki transportera muszą być zawsze
wgórnej pozycji.
4
2
1
3
KNOWING YOUR SEWING MACHINE
Converting to free-arm sewing
Your machine can be used either as a flat-bed or as a
free-arm model.
With the extension table in position, it provides a
large working surface as a standard flat-bed model.
To remove the extension table, hold it firmly with both
hands and pull it off to the left as shown. To replace,
slide the extension table back into place until it
clicks.
With the extension table removed the machine
converts into a slim free-arm model for sewing
children’s clothes, cuffs, trouser legs, and other
hard-to-reach pl
aces.
Presser foot lifter
There are three positions for your presser foot.
1. Lower the presser foot to sew.
2. Raise the lifter to the middle position to insert or remove
fabric.
3. Lift it to its highest position to change the presser foot or to
remove thick fabric.
Reverse sewing lever
As long as you are pressing down this
button while sewing, the machine will feed
the fabric backwards.
Dropping the feed dogs
1. For dropping the feed dogs, press down
lever and move it to the direction of arrow
as illustrated.
2. To raise the feed dogs, press down the
lever and move it to the direction or arrow
as illustrated.
* Feed dogs must always be up for normal
sewing.
5
1
2
3
KNOWING YOUR SEWING MACHINEKNOWING YOUR SEWING MACHINE
Seam guide line
The numbers on the needle plate indicate
the distance between the center needle
position and the indicating line.
The numbers in the front indicate in
Millimeters.
The numbers in the back indicate in inches.
Setting spool pins
The spool pins are used for holding the spool of thread in order
to feed thread to the machine.
To use, pull up the spool pin. Push down for storage.
Winding the bobbin
1. Place a spool of thread on the left spool pin. Pull
the thread out from the spool and place it through
thre
ad guide as shown in illustration. Put end of
thread through the hole in bobbin as shown.
2. Push the bobbin wider shaft to far left position, if
it is not already there. Place bobbin onto the
bobbin wider shaft with end of thread coming
from top of bobbin. Push bobbin winder shaft to
the right until it clicks. Hold onto end of thread.
3. Start machine. Bobbin will automatically stop
turning when completely filled. Push shaft to the
left to remove bobbin and cut thread.
Texi Fox 25 151