PL
PRZYSZYWANIE ZAMKÓW BŁYSKAWICZNYCH - ŚCIEG PROSTY
PRZYSZYWANIE GUZIKÓW
STOPKA - DO WSZYWANIA ZAMKÓW
1. Załóż stopkę do zamków.
2. Umieść zamek na materiale, do którego
ma być przyszyty, a następnie oba
podłóż pod stopkę.
3. Podczas szycia lewej strony zamka
błyskawicznego stopka musi
znajdować się po prawej stronie igły.
4. Ustaw stopkę tak, aby ścieg był szyty
możliwie najbliżej ząbków zamka.
5. Ustaw stopkę po lewej stronie, aby
możliwe było szycie prawej strony
zamka błyskawicznego. Przyszyj tę
stronę również maksymalnie blisko
ząbków zamka.
6. Podnieś stopkę i rozsuń suwak zanim
stopka dojdzie do uchwytu zamka.
STOPKA - DO NASZYWANIA GUZIKÓW
1. Załóż stopkę do naszywania guzików.
2. Wyłącz ząbki transportera, przesuwając dźwignię
transportu dolnego w prawo - tak aby dźwignia
pokrywała się z rysunkiem
3. Umieść materiał i guzik pod stopką. Ustaw otwory
guzika w poprzecznym wycięciu stopki, a lewą
dziurkę guzika tuż pod końcówką igły.
4. Wybierz szerokość ściegu, a następnie opuść stopkę i sprawdź, czy wybrana szerokość
koresponduje z otworami w guziku: wolno obracaj kołem pasowym, aż końcówka igły
znajdzie się bezpośrednio nad prawą dziurką guzika. W razie potrzeby dostosuj szerokość
zygzaka.
5. Wykonaj ok. 6-7 ściegów ( 10 na grubszym
materiale) na wolnych obrotach i podnieś igłę do
najwyższej pozycji.
6. Przeciągnij górną nitkę na lewą stronę materiału
izwiąż obie nitki górną i dolną.
W zależności od tego czy szyta jest prawa,
czy lewa strona zamka, stopka zawsze
musi znajdować się na materiale obok
ząbków zamka.
18
UTILITY STITCHES
Helpful hint:
During zipper inserting, ensure that the
needle do not touch the zipper. Otherwise
it will cause needle break or even injury.
Buttonhole stitch
Zipper application
Tips:
Slightly reduce the upper tension to
produce better results.
Use backing material for fine or
stretchy materials.
We recommend placing a pin across
the end of the buttonhole as a
precaution against cutting the stitches
with the seam ripper.
It is advisable to use gimp cord for
stretch or knit fabrics. The zigzag
should sew over the gimp.
The lines on the button
hole foot can be
used guides when sewing multiple
buttonholes.
1. Lift the presser foot, pull the gimp cord and come round the protruding point on back of the
buttonhole foot.
2. Pull the gimp cord under the foot to the front.
3. Fix the gimp cord to the protruding point on front of foot.
4. Turn the needle down to the starting position on fabric, put down the presser foot.
5. Sew the buttonhole according to page 17.
6. Pull the gimp cord straightly.
7. Cut the gimp cord.
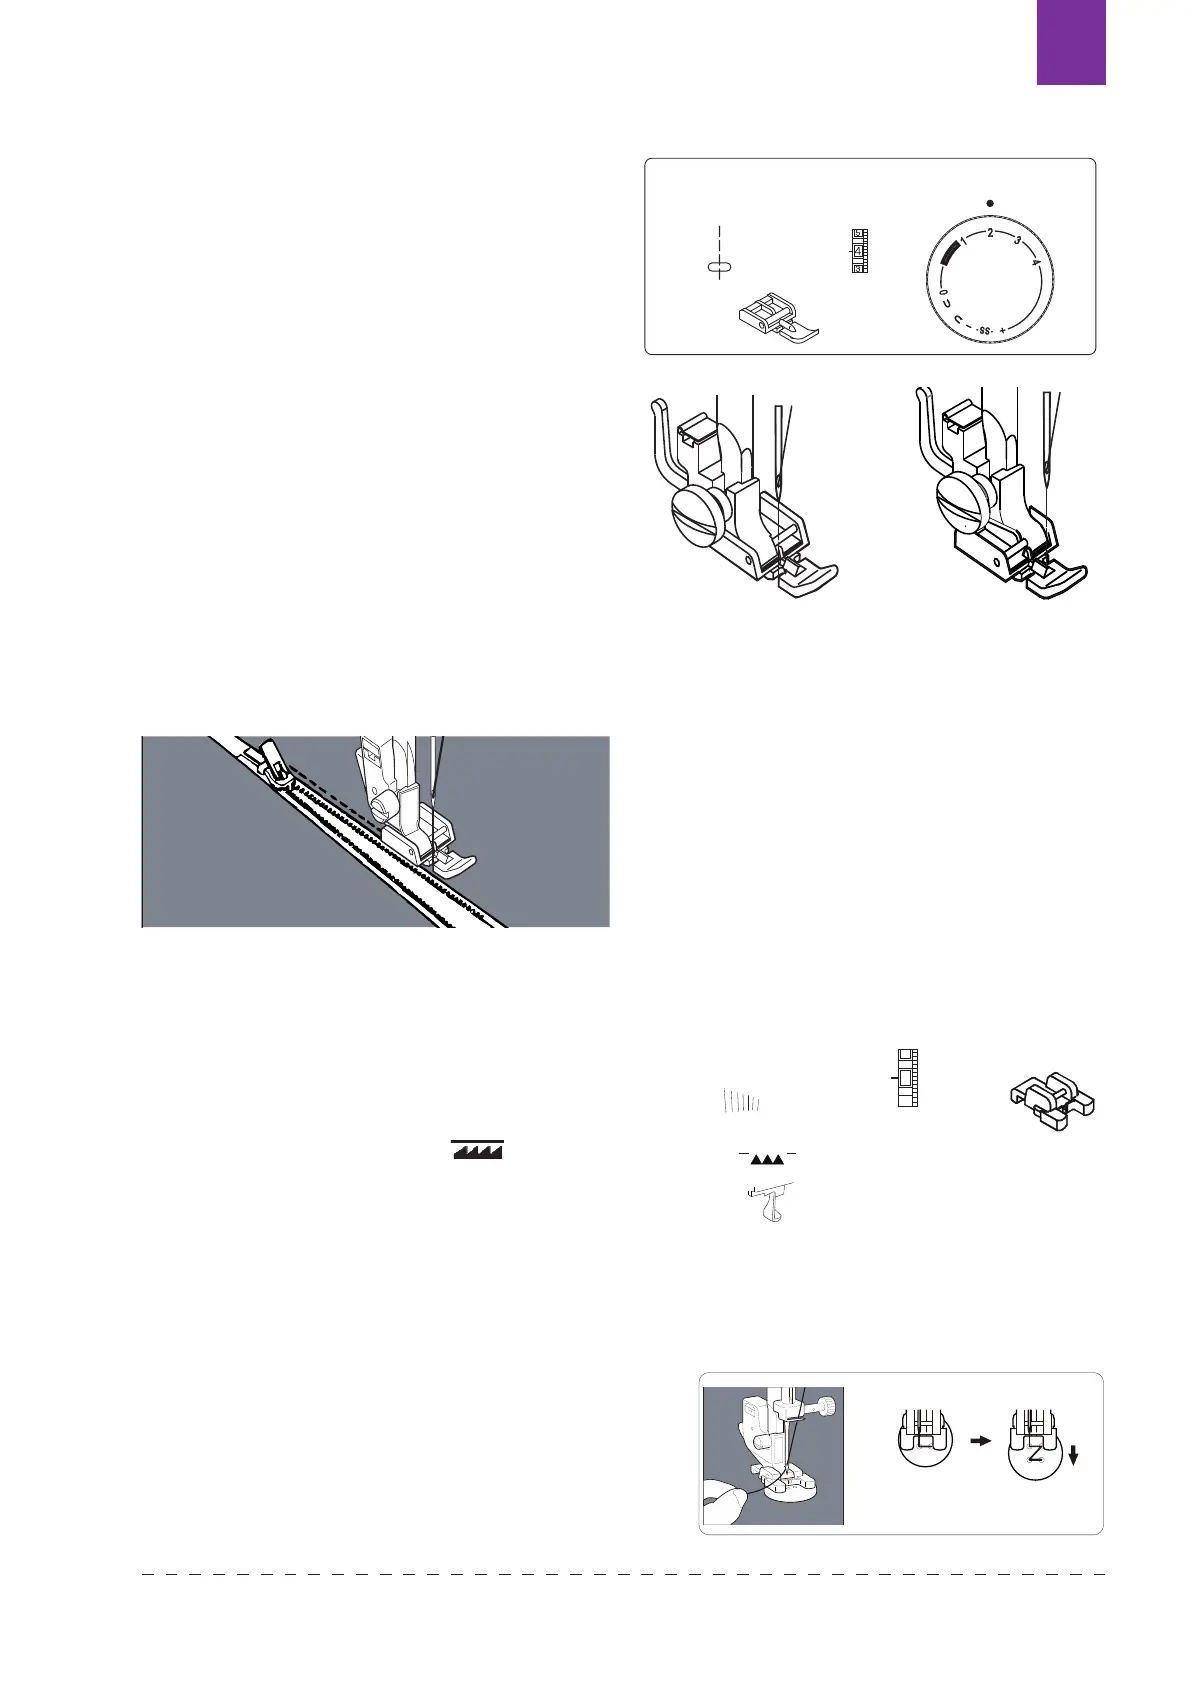
Attach the zipper foot.
When sewing the right side of the zipper, attach the
zipper foot as the illustration in right.
When sewing the le
ft side of the zipper, attach the
zipper foot as the illustration in right.
Sew the right side
of the zipper.
Sew the left side
of the zipper.
A
3~6
2
Machine Setting
18
UTILITY STITCHES
Helpful hint:
During zipper inserting, ensure that the
needle do not touch the zipper. Otherwise
it will cause needle break or even injury.
Buttonhole stitch
Zipper application
Tips:
Slightly reduce the upper tension to
produce better results.
Use backing material for fine or
stretchy materials.
We recommend placing a pin across
the end of the buttonhole as a
precaution against cutting the stitches
with the seam ripper.
It is advisable to use gimp cord for
stretch or knit fabrics. The zigzag
should sew over the gimp.
The lines on the button
hole foot can be
used guides when sewing multiple
buttonholes.
1. Lift the presser foot, pull the gimp cord and come round the protruding point on back of the
buttonhole foot.
2. Pull the gimp cord under the foot to the front.
3. Fix the gimp cord to the protruding point on front of foot.
4. Turn the needle down to the starting position on fabric, put down the presser foot.
5. Sew the buttonhole according to page 17.
6. Pull the gimp cord straightly.
7. Cut the gimp cord.
Attach the zipper foot.
When sewing the right side of the zipper, attach the
zipper foot as the illustration in right.
When sewing the le
ft side of the zipper, attach the
zipper foot as the illustration in right.
Sew the right side
of the zipper.
Sew the left side
of the zipper.
A
3~6
2
Machine Setting
16
UTILITY STITCHES
Sewing buttons
To secure thread, cut the upper thread with 25cm of excess, wind it
around the thread between the button and the fabric, and then tie it
tightly.
Position your fabric and button under the presser foot. Lower presser foot. Turn the
handwheel to make sure needle clears both left and right openings of button. Adjust
width if required. Sew 10 stitches across.
When attaching four-hole buttons, first sew the two holes closest to you. Then,
slide the
button so that the needle goes into the two holes toward the rear of the sewing machine,
and then sew th
em in the same way.
1
2
3
C~B
Machine Setting
1~3
NOTE: 1. Drop the feed dog (Refer to page 4) .
After you finish sewing, set the drop feed
lever to the original position.
2. You do not have to adjust the stitch length dial.
Dropthefeeddog
Texi Fox 25 163
 Loading...


