DE
ANNÄHEN VON REISSVERSCHLUSS
ANNÄHEN DER KNÖPFE
TYP DES NÄHFUSSES REISSVERSCHLUSSFUSS
1. Setzen Sie den Nähfuß zum Nähen von
Reißverschlüssen an.
2. Positionieren Sie den Reißverschluss auf dem Sto
und legen anschließend beides unter den Nähfuß.
3. Während des Nähens der linken Reißverschlussseite
muss sich der Nähfuß rechts der Nadel benden.
4. Positionieren Sie den Näßfuß so, dass der Stich
möglichst nah an den Schließgliedern des
Reißverschlusses genäht werden kann.
5. Positionieren Sie den Nähfuß links, so dass das
Nähen der rechten Reißverschlussseite erfolgen
kann. Nähen Sie auch hier möglichst nah an den
Schließgliedern.
6. 6. Heben Sie den Nähfuß und önen den
Reißverschluss, bevor der Nähfuß den
Schiebekörper des Reißverschlusses erreicht.
KNOPFNÄHFUSS
1. Befestigen Sie den Knopfnähfuß.
2. Versenken Sie den Transporter, indem Sie den
Hebel des unteren Transporters nach rechts
schieben, bis sich der Hebel mit der Zeichnung
deckt
3. Positionieren Sie den Stoff und den Knopf
unter dem Knopfnähfuß. Positionieren Sie die Knopflöcher im Querausschnitt des
Knopfannähfußes, sodass sich das linke Knopfloch direkt unter der Nadelspitze befindet.
4. Bestimmen Sie die Stichbreite und anschließend senken Sie den Knopfnähfuß, um
zu kontrollieren, ob die ausgesuchte Stichbreite mit en Knopflöchern korrespondiert:
betätigen Sie ganz langsam das Antriebsrad bis die Nadelspitze die Stellung direkt über
dem rechten Knopfloch erreicht. Bei Bedarf passen Sie die Zickzackbreite entsprechend an.
5. Machen Sie ca. 6-7 Stiche (beim dickeren Stoff 10) bei langsamen Bewegungen und heben
die Nadel zur höchstmöglichen Stellung an.
6. Ziehen Sie den Oberfaden auf die linke Stoffseite und verbinden Sie den Ober- und
Unterfaden.
Je nachdem, ob gerade
die linke oder die rechte
Reißverschlussseite angenäht
wird, muss sich der Nähfuß
auf dem Sto, neben
den Zähnen von
Reißverschluss benden.
18
UTILITY STITCHES
Helpful hint:
During zipper inserting, ensure that the
needle do not touch the zipper. Otherwise
it will cause needle break or even injury.
Buttonhole stitch
Zipper application
Tips:
Slightly reduce the upper tension to
produce better results.
Use backing material for fine or
stretchy materials.
We recommend placing a pin across
the end of the buttonhole as a
precaution against cutting the stitches
with the seam ripper.
It is advisable to use gimp cord for
stretch or knit fabrics. The zigzag
should sew over the gimp.
The lines on the button
hole foot can be
used guides when sewing multiple
buttonholes.
1. Lift the presser foot, pull the gimp cord and come round the protruding point on back of the
buttonhole foot.
2. Pull the gimp cord under the foot to the front.
3. Fix the gimp cord to the protruding point on front of foot.
4. Turn the needle down to the starting position on fabric, put down the presser foot.
5. Sew the buttonhole according to page 17.
6. Pull the gimp cord straightly.
7. Cut the gimp cord.
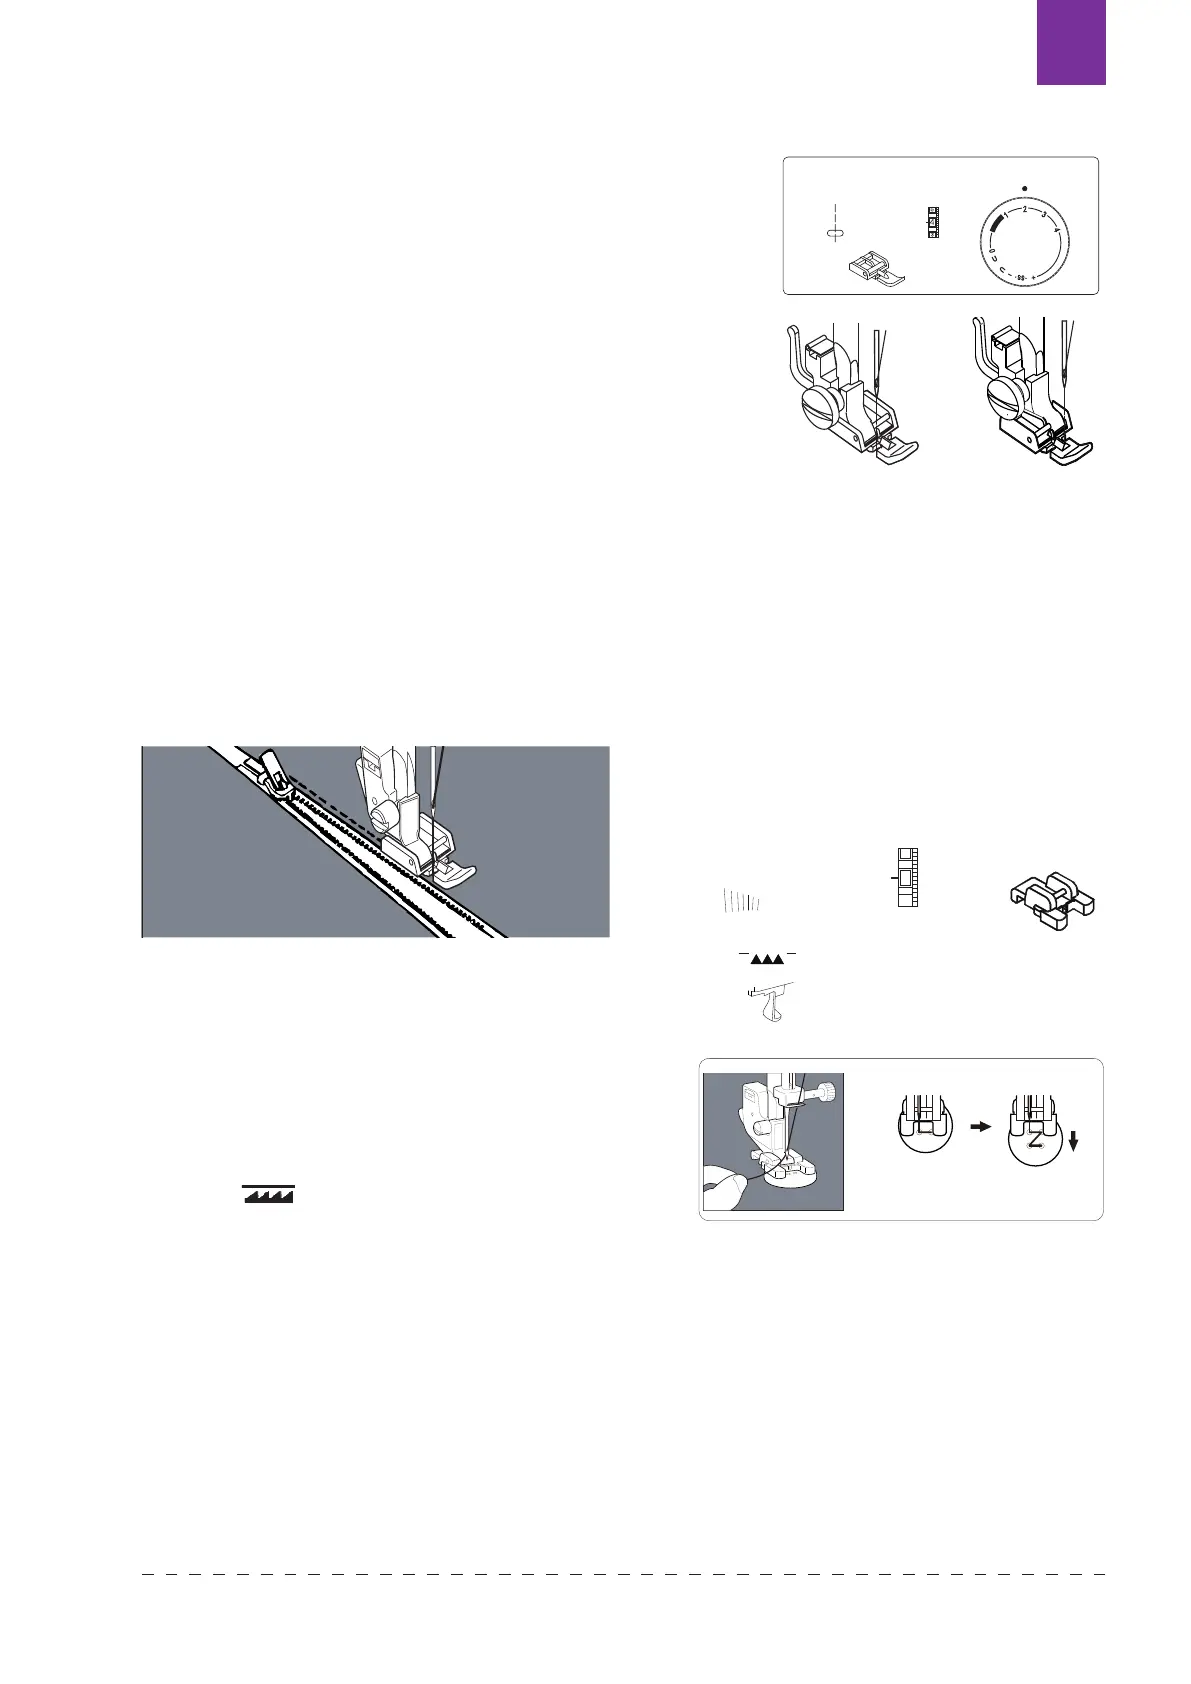
Attach the zipper foot.
When sewing the right side of the zipper, attach the
zipper foot as the illustration in right.
When sewing the le
ft side of the zipper, attach the
zipper foot as the illustration in right.
Sew the right side
of the zipper.
Sew the left side
of the zipper.
A
3~6
2
Machine Setting
18
UTILITY STITCHES
Helpful hint:
During zipper inserting, ensure that the
needle do not touch the zipper. Otherwise
it will cause needle break or even injury.
Buttonhole stitch
Zipper application
Tips:
Slightly reduce the upper tension to
produce better results.
Use backing material for fine or
stretchy materials.
We recommend placing a pin across
the end of the buttonhole as a
precaution against cutting the stitches
with the seam ripper.
It is advisable to use gimp cord for
stretch or knit fabrics. The zigzag
should sew over the gimp.
The lines on the button
hole foot can be
used guides when sewing multiple
buttonholes.
1. Lift the presser foot, pull the gimp cord and come round the protruding point on back of the
buttonhole foot.
2. Pull the gimp cord under the foot to the front.
3. Fix the gimp cord to the protruding point on front of foot.
4. Turn the needle down to the starting position on fabric, put down the presser foot.
5. Sew the buttonhole according to page 17.
6. Pull the gimp cord straightly.
7. Cut the gimp cord.
Attach the zipper foot.
When sewing the right side of the zipper, attach the
zipper foot as the illustration in right.
When sewing the le
ft side of the zipper, attach the
zipper foot as the illustration in right.
Sew the right side
of the zipper.
Sew the left side
of the zipper.
A
3~6
2
Machine Setting
16
UTILITY STITCHES
Sewing buttons
To secure thread, cut the upper thread with 25cm of excess, wind it
around the thread between the button and the fabric, and then tie it
tightly.
Position your fabric and button under the presser foot. Lower presser foot. Turn the
handwheel to make sure needle clears both left and right openings of button. Adjust
width if required. Sew 10 stitches across.
When attaching four-hole buttons, first sew the two holes closest to you. Then,
slide the
button so that the needle goes into the two holes toward the rear of the sewing machine,
and then sew th
em in the same way.
1
2
3
C~B
Machine Setting
1~3
NOTE: 1. Drop the feed dog (Refer to page 4) .
After you finish sewing, set the drop feed
lever to the original position.
2. You do not have to adjust the stitch length dial.
Dropthefeeddog
Texi Fox 25 51