VŠÍVÁNÍ ZIPŮ A PASPULE
PŘIŠÍVÁNÍ KNOFLÍKŮ
PŘÍTLAČNÁ PATKA ZIPOVÁ PATKA
1. Pri šití pravé a levé strany zipu použijte
ipovou patku, nebo pro šití v blízkosti
vyplňovacího kordu při šití paspule.
2. Patku můžete nasadit na levou i na
pravou stranu dle toho, kteoru část zipu
budete šít.
3. Pro našívání zipů postupujte dle
instrukcí pro všívání zipu, jeho přípravy
a umístění na látku.
4. Nasaďte zipovou patku vždy na tu
stranu, abyste byli co nejblíže s jehlu u
zoubků zipu při šití.
PŘÍTLAČNÁ PATKA PATKA PRO PŘÍŠÍVÁNÍ KNOFLÍKŮ
1. Nasaďte patku pro našívání knoflíků (O).
2. Posuňte páčku pro spuštění podavače
ve směru šipky
3. Umístěte látku i knoflík pod patku.
Spusťe přítlačnou patku. Otočte ručním
kolem a ujistěte se, že jehla prochází při
šití oběma otvory v knoflíku.
4. Spusťte patku a upravte šířku stehu
tak, aby odpovídala vzdálenosti otvorů
knoflíku.
5. Ušijte 6-7 stitches(10 na těžkém
materiálu). Zdvihněte jehlu do nejvyšší
polohy pomocí ručního kola.
6. Pro zajištění nitě provlékněte obě nitě
na rubovou stranu látky pomocí jehly
pro ruční šití a svažte je k sobě
Bez ohledu na to, kterou stranu zipu šijete,
můžete patku nasadit na obě strany a vždy
šít co nejblíže zoubků zipu.
18
UTILITY STITCHES
Helpful hint:
During zipper inserting, ensure that the
needle do not touch the zipper. Otherwise
it will cause needle break or even injury.
Buttonhole stitch
Zipper application
Tips:
Slightly reduce the upper tension to
produce better results.
Use backing material for fine or
stretchy materials.
We recommend placing a pin across
the end of the buttonhole as a
precaution against cutting the stitches
with the seam ripper.
It is advisable to use gimp cord for
stretch or knit fabrics. The zigzag
should sew over the gimp.
The lines on the button
hole foot can be
used guides when sewing multiple
buttonholes.
1. Lift the presser foot, pull the gimp cord and come round the protruding point on back of the
buttonhole foot.
2. Pull the gimp cord under the foot to the front.
3. Fix the gimp cord to the protruding point on front of foot.
4. Turn the needle down to the starting position on fabric, put down the presser foot.
5. Sew the buttonhole according to page 17.
6. Pull the gimp cord straightly.
7. Cut the gimp cord.
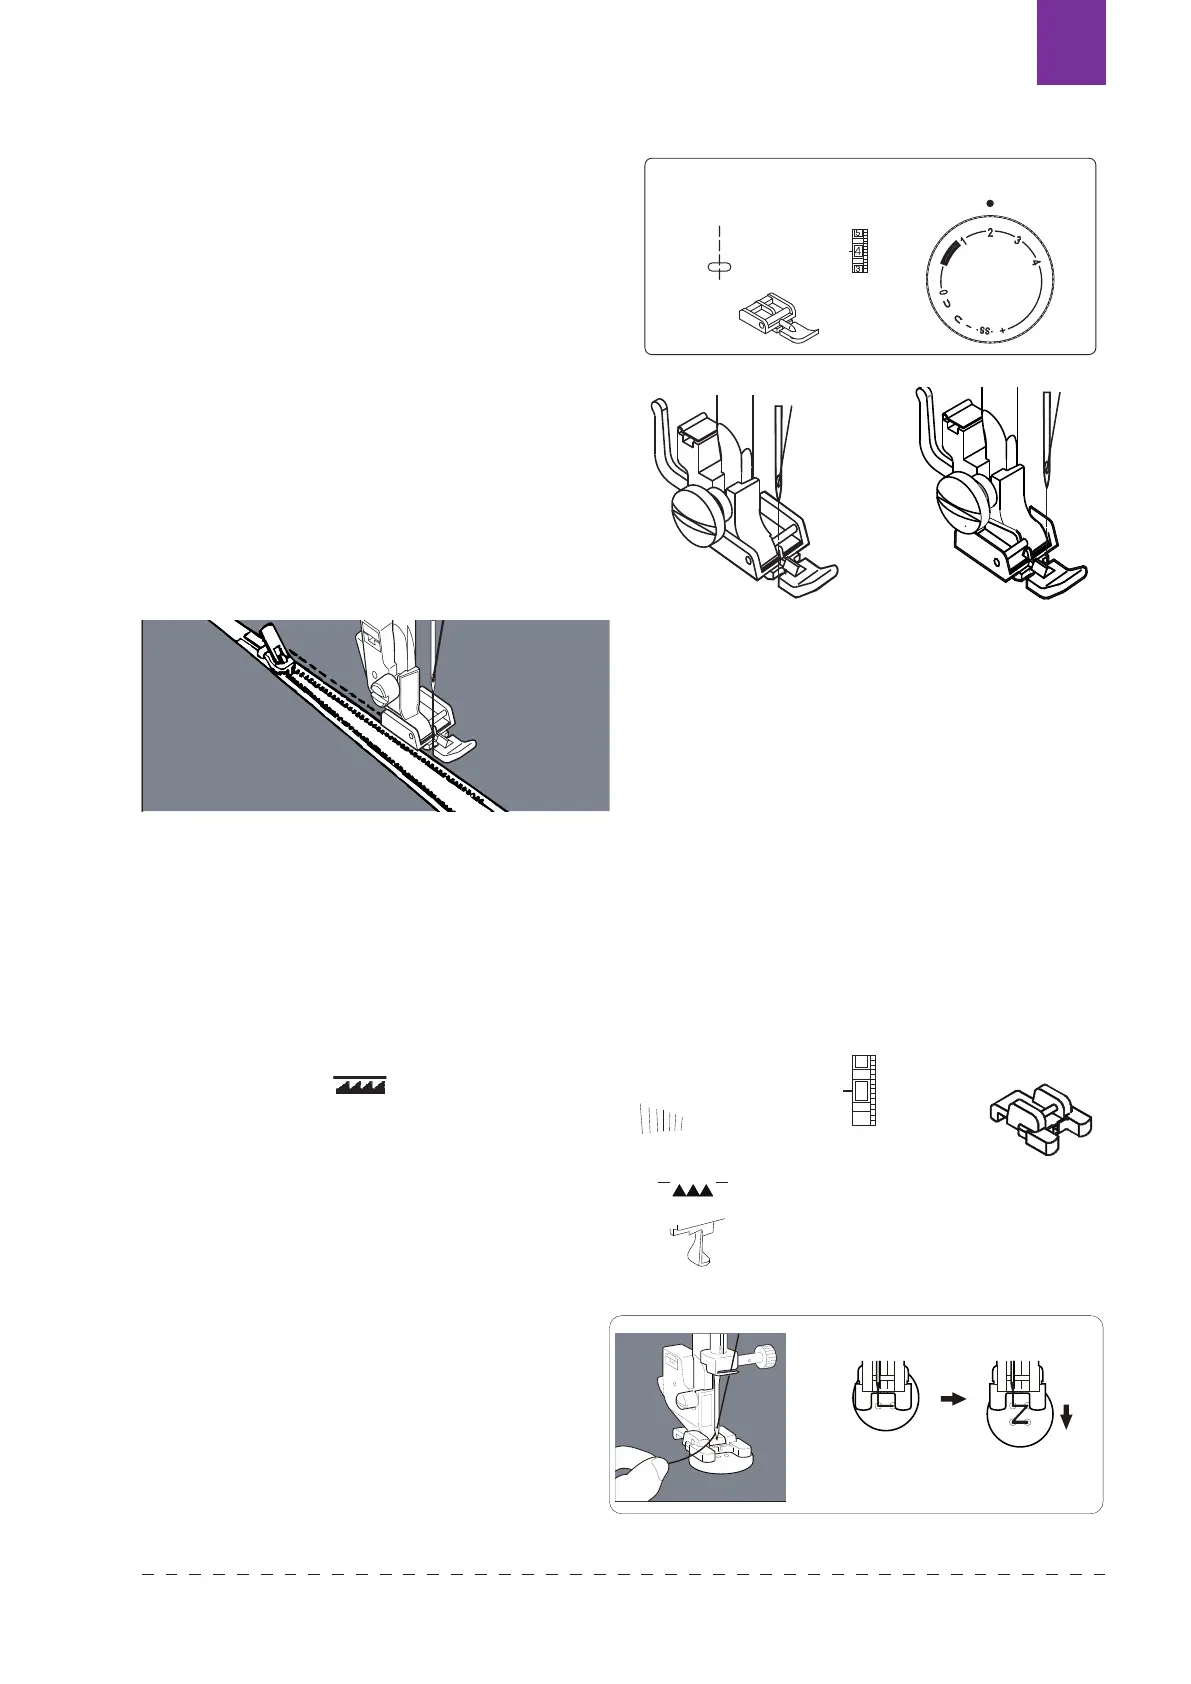
Attach the zipper foot.
When sewing the right side of the zipper, attach the
zipper foot as the illustration in right.
When sewing the le
ft side of the zipper, attach the
zipper foot as the illustration in right.
Sew the right side
of the zipper.
Sew the left side
of the zipper.
A
3~6
2
Machine Setting
18
UTILITY STITCHES
Helpful hint:
During zipper inserting, ensure that the
needle do not touch the zipper. Otherwise
it will cause needle break or even injury.
Buttonhole stitch
Zipper application
Tips:
Slightly reduce the upper tension to
produce better results.
Use backing material for fine or
stretchy materials.
We recommend placing a pin across
the end of the buttonhole as a
precaution against cutting the stitches
with the seam ripper.
It is advisable to use gimp cord for
stretch or knit fabrics. The zigzag
should sew over the gimp.
The lines on the button
hole foot can be
used guides when sewing multiple
buttonholes.
1. Lift the presser foot, pull the gimp cord and come round the protruding point on back of the
buttonhole foot.
2. Pull the gimp cord under the foot to the front.
3. Fix the gimp cord to the protruding point on front of foot.
4. Turn the needle down to the starting position on fabric, put down the presser foot.
5. Sew the buttonhole according to page 17.
6. Pull the gimp cord straightly.
7. Cut the gimp cord.
Attach the zipper foot.
When sewing the right side of the zipper, attach the
zipper foot as the illustration in right.
When sewing the le
ft side of the zipper, attach the
zipper foot as the illustration in right.
Sew the right side
of the zipper.
Sew the left side
of the zipper.
A
3~6
2
Machine Setting
16
UTILITY STITCHES
Sewing buttons
To secure thread, cut the upper thread with 25cm of excess, wind it
around the thread between the button and the fabric, and then tie it
tightly.
Position your fabric and button under the presser foot. Lower presser foot. Turn the
handwheel to make sure needle clears both left and right openings of button. Adjust
width if required. Sew 10 stitches across.
When attaching four-hole buttons, first sew the two holes closest to you. Then,
slide the
button so that the needle goes into the two holes toward the rear of the sewing machine,
and then sew th
em in the same way.
1
2
3
C~B
Machine Setting
1~3
NOTE: 1. Drop the feed dog (Refer to page 4) .
After you finish sewing, set the drop feed
lever to the original position.
2. You do not have to adjust the stitch length dial.
Dropthefeeddog
Texi Fox 25 23
CS