DRŽÁKY ŠPULEK NITÍ
NAVÍJENÍ CÍVEK
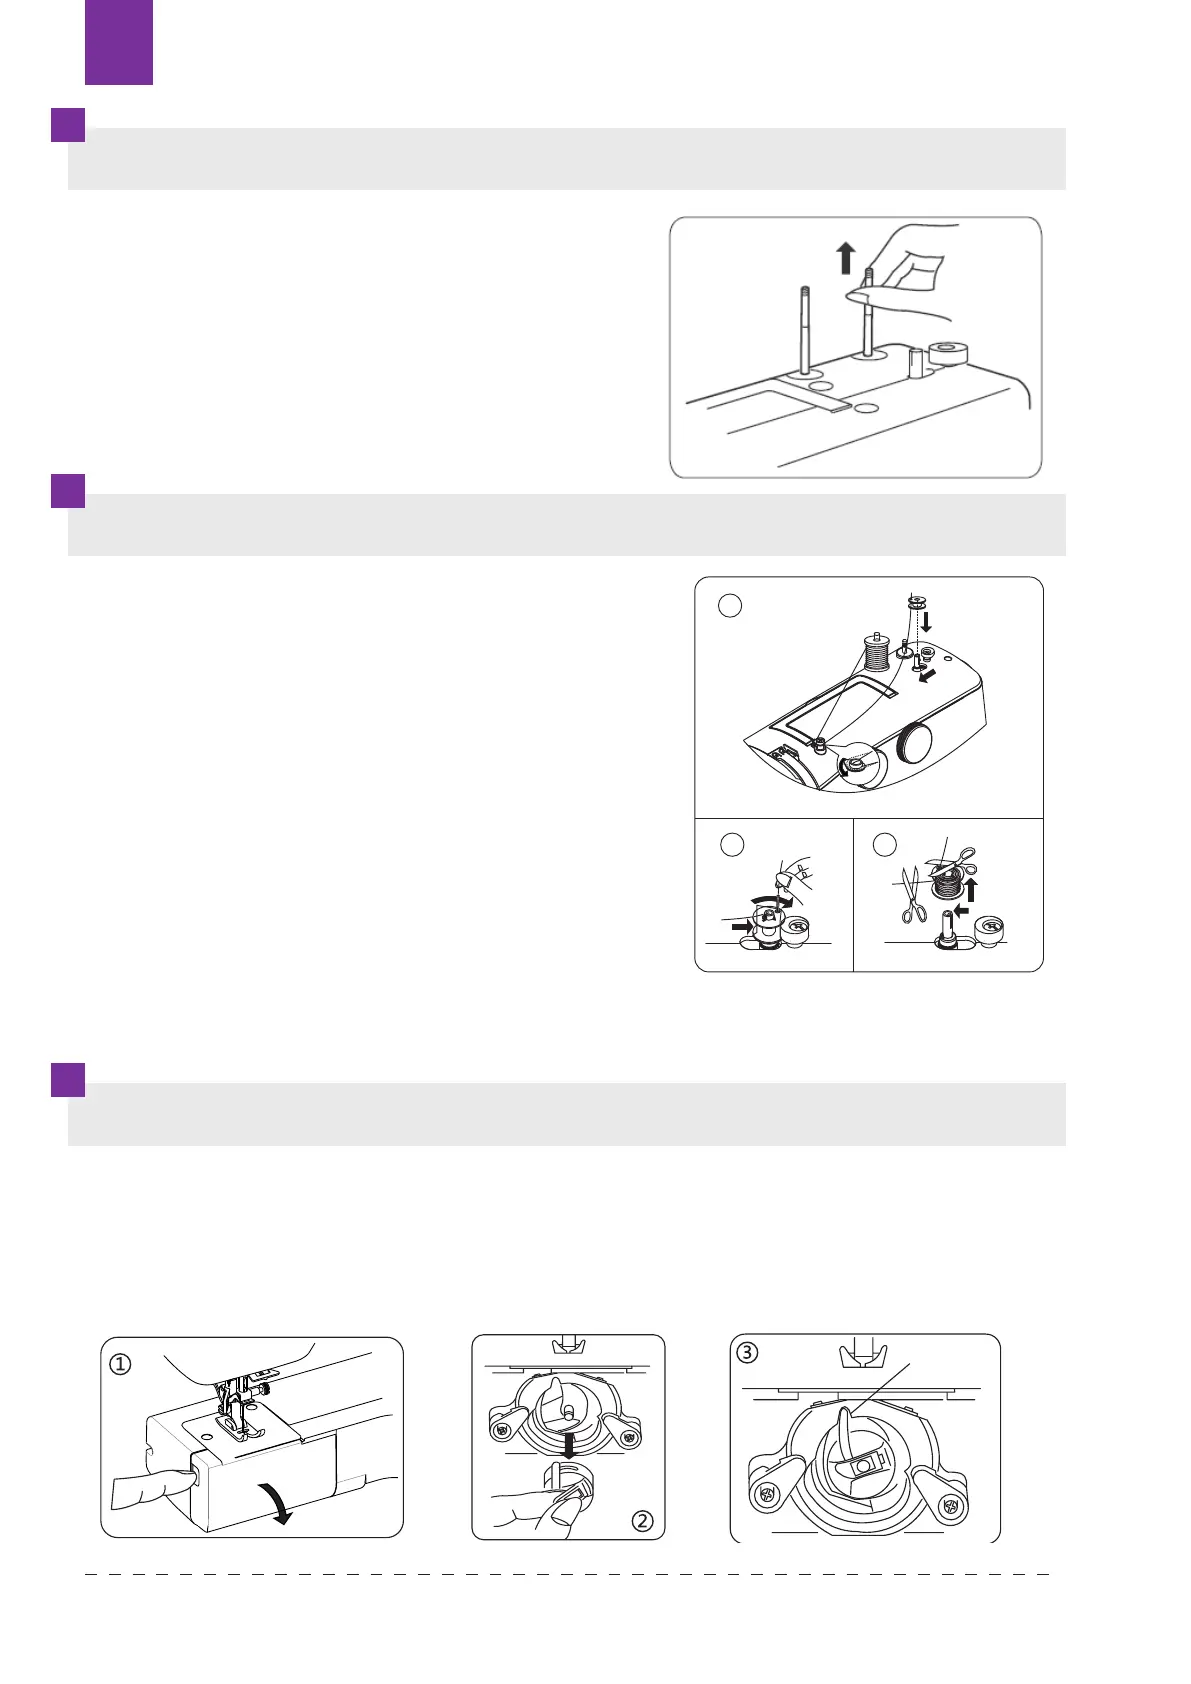
ODSTRANĚNÍ ČI VLOŽENÍ CÍVKOVÉHO POUZDRA
Kolíčky se používají při držení špulek nití, aby
docházelo k jejich pravidelnému a
rovnoměrnému podávání při šití.
Před použitím vytáhněte kolíčky nahoru. Před
uskladněním je zatlačte zpět dolů.
Vytáhněte nit ze špulky. Veďte nit okolo vodiče pro
navíjení cívek. Provlékněte nit jedním z otvorů v
cívce směrem zevnitř ven. Navlékněte cívku na
navíjecí hřídel a zatlačte ji směrem vpravo.
Zatímco levou rukou přidržujete kolečko napětí
horní nitě, otáčejte spojkovým kolem proti směru
hodinových ručiček pravou rukou. Volný konec
nitě přidržujte rukou a sešlápněte pedál. Zastavte
stroj po několika otáčkách cívky a odstřihněte
volný konec nitě v blízkosti cívky. Znovu sešlápněte
pedál. Jakmile je cívka plně navinuta, stroj se
automaticky zastaví. Vraťte navíjecí hřídel cívek do
původní polohy zatlačením vlevo a odstřihněte nit.
Otočte spojkovým kolem po směru hodinových
ručiček.
Upozornění: Před zahájením této operace vypněte hlavní vypínač stroje.
Zdvihněte jehlu otáčením ručního kola směrem k sobě.
1. Otevřete kryt cívky.
2. Vyjměte cívkové pouzdro za západku, viz obrázek.
3. Při vkládání cívkového pouzdra vložte trn cívkového pouzdra do výřezu v dráze chapače.
6
Linie na płytce ściegowej pomagają zachować
właściwą odległość ściegu od krawędzi materia-
łu (a konkretnie od centralnego uderzenia igły).
Wartości liczbowe pokazane są zarówno w ca-
lach (z tyłu płytki), jak i w milimetrach (z przodu
płytki).
OZNACZENIA NA PŁYTCE ŚCIEGOWEJ
W zapakowanej fabrycznie maszynie stojaki na nici są
wciśnięte (schowane w obudowie), aby nie uległy
uszkodzeniu. Przed rozpoczęciem szycia należy je
wyciągnąć do góry, natomiast zawsze przed zapako-
waniem maszyny do kartonu, walizki czy choćby po-
krowca, należy wciskać stojaki w dół w obudowę.
STOJAKI NA NICI
NAWIJANIE NICI NA SZPULKĘ
1. Nałóż szpulę z nicią na jeden ze stojaków Pociągnij nitkę
ze szpulki i przeprowadź przez prowadnik na pokrywie gór-
nej (1)
2. Przeciągnij nitkę przez otwór w szpulce od wewnątrz na
zewnątrz i załóż szpulkę bębenka na trzpień szpulownika.
3. Przesuń trzpień ze szpulką w prawo (2).
5. Przytrzymaj za koniec nitki i naciśnij rozrusznik rozpo-
czynając nawijanie. Zatrzymaj maszynę po nawinięciu kilku
zwojów i utnij nitkę blisko otworu w szpulce (3).
1
2
3
KNOWING YOUR SEWING MACHINEKNOWING YOUR SEWING MACHINE
Seam guide line
The numbers on the needle plate indicate
the distance between the center needle
position and the indicating line.
The numbers in the front indicate in
Millimeters.
The numbers in the back indicate in inches.
Setting spool pins
The spool pins are used for holding the spool of thread in order
to feed thread to the machine.
To use, pull up the spool pin. Push down for storage.
Winding the bobbin
1. Place a spool of thread on the left spool pin. Pull
the thread out from the spool and place it through
thre
ad guide as shown in illustration. Put end of
thread through the hole in bobbin as shown.
2. Push the bobbin wider shaft to far left position, if
it is not already there. Place bobbin onto the
bobbin wider shaft with end of thread coming
from top of bobbin. Push bobbin winder shaft to
the right until it clicks. Hold onto end of thread.
3. Start machine. Bobbin will automatically stop
turning when completely filled. Push shaft to the
left to remove bobbin and cut thread.
6
KNOWING YOUR SEWING MACHINE
Removing or replace the bobbin case
1. Refer to page 4 to remove the Extension table, raise the needle by turning the hand wheel
toward you, then open the shuttle cover.
2. Take out bobbin case holding the latch.
3. When installing the bobbin case, the pin on the case should fit into the gap of the shuttle race.
Threading the bobbin case
1. Install the bobbin into bobbin case. Make sure the thread unwinds in the direction of arrow.
2. Pull the thread into the groove in the bobbin case slot.
3. Now pull the thread under the tension spring and into the delivery eye.
NOTE: L
eave about 10cm (4 inches) of the thread hanging out of the bobbin case. When
you pull the thread, the bobbin should spin clockwise.
Changing the presser foot
1. Turn the hand wheel toward you to raise the needle to its highest position.
Raise the presser foot.
2. Press the lever on the back of the presser foot holder. The presser foot will drop off.
3. Place the presser foot so the pin on the foot lies just under the groove of the holder.
Lower the presser foot holder to lock the foot in place.
Be sure to disconnect the power supply before operating the machine.
Attaching the seam guide(optional)
Attach the seam guide in the slot as illustrated. adjust according to
need for hems pleats etc.
Gap
Výřez
Texi Fox 2512
CS