January 2016
6-62
WorkCentre 4150/4250/4260WorkCentre 4150/4250/4260WorkCentre Work-
dC132
General Procedures and Information
dC132 NVM Initialization
NOTE: The NVM Initialization procedures for the 4265 are indicated where applicable.
Refer to the relevant section:
• NVM Initialization - Copier
• NVM Initialization - Network
• NVM Initialization - Fax Card
NVM Initialization - Copier
Purpose
To return the copier NVM settings to default. Refer to dC131.
Procedure (4150, 4250, 4260)
1. Enter diagnostics, GP 1.
2. Select Diagnostic Routines.
3. Select Copier Routines, then 132 NVM Initialization - Copier.
4. Touch the appropriate button to select the NVM to be initialized and follow the screen
instructions. Refer to Table 1, for the functions that are reset to default:
• All Copier NVM
• Machine Variable NVM
• SA/KO Dust Off
• System Counters Dust Off
5. Switch off the machine, then switch on the machine.
Procedure (4265)
1. Enter Diagnostics, GP 1.
2. Select Copier Diagnostics.
3. Select dC 132 NVM Initialization.
4. Select Initialize All NVM.
5. Switch off the machine, then switch on the machine.
NVM Initialization - Network
Purpose
To reset the NIC PWB to default.
Procedure (4150, 4250, 4260)
1. Enter diagnostics, GP 1.
2. Select Diagnostic Routines.
3. Select Network Routines, then 132 NVM Initialization - Network.
4. Follow the screen instructions to reset the NIC PWB.
5. Switch off the machine, then switch on the machine.
Procedure (4265)
1. Enter diagnostics, GP 1.
2. Select Fax and NW Diagnostics.
3. Select dC 132 NVM Initialization - NW.
4. Follow the screen instructions to reset the NIC PWB.
5. Switch off the machine, then switch on the machine.
NVM Initialization - Fax Card
Purpose
To return the fax card NVM settings to default. Refer to dC131.
Procedure
1. Enter diagnostics, GP 1.
2. Select Diagnostic Routines.
3. Select Fax dC Routines, then 132 NVM initialization.
4. Touch the appropriate button to select the NVM to be initialized and follow the screen
instructions. Refer to Table 2, for the functions that are reset to default.
•Reformat
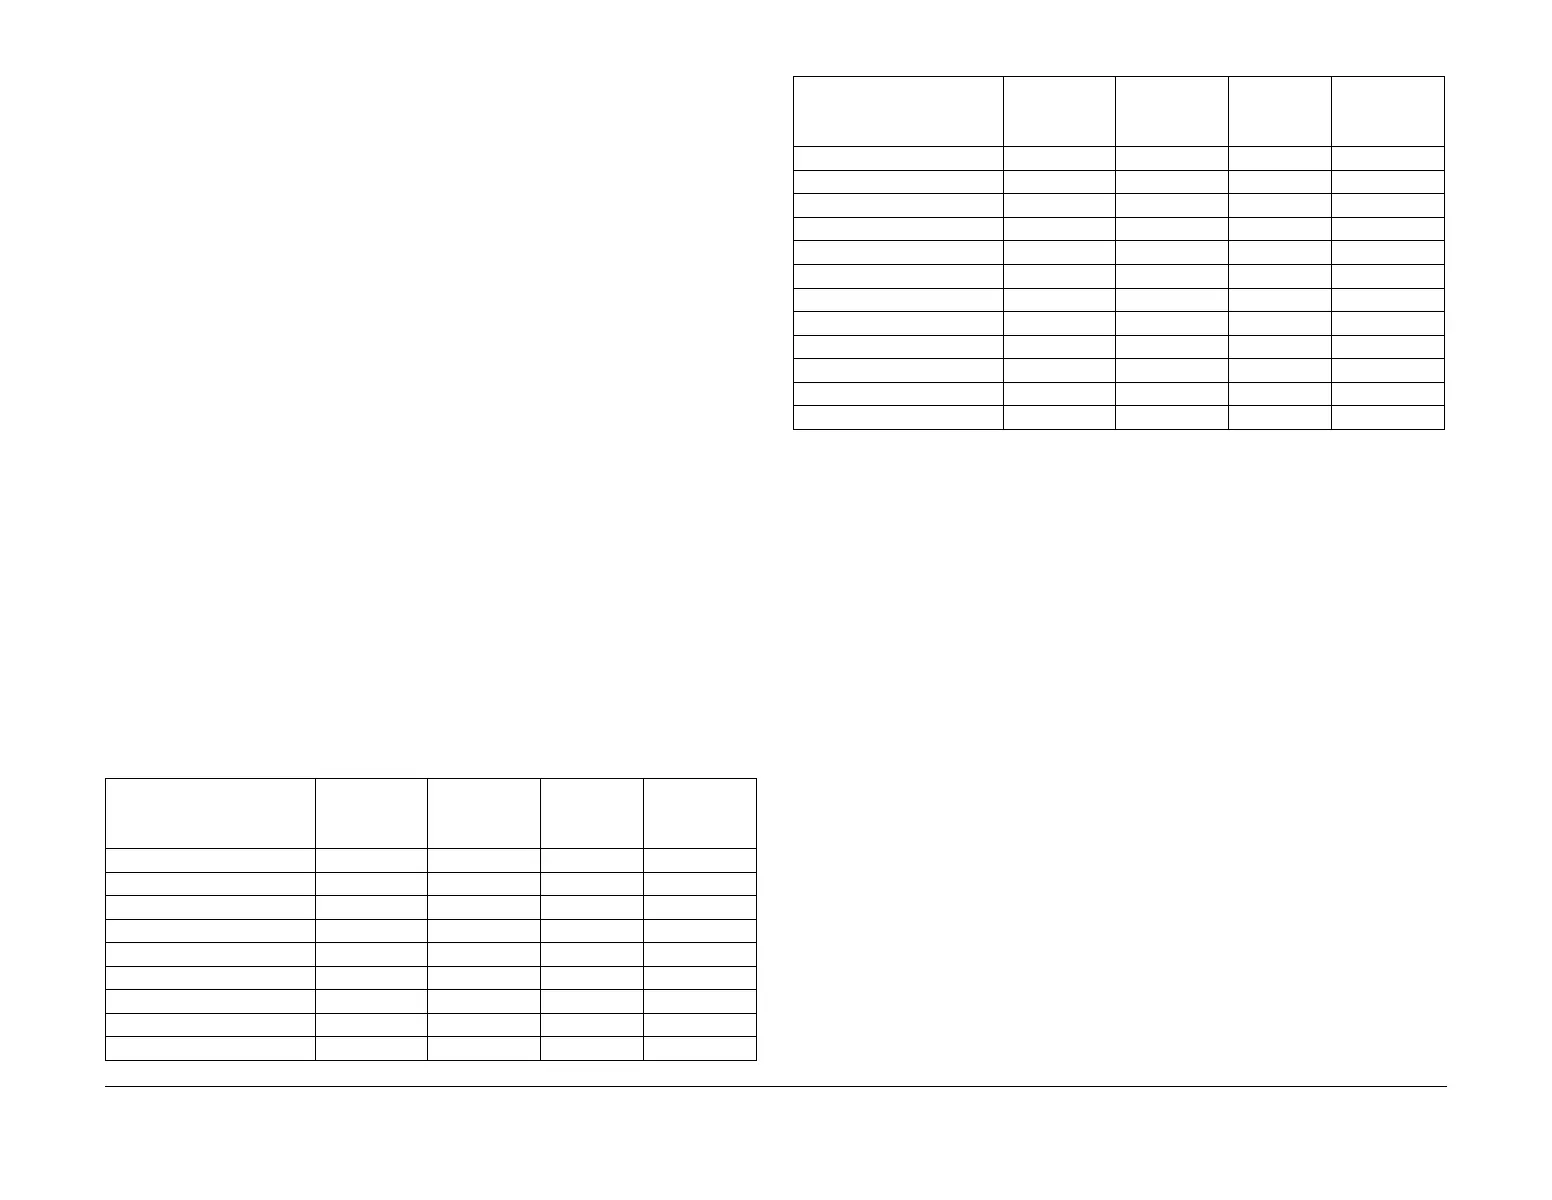
Table 1 Copier NVM
Copier file type Category
All Copier
NVM
Machine
Variable NVM
SA/KO Dust
Off
System
Counters
Dust Off
NVM System Usage Counter Y Y
NVM Fault Counter Y Y
NVM Diag Counter Y Y
NVM SAKO Setting Y Y
NVM Fault Log Y
NVM Configuration Y
NVM Diagnostics Y
NVM Debug Y
NVM Mach Var Y Y
NVM Mach Var Zero Y Y
NVM Mach Var Registration Y Y
NVM Mach Var Paper Path Y Y
NVM Mach Var DADF Y Y
NVM Mach Var Platen Y Y
NVM Auditron Y Y
NVM Crash Recovery Y
NVM Completed Job Log Y
NVM JBA Database Y Y
NVM JBA Config Y Y
NVM Auditron Config Y Y
NVM HFSI Counter N N N N
Table 1 Copier NVM
Copier file type Category
All Copier
NVM
Machine
Variable NVM
SA/KO Dust
Off
System
Counters
Dust Off

 Loading...


