29
MOTIF XS6/MOTIF XS7/MOTIF XS8
MOTIF SX6
Rubber contact
13Key
(接点ゴム 13Key)
Rubber contact
12Key A
(接点ゴム 12KeyA)
Rubber contact
12Key B
(接点ゴム 12KeyB)
Rubber contact
12Key C
(接点ゴム 12KeyC)
Rubber contact
12Key D
(接点ゴム 12KeyD)
Application Circuit Board
(適用シート)
MK61L
MK61L MK61L MKH-D MKH-D
Remove Key Stopper
(外すキーストッパー)
L L, H L, H H 61
Remove Key(外す鍵盤)
C1-C2 C2-C3 C3-C4 C4-C5 C5-C6
Table 2(表 2)
MOTIF SX7
Rubber contact
76L
(接点ゴム 76L)
Rubber contact
12Key E
(接点ゴム 12KeyE)
Rubber contact
12Key F
(接点ゴム 12KeyF)
Rubber contact
12Key G
(接点ゴム 12KeyG)
Rubber contact
12Key H
(接点ゴム 12KeyH)
Rubber contact
12Key I
(接点ゴム 12KeyI)
Rubber contact
76H
(接点ゴム 76H)
Application Circuit Board
(適用シート)
MK76L MK76L MK76L MKC MKH-D MKH-D MKH-D
Remove Key Stopper
(外すキーストッパー)
76A 76A 76A, 76B 76B 76B, 76C 76C 76C
Remove Key(外す鍵盤)
E0-C1 C1-C2 C2-C3 C3-C4 C4-C5 C5-C6 C6-G6
Rubber contact
(接点ゴム)
Contact (Long) Contact (Short)
(接点(長い)) (接点(短い))
Rubber contact
(接点ゴム)
17. Installing Keys (White and Black Keys)
17-1 Black key
17-1-1 With the white keys to the right and left sides
removed, lower the front end of the horizontal
black key and fi t it into the frame while pushing it
rearward.
* At this time, pay attention not to bend the key
guide cap by lowering the front portion of the
key too much. (Photo 9)
17-2 White key
17-2-1 After installing the black keys, install the white
keys in the same way as the black keys.
(See procedure 17-1.)
17-3 Install the removed key stoppers.
(Table 1, Fig. 15)
18. Disassembling Keyboard Assembly
18-1 Rubber Contact
18-1-1 Remove the keyboard assembly.
(See procedure 15.)
18-1-2 Remove the key stoppers and keys listed in the
table 2, corresponding to the rubber contacts to be
removed. (Table 2, fi g. 15) (See procedure 16.)
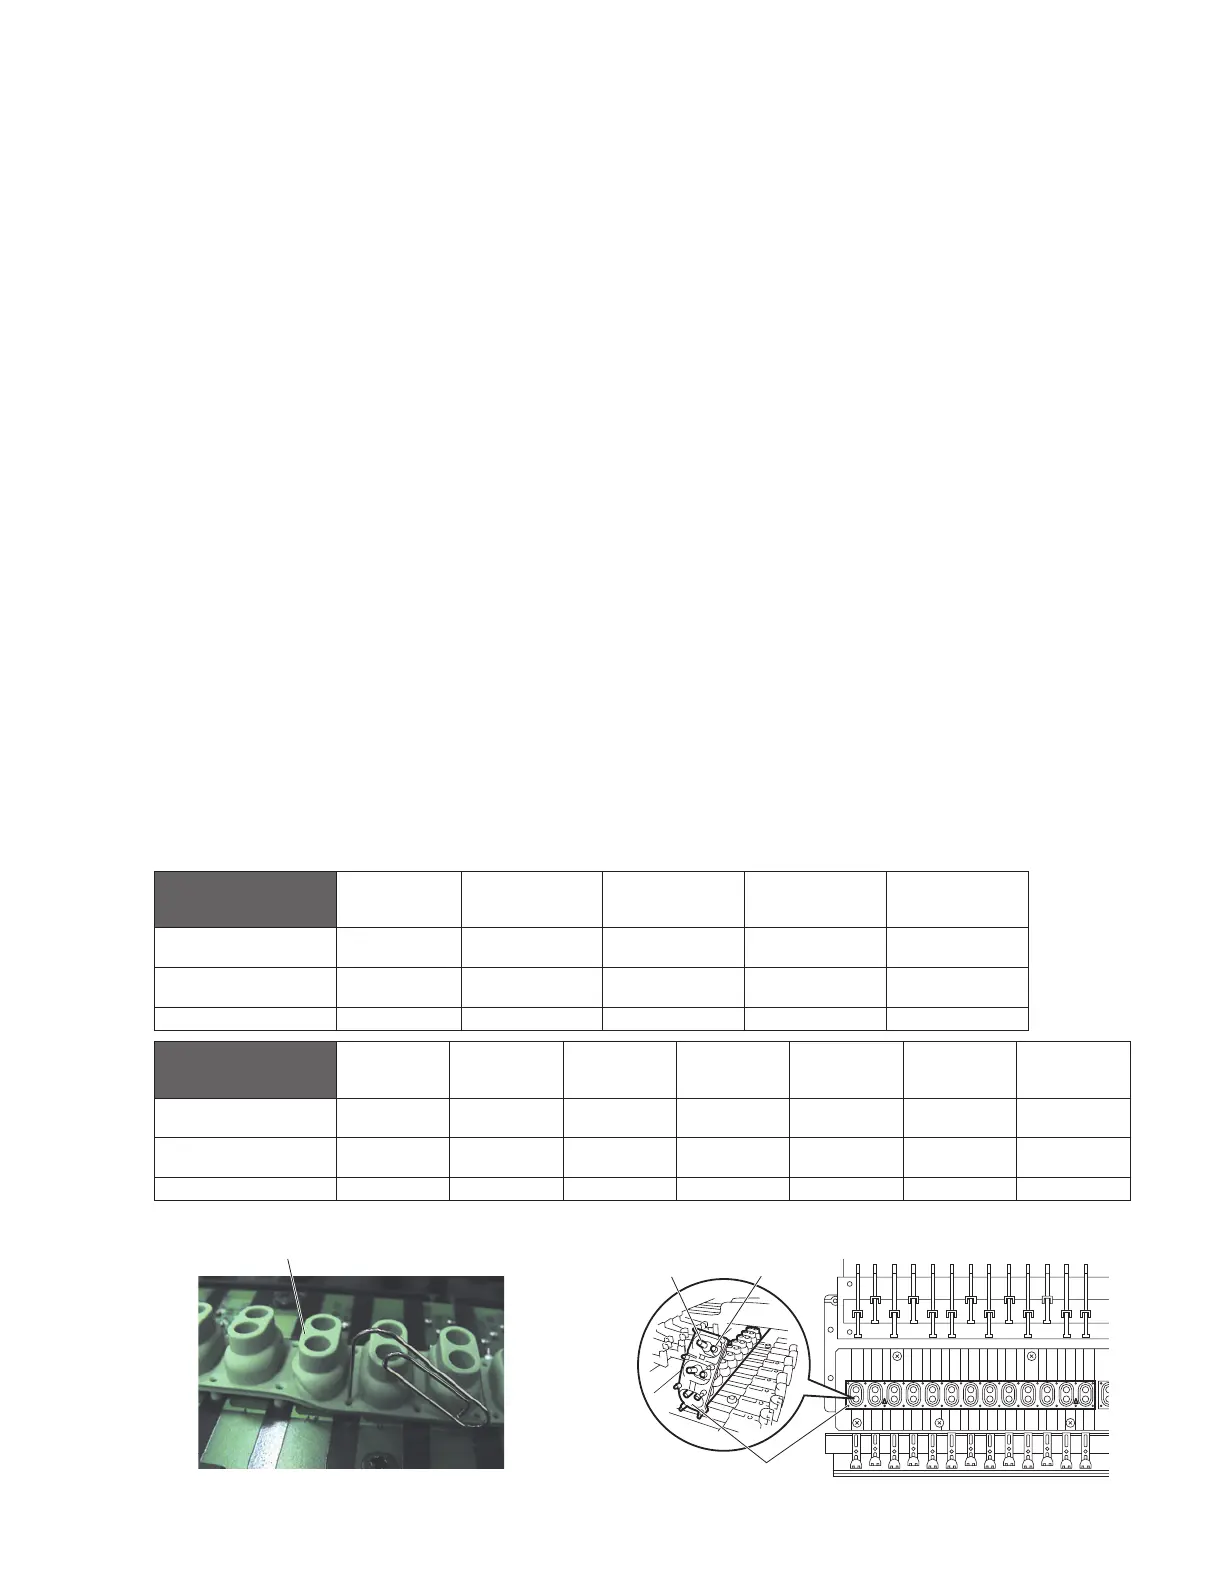
18-1-3 Pull out the rubber contact. (Fig. 15)
*
The orientation of rubber contacts on the keyboard
is previously designated. Pay attention not to
install the rubber contacts inversely. (Fig. 16)
* When installing the rubber contact, push it
with the end of a clip. (Photo 10)
17. 鍵盤(白鍵、黒鍵)の取り付け
17-1 黒鍵
17-1-1 左右の白鍵がない状態で、黒鍵を水平に保ちなが
ら手前を下げて、奥に押し込みながらフレームに
はめ込みます。
※ このとき、手前を下げすぎてキーガイドキャップ
を曲げないように注意してください。(写真 9)
17-2 白鍵
17-2-1 黒鍵を取り付けてから、黒鍵と同じように取り付
けます。(17-1 項参照)
17-3 外したキーストッパーを取り付けます。
(表 1、図 15)
18. FSX 鍵盤 D の分解
18-1 接点ゴム
18-1-1 FSX 鍵盤 D を外します。(15 項参照)
18-1-2 表 2 に該当するキーストッパー、鍵盤を外します。
(表 2、図 15)(16 項参照)
18-1-3 接点ゴムを引っ張って外します。(図 15)
※ 鍵盤の接点ゴムには取り付けの向きが決まってい
ます。接点ゴムを逆に取り付けないように注意し
てください。(図 16)
※ 接点ゴムを取り付けるときは、クリップの先で押
し込んで取り付けます。(写真 10)
Photo10( 写真 10)
Fig.16( 図 16)

 Loading...


