37
MOTIF XS6/MOTIF XS7/MOTIF XS8
[245][510]
mLAN support angle
(mLANサポート金具)
mLAN support angle
(mLANサポート金具)
Earth plate
(アースプレート)
Earth plate
(アースプレート)
[245]
[240]
MLAN
JKAN-ML
Rail
(レール)
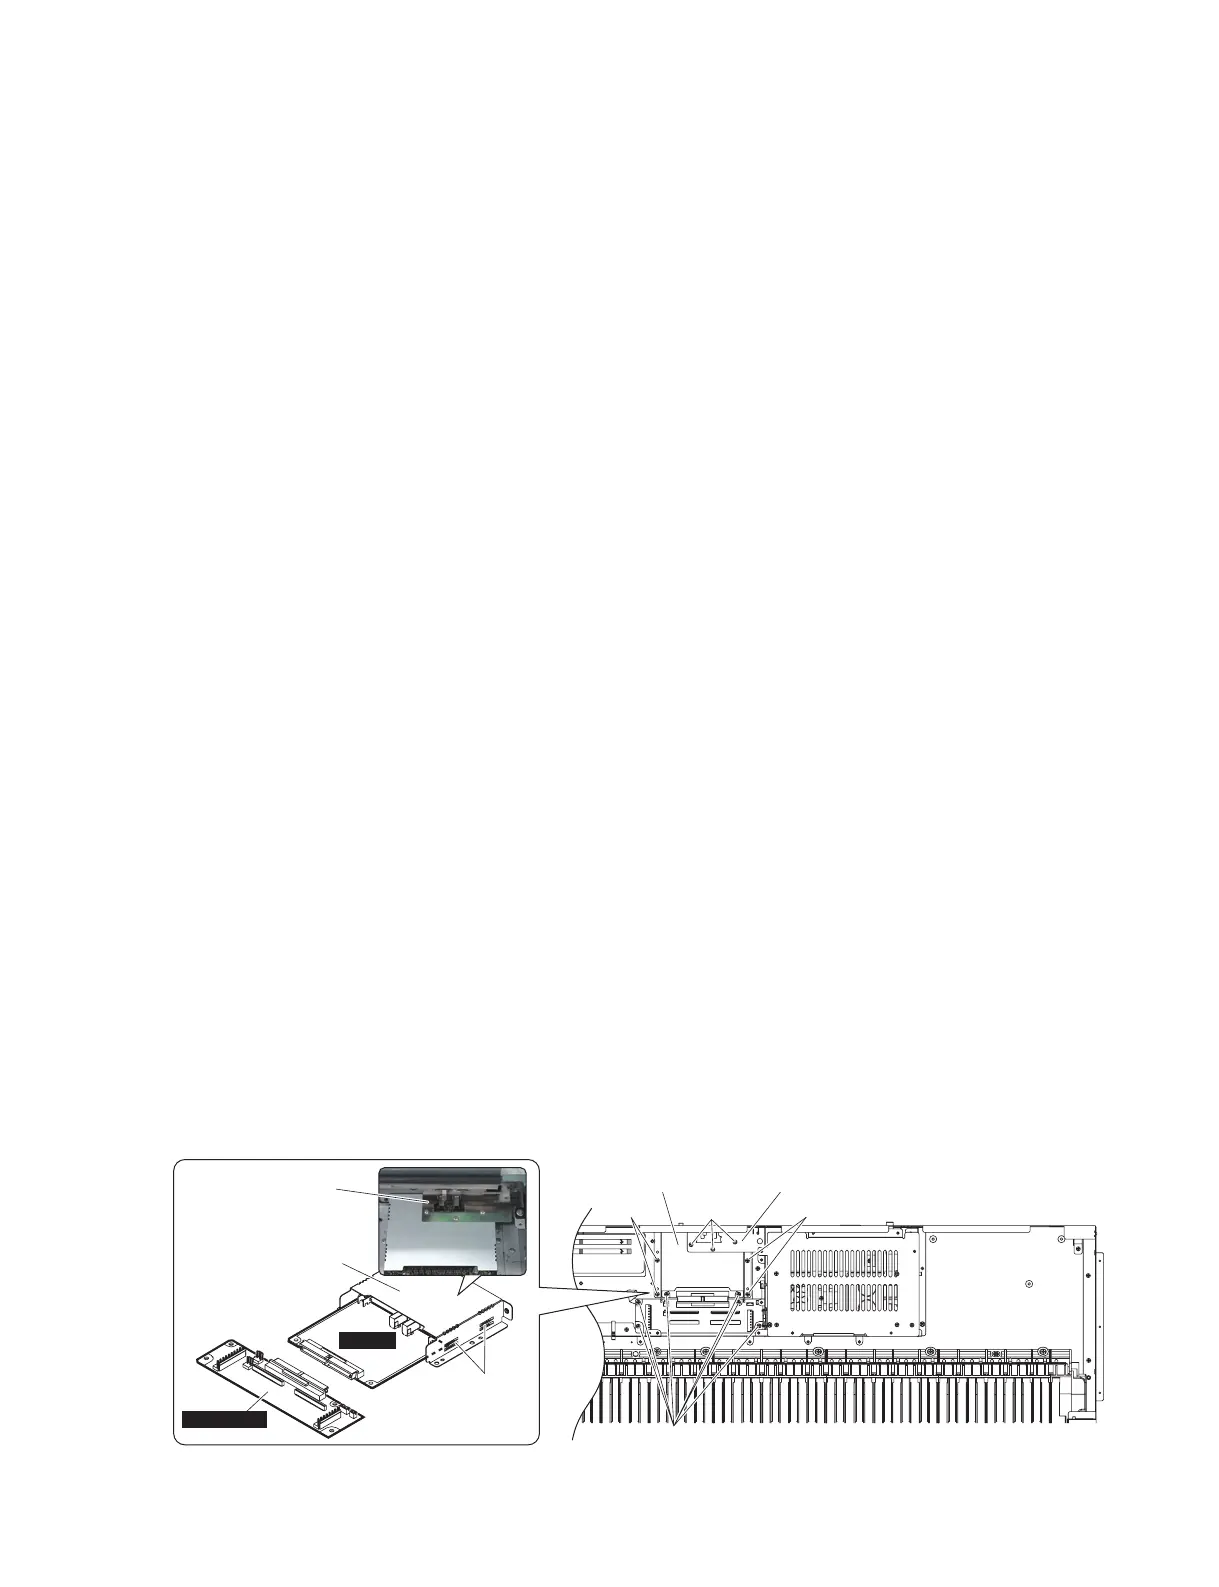
5. JKAN-ML Circuit Board, MLAN Circuit
Board
(Time required: About 6 minutes)
5-1
Remove the side cover R and side cover L.(See procedure 1.)
5-2
Open the control panel assembly. (See procedure 3-2.)
5-3 Remove the DM circuit board. (See procedure 4.)
5-4 Remove the three (3) screws marked [510]. The
earth plate can then be removed. (Fig. 7)
5-5
Remove the two (2) screws marked [220A], two (2) screws marked
[540], six (6) screws marked [240] and four (4) screws marked [245].
The JKAN-ML circuit board and MLAN circuit board can then be
removed together with the mLAN support angle. (Fig. 6, 7)
* One each bushing is inserted into the two (2)
threaded holes marked [220A]. Take care not to
lose them as they can be easily removed.
5-6
Separate the JKAN-ML circuit board, MLAN circuit
board and mLAN support angle from each other. (Fig. 7)
*
When installing the JKAN-ML circuit board, MLAN circuit
board and mLAN support angle, assemble the JKAN-ML
circuit board, MLAN circuit board and mLAN support an-
gle and fi x them to the bottom plate with screws. When
installing the MLAN circuit board to the mLAN support
angle, insert the MLAN circuit board into the rails at the
right and left sides of the mLAN support angle. (Fig. 7)
6. Power Supply Unit, AC-IN Connector, Pow-
er Switch
(Time required: About 6 minutes)
6-1
Remove the side cover R and side cover L.(See procedure 1.)
6-2
Open the control panel assembly. (See procedure 3-2.)
6-3
Remove the three (3) screws marked [195] and the screw
marked [198]. The PS guard can then be removed. (Fig. 5)
6-4
Power Supply Unit (Time required: About 6 minutes)
6-4-1 Remove the five (5) screws marked [125]. The
power supply unit can then be removed. (Fig. 6)
6-5 AC-IN Connector, Power Switch
(Time required: About 5 minutes)
6-5-1
Remove the two (2) screws marked [180A], two (2)
screws marked [185A] and the screw marked [191]. The
AC IN connector assembly can then be removed. (Fig. 6)
6-5-2 Remove the AC-IN connector from the AC IN con-
nector assembly. (Fig. 6)
6-5-3
Remove the two (2) screws marked [170] and re-
move the holder from the AC IN connector assembly.
The power switch can then be removed. (Fig. 6)
5. JKAN-ML シート、MLAN シート
(所要時間:約 6 分)
5-1 腕木 R と腕木 L を外します。(1 項参照)
5-2 コンパネ Assy を開きます。(3-2 項参照)
5-3 DM シートを外します。(4 項参照)
5-4 [510] のネジ 3 本を外してアースプレートを外し
ます。(図 7)
5-5 [220A] のネ ジ 2 本と [540] のネ ジ 2 本、[240] の
ネジ6 本、[245] のネジ 4本を外して、JKAN-ML シー
トと MLAN シートを mLAN サポート金具と共に
外します。(図 6、図 7)
※ [220A] のネジのネジ穴 2 箇所には、それぞれ 1 個
ずつブッシュが差し込まれています。外れやすい
ので、無くさないように気を付けてください。
5-6 JKAN-ML シートと MLAN シート、mLAN サポー
ト金具をそれぞれ分離します。(図 7)
※ JKAN-ML シートと MLAN シート、mLAN サポー
ト金具を取り付けるときは、JKAN-ML シ ー ト
と MLAN シート、mLAN サポート金具を組んだ
状態でボトムプレートにネジ止めしてください。
MLAN シートを mLAN サポート金具に組み込むと
きには、mLAN サポート金具の左右にあるレール
を通してください。(図 7)
6. 電源ユニット、AC インレット、
電源スイッチ
(所要時間:約 6 分)
6-1 腕木 R と腕木 L を外します。(1 項参照)
6-2 コンパネ Assy を開きます。(3-2 項参照)
6-3 [195] のネジ 3 本と [198] のネジ 1 本を外してガー
ド PS を外します。(図 5)
6-4 電源ユニット(所要時間:約 6 分)
6-4-1 [125] のネジ 5 本を外して、電源ユニットを外し
ます。(図 6)
6-5 AC インレット、電源スイッチ(所要時間:約 5 分)
6-5-1 [180A] のネジ 2 本と [185A] のネジ 2 本、[191] の
ネジ 1 本を外して、ACIN 束線を外します。(図 6)
6-5-2 ACIN 束線から AC インレットを外します。(図 6)
6-5-3 [170] のネジ 2 本を外して、ACIN 束線から PSW
アングルを外してから、電源スイッチを外します。
(図6)
Fig.7( 図 7)
[240]:BindHeadTappingScrew-B(B タイト+ BIND)3.0X6MFZN2W3(WE936300)
[245]:BindHeadTappingScrew-1(TP#1 + BIND)3.5X12MFZN2W3(WE970900)
[510]:BindHeadTappingScrew-B(B タイト+ BIND)3.0X6MFZN2W3(WE936300)

 Loading...


