■
Connection diagram
See section Connection diagram (page 101).
■
Connection procedure
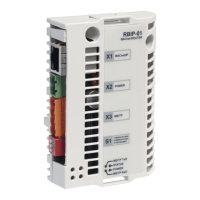
Connect the brake chopper the DC+ and DC- terminals of the drive. Connect the
resistor cables to the brake chopper as described in the brake chopper manual. If
a shielded three-conductor cable is used, cut the third conductor, insulate it, and
ground the twisted shield of the cable (protective earth conductor of the resistor
assembly) at both ends.
Note: For NEC installations the shield is not allowed as PE conductor. A separate
insulaled conductor in required.
Start-up
Note: New brake resistors may be coated with storage grease. As the brake chopper
operates for the first time, the grease burns off and may produce some smoke.
Make sure there is sufficient ventilation.
Set the following parameters (HVAC control program):
• Disable the overvoltage control of the drive by parameter 30.30 Overvoltage
control.
• Set parameter 31.01 External event 1 source to point to the digital input where
the thermal switch of the brake resistor is wired.
• Set parameter 31.02 External event 1 type to Fault.
• Enable the brake chopper by parameter 43.06 Brake chopper enable. If Enabled
with thermal model is selected, set also the brake resistor overload protection
parameters 43.08 and 43.09 according to the application.
• Check the resistance value of parameter 43.10 Brake resistance.
With these parameter settings, the drive stops by coasting on brake resistor
overtemperature.
248 Resistor braking
 Loading...