7
1. Install the ducted air conditioning unit, zone damper motors, flexible duct and grilles as per manufacturer’s instructions and in accordance with relevant
Australian Standards.
2. NOTE: For full wiring details, please refer to pages 13-27.
Hardware Installation
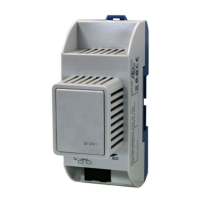
Connect the CPU (CM225) and the relevant A/C unit module together (Installation of the A/C unit module is only applicable to system set-ups that require A/C Unit
Control) (CM325# – Refer to module list for correct module). Take care ensuring that the A/C unit module pins are installed straight and direct.
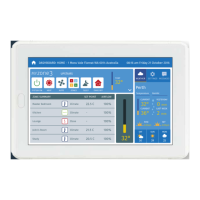
3. Connect the supplied blue RJ45 cable to the “Myzone Net” port at the top of the Myzone CPU (CM225), run the other end of the cable to the Myzone Nexus/Nano Tablet.
4. Connect the blue RJ12 zone motor cables (sold separately) in consecutive ports starting at Zone 1 on the CPU (CM225) The CPU (CM225) is marked with zone numbers.
All zone motors must be the same brand.
5. Connect the red supply air sensor (CDTS) to the supply air temp. port on the Myzone CPU (CM225) and place the temperature sensor inside the supply air plenum/duct
and secure sensor with reinforced aluminium tape. NOTE: A supply air sensor is only required to be installed if there are individual temperature controlled zones. ON/OFF
zone control does NOT require a supply air temperature sensor.
6. Run twin-shielded data cable from the A/C unit control cable terminals on the Myzone CPU (CM225) to the A/C unit indoor board (see pages 28-43 for detailed wiring
instructions on A/C unit brands) Must use minimum 0.75mm signal cable. NOTE: Only run twin-shielded data cable if A/C unit control is required.
7. Plug the 240V power plug on the transformer into a power source. Plug in the 24V transformer plug into the side of the Myzone CPU (CM225) to provide power to the CPU.
Ensure to run a separate power supply for the 240V plug o the transformer. DO NOT take power from the A/C unit.
8. Ater System Initialisation has completed, configure the Myzone control to your application (see configuration instructions on pages (page 76).
9. Pair Wireless Sensors to the system as per instructions in configuration on page 81 and mount according to general installation rule 11.
10. Pair Wi-Fi Bridge to the system as per instructions in configuration on page 72.
The above general installation instructions are applicable to installation configurations pictured on pages 28-43, any other configurations will require dierent/extra
installation procedures (refer to installation wiring layout and index for assistance).
General Installation Instructions
 Loading...