360179-A/B 14
Installation & Conguration
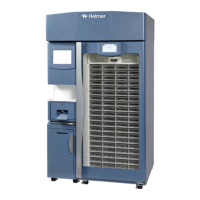
7 Attach waste basket to Consumable Cart.
Attach waste basket to cart
8 Close and lock the door.
6.3.3 Attach the Access Console to a Wall
A wall mounting kit is required to attach the Access Console to the wall. Refer to the instructions included
with the wall mounting kit for installation information. Contact Haemonetics
®
Corporation BloodTrack
®
Customer Support. Part number 401323-1.
6.3.4 Attach the Access Console to a Table
A table mounting kit is required to attach the Access Console to a table Refer to the instructions included
with the table mounting kit for installation information. Contact Haemonetics
®
Corporation BloodTrack
®
Customer Support. Part number 401322-1.
6.4 Connect External Monitoring Devices
CAUTION ► The interface on the remote alarm monitoring system is intended for connection to
the end user’s central alarm system(s) that uses normally-open or normally-closed
dry contacts.
► If an external power supply exceeding 30 V (RMS) or 60 V (DC) is connected to the
remote alarm monitoring system’s circuit, the remote alarm will not function properly;
may be damaged; or may result in injury to the user.
Required tools:
► #2 Phillips screwdriver
► Cable tie
The remote alarm interface is a relay switch with three terminals:
► Common (COM)
► Normally Open (NO)
► Normally Closed (NC)
The terminals on the remote alarm interface have the following maximum load capacity:
► 0.5 A at 30 V (RMS); 1.0 A at 60 V (DC)
Connect to the alarm interface:
1 On the electrical box, locate the remote alarm terminals.
► Terminals are located on the electrical box, on top of the Compartmental Access Refrigerator