23
Galaxy 2 Series Installation Manual
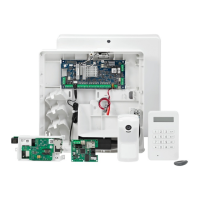
Removing and Replacing the Galaxy 2 Series PCB
NOTE: The metal box comes with the PCB installed. The PCB does not have to be removed to enable
access to the keyhole mounting slot (see Figure 17).
Mounting the Metal Enclosure Base
Use the keyhole slot in the metal box to position the base. Three mounting screws (not provided) are required
to mount the metal base. Fix one of the screws into the mounting surface, this will be used for the top, keyhole
mounting hole. Hang the enclosure base onto the mounting screw ensuring that the screw sits in the narrow
portion of the keyhole.
All cables must be brought into the enclosure base via the cable entry points shown in Figure 17. There are
four cable entry holes for the entry of alarm cables. There is one a.c. mains cable entry point located below
the mains terminal block.
NOTE: There are three knockouts at the top of the metal enclosure base and three at the bottom for cable
entry if required.
Panel Mounting (cont’d)

 Loading...