MX-2300/2700 N/G SIMULATION 7 – 102
50-28
Purpose : Adjustment
Function (Purpose) : Used to execute the service adjustment,
the OC adjustment, the BK main scan mag-
nification ration correction, the RSPF
adjustment, and the print position adjust-
ment (Auto void adjustment (Service instal-
lation adjustment)).
Section :—
Item : Image quality
Operation/Procedure
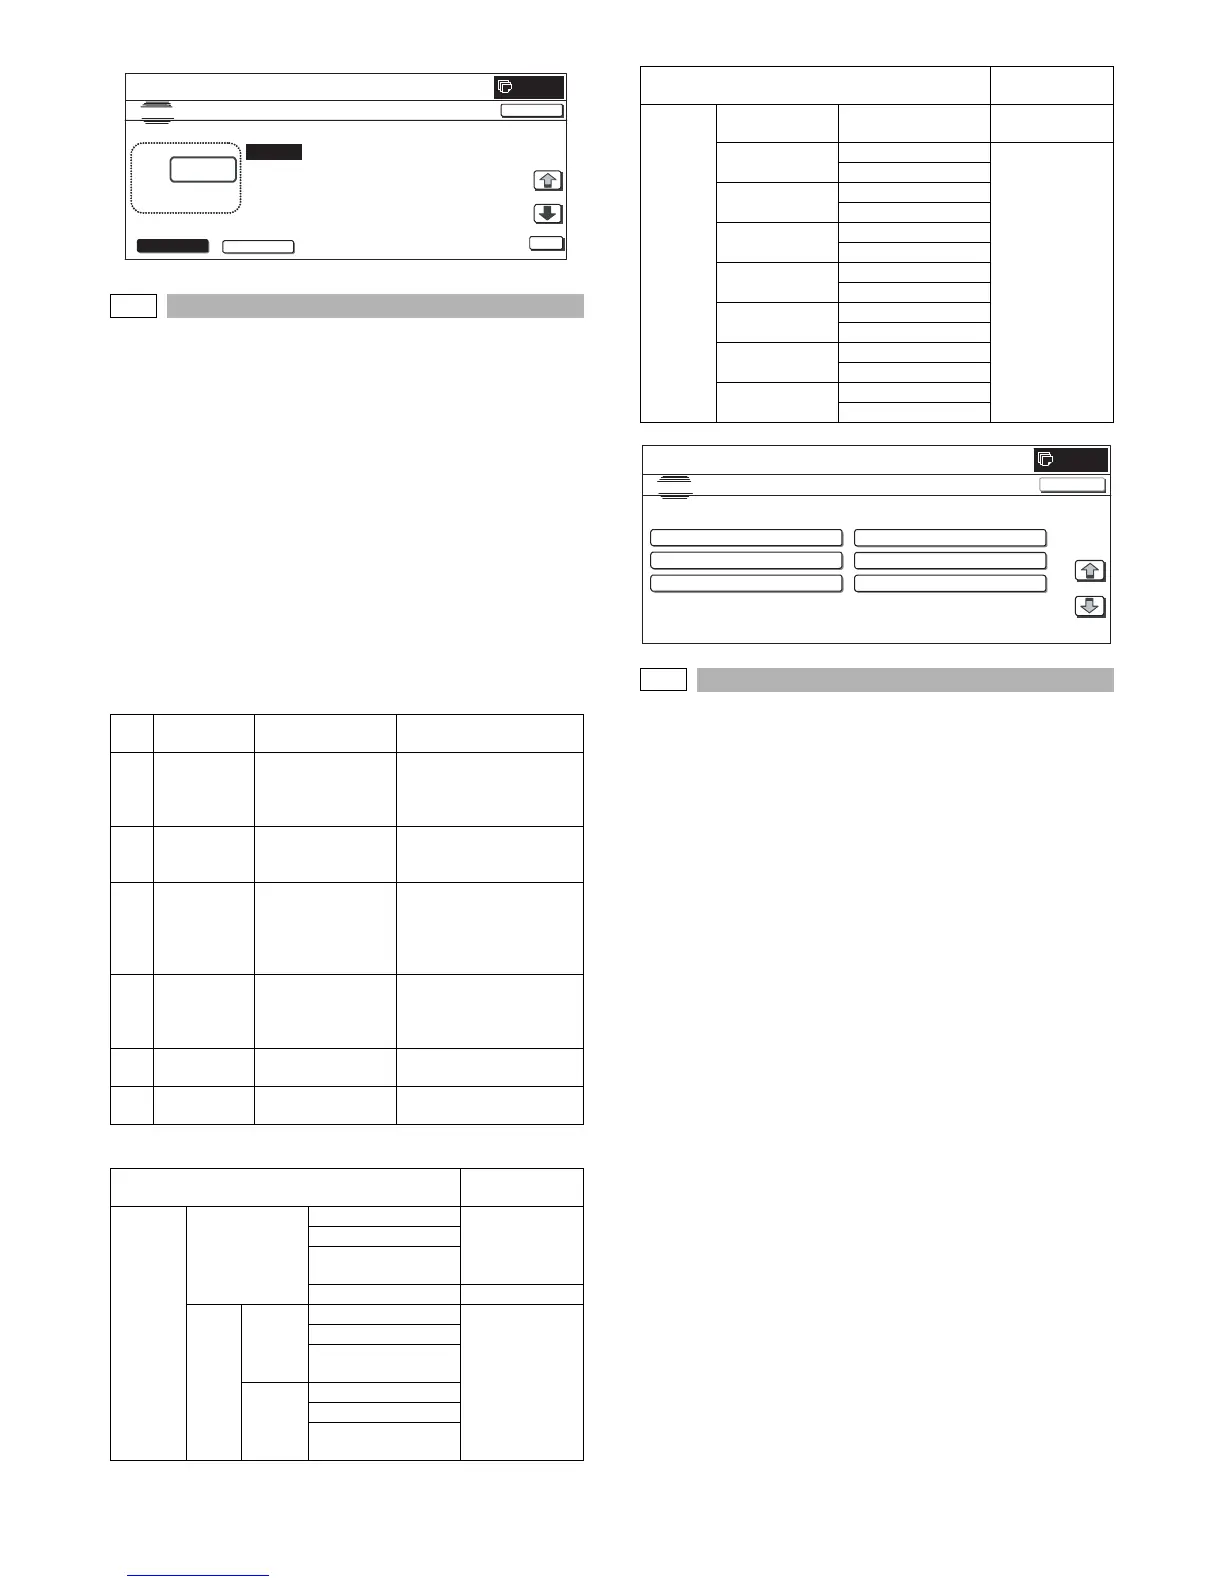
1) When the machine enters Simulation 50-28, the following
screen is displayed.
2) Press the button of an item to be adjusted, and the display is
shifted to the adjustment screen.
* The operating procedures and the display shift for each adjust-
ment and the display, refer to the next page.
<List of adjustment items>
<List of adjustment items and adjustment menus>
50-28
Purpose : Adjustment
Function (Purpose) : Used to adjust the OC document lead
edge, off-center, and the sub scan magnifi-
cation ratio. (Auto void adjustment (Service
installation adjustment) (1: OC adjustment))
Section :—
Item : Image quality
Operation/Procedure
1) When [OC ADJ] button is pressed on the top menu screen, the
screen shown on the right side is displayed.
2) Select a cassette of self print of the OC adjustment pattern.
(Only one cassette can be selected.)
3) Press [EXECUTE] button to start self print of the OC adjust-
ment pattern.
* During self printing of the OC adjustment
After completion of self print, the display is shifted to the OC
adjustment start screen.
4) Set the OC adjustment pattern on the OC with the corner refer-
ence, and cover the black background chart over the OC
adjustment pattern.
* Set the adjustment pattern in traversal position (A4). Check
to confirm that there is no clearance with the document
guide.
* Kind and size of black background charts made with a cut-
ting sheet equivalent to 310 x 470 cutting sheet No. 791
(Black).
5) Press [EXECUTE] button to start scanning of the OC adjust-
ment pattern.
* When [REPRINT] button is pressed, the display returns to
the cassette select screen to allow self-printing of the OC
adjustment pattern again.
* During scanning of the OC adjustment pattern and calculat-
ing of the adjustment value
After completion of scanning, the adjustment value is calcu-
lated.
After completion of calculation of the adjustment value, the
display is shifted to the result display screen.
NO.
Menu
display item
Content Description
1 OC ADJ OC adjustment OC document lead edge,
off-center, and sub scan
magnification ratio
adjustment
2BK-MAG
ADJ
BK main scan
magnification ratio
correction
BK main scan
magnification ratio
adjustment
3 SPF ADJ SPF adjustment RSPF (front/back)
document lead edge, off-
center, sub scan
magnification ratio
adjustment
4SETUP/
PRINT ADJ
Print position
adjustment
Print lead edge adjustment,
all-cassette print off-center
(individual cassette, ADU)
adjustment
5 RESULT Result display Display of the adjustment
result
6 DATA Data display Display of data used for the
adjustment
Adjustment item
Adjustment
menu
Scanner OC Document lead edge OC ADJ
Document off-center
Sub scan
magnification ratio
γ adjustment –
RSPF SIDE1
(front)
Document lead edge SPF ADJ
(RSPF)
Document off-center
Sub scan
magnification ratio
SIDE2
(back)
Document lead edge
Document off-center
Sub scan
magnification ratio
CLOSE
0
:
SI MU LATI ON N O.50
㧙
27
SCANNER/FAX-SEND ALL EDGE ADJUSTMENT VALUE
30
㨇 0㨪 100 㨉
O
TEST
FAX SCANNER
A㧦 30
㧧 LEAD_EDGE(OC)
B㧦 20 㧧 FRONT_REAR(OC)
C㧦 20 㧧 TRAIL_EDGE(OC)
D㧦 30 㧧 LEAD_EDGE(SPF_SIDE1)
Engine – BK main scan
magnification ratio
BK-MAG ADJ
MFT Print off-center SETUP/PRINT
ADJ
Print lead edge
CS1 Print off-center
Print lead edge
CS2 Print off-center
Print lead edge
ADU Print off-center
Print lead edge
CS3 Print off-center
Print lead edge
CS4 Print off-center
Print lead edge
LCC Print off-center
Print lead edge
Adjustment item
Adjustment
menu
SI MU LATI O N
NO.50
28
TEST
AUTO IMAGE POSITION ADJUSTMENT㧦SERVICE
OC ADJ BK-MAG ADJ
SPF ADJ
SETUP/PRINT ADJ
RESULT DATA
1/1
0
CLOSE