1-45
DSR-70/70P
Chapter 5 Special Editing and Recording/Playback
88
Chapter 5 Special Editing and Recording/Playback
Playback
This section describes playback of tapes performed
using this unit as a player.
Notes
•When two DSR-70/70P units are combined, set both
REMOTE/LOCAL switches to LOCAL.
•When controlling this unit from the editing control
unit connected to the REMOTE connector, set the
REMOTE/LOCAL switch to REMOTE.
For playback using the jog/shuttle dials, see “Finding Edit
Points — Search” (page 49).
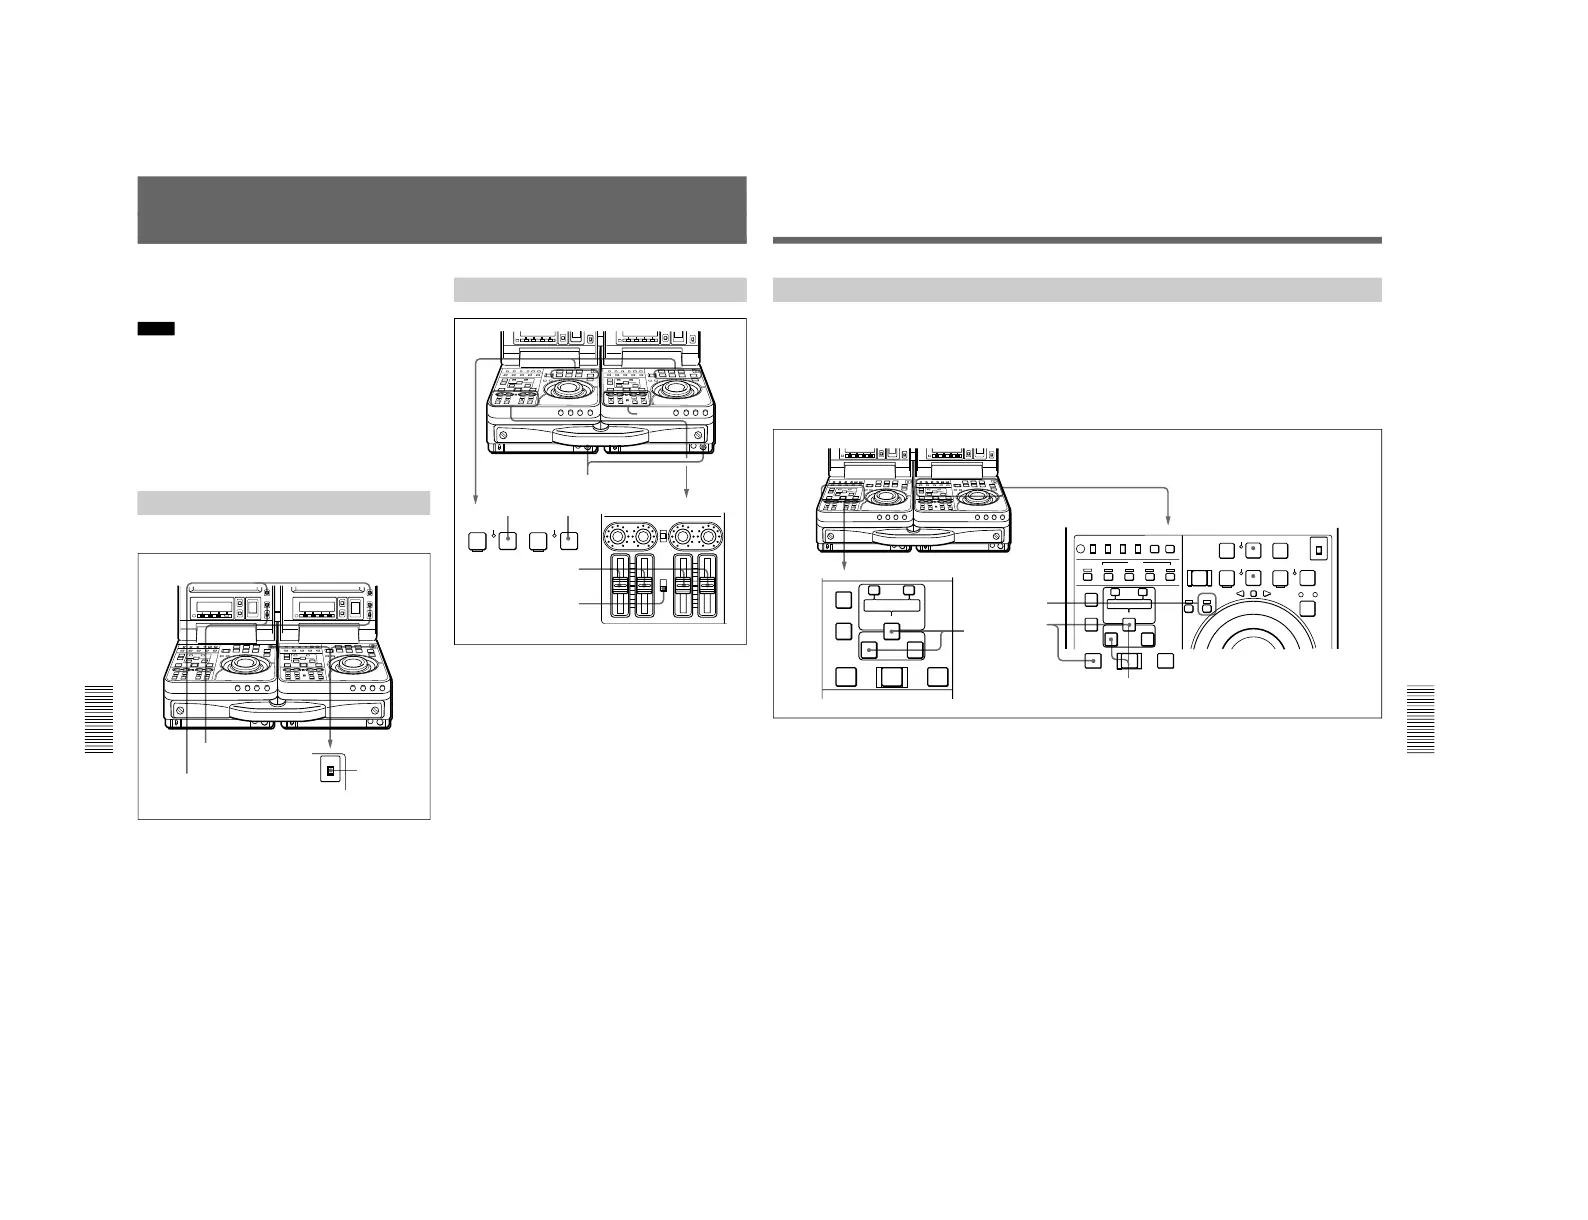
Preparations for Playback
Perform the following procedure.
1
Connect video/audio signal output connectors to
external equipment if necessary.
2
Select output audio signals (see “Audio settings
page 1-3 on page 71).
3
Press the COUNTER SELECT button to select the
time data.
When using COUNTER
Press the RESET button to set the value to
“0:00:00:00”.
4
Set the METER switch to CH-1/2 or CH-3/4 to
select the channels indicated by audio level meter.
LEVEL knob
2
1
REW PLAY F FWD
SERVO
)
0p
4
AUDIO INPUT
PB
AUDIO
PRESET
VARIABLE
CH-1
PRESET
VARIABLE
CH-2 CH-3 CH-4
STOP
STANDBY
PB AUDIO CH-1 to CH-4
level adjustment sliders
PB AUDIO PRESET/
VARIABLE switch
RESET buttons
COUNTER
SELECT buttons
METER
switches
Playback Operation
1
Press the PLAY button.
Playback starts.
To adjust speaker/headphones audio level
Rotate the LEVEL knob on the front control
section.
To adjust audio playback level
Set the PB AUDIO PRESET/VARIABLE switch
to VARIABLE, and adjust using the PB AUDIO
CH-1 to CH-4 level adjustment sliders.
2
Press the STOP button to stop playback.
If playback continues to the end of the tape, the
tape automatically rewinds to the beginning and
stops.
Chapter 5 Special Editing and Recording/Playback
Chapter 5 Special Editing and Recording/Playback
89
Two-Unit Synchronous Playback
Connecting two DSR-70/70P units and synchronizing
their tape transport, you can carry out two-unit
synchronous playback with an accuracy of ±0 frame.
For equipment/signal connections and basic settings, see the
section “Connections for Two-Unit Synchronous Playback”
on page 122.
Perform the following procedure.
(In the following, the controlling unit is referred to as
the recorder and the controlled unit as the player.).
1
Insert two source tapes in the recorder and player.
2
Cue up to the tape position where to start playback
on each of the recorder and the player, then,
holding down the ENTRY/SHIFT button, press the
IN button.
On each unit, the cued-up tape position is set as the
IN point and the IN button lights.
3
Press the RECORDER button, lighting the
RECORDER indicator.
3
4
2
2
OFF
ON
ON
OFF
LOCAL
REC INHI
REMOTE
INT
EXT
MENU
TC CHARACTER
SET
AUDIO IN
VIDEO
CH1,1/2 CH2,3/4
AUDIO
TRIM
LIST MARK
CLIP
LINK
ENTRY SHIFT
IN OUT
ASSEMBLE INSERT
TC
–+
DELETE
EJECT REW PLAY F FWD
SERVO
CH-1/2
CH-3/4
PREROLL
REC SEQ EDIT
METER
REC
INHI
REVERSE
PLAYER
RECORDER
FORWARD
SHUTTLE JOG
)
0
r
p
6
4
STOP
STANDBY
AUDIO IN
TRIM
LIST MARK
CLIP
LINK
ENTRY SHIFT
IN OUT
–+
DELETE
AUTO EDIT
PREVIEW REVIEW
AUTO EDIT
PREVIEW REVIEW
4
On the recorder, holding down the ENTRY/SHIFT
button, press the PREVIEW button.
Both the recorder and the player start preroll
followed by playback by the two units.
When the setup menu item 004 is set to ON and
305 set to ACCUR on the recorder side, the
recorder and player tape transports are
synchronized during the preroll allowing two-unit
synchronous playback with ±0 frame accuracy to
start at the player and recorder IN points.
To end synchronous playback while it is in
progress
Press the STOP button on the recorder.
 Loading...