Chapter 7 Setup Menu
106
Chapter 7 Setup Menu
Extended Menu
Extended Menu
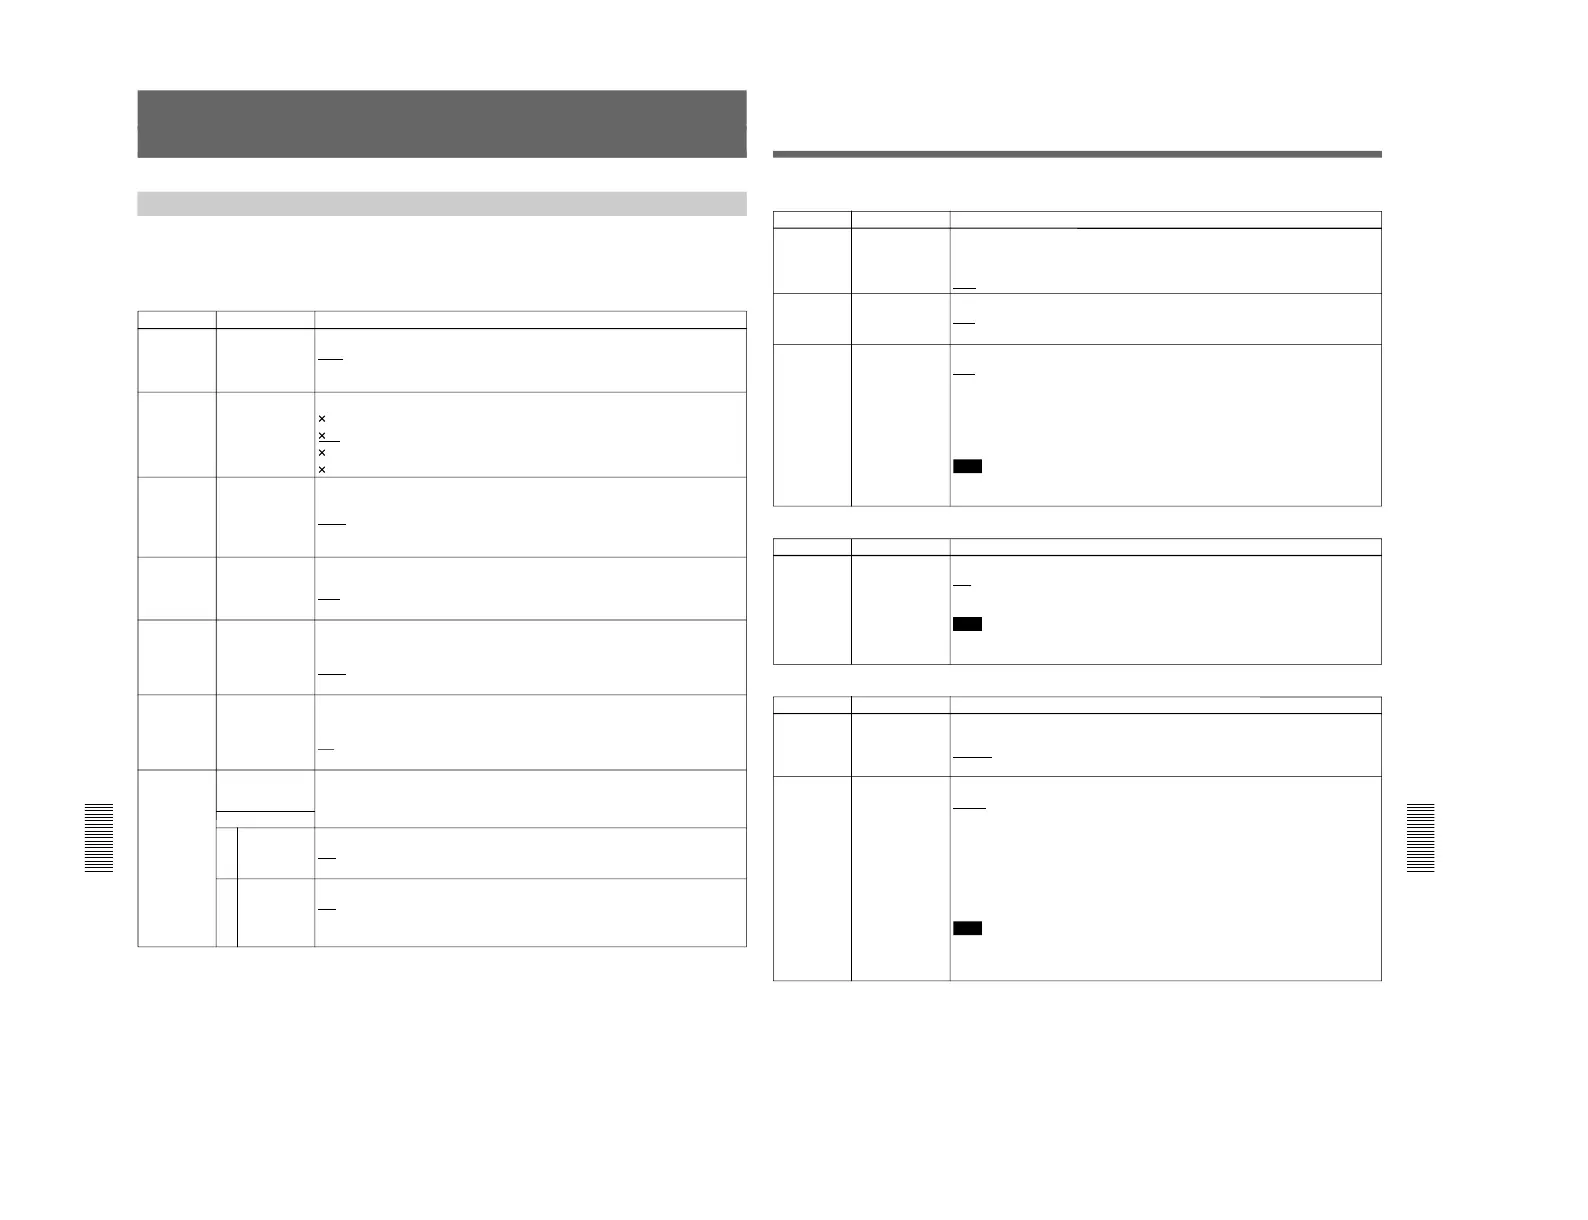
Items in the Extended Menu
The extended menu contains the following items.
In the Settings column of the table, the factory default
settings are underlined.
Item number Item name Settings
101 SELECTION FOR
SEARCH DIAL
ENABLE
Select how the unit enters the search mode.
DIAL: Turning the jog or shuttle dial switches to search mode at all times except during
recording/editing.
KEY: The search button must be pressed to switch to search mode.
Menu items in the 100s, relating to the control panels
102 MAXIMUM TAPE
SPEED
Specify the maximum tape speed in search mode.
16: Maximum 16 times normal
105 REFERENCE
SYSTEM ALARM
Select whether or not to display alarm messages concerning the reference video signal.
ON: Flash the STOP button and display an alarm message.
LIMIT: Flash the STOP button and display an alarm message only either when the unit
is in recording mode or E-E mode or when editing operation is being carried out.
OFF: No alarm messages.
107 REC INHIBIT
LAMP FLASHING
Select whether or not to flash the REC INHI indicator when recording is prevented
though the REC INHI switch on the control panel is set to OFF.
OFF: Light the REC INHI indicator.
ON: Flash the REC INHI indicator.
108 AUTO EE
SELECT
When a cassette is inserted and the PB/EE item in the sub LCD menu general settings
page is set to PB/EE, select the operation modes in which input video and audio signals
are automatically handled in E-E mode.
S/F/R: In STOP/F FWD (fast-forward)/REW (rewind) modes
STOP: In STOP mode
109 FORCED EE
WHEN TAPE
UNTHREAD
During tape threading and unthreading, and when no cassette is inserted, select
whether the PB/EE item of the sub LCD menu general settings page controls the output
signal PB/EE setting.
ON: No control (the signal is always an E-E signal).
OFF: Control.
118 KEY INHIBIT
SWITCH
EFFECTIVE AREA
Sub-item
Select which switches and buttons can be operated when the KEY INH in the sub LCD
menu is set to ON. The following sub-items control different sets of switches and
buttons independently.
REMOTE
SELECT
Select whether the REMOTE/LOCAL switch on the control panel is enabled.
DIS: Disabled.
ENA: Enabled.
1
CONTROL
PANEL
Select which switches and buttons operations on the control panel are enabled.
DIS: All switches and buttons are disabled.
EDIT: All switches and buttons for editing operations are disabled.
ENA: All switches and buttons are enabled.
2
Chapter 7 Setup Menu
Chapter 7 Setup Menu
107
Item number Item name Settings
125 AUTO REW Select whether to rewind the tape automatically when recording or playback reaches the
end of a tape.
DIS: Do not rewind the tape automatically.
ENA: Rewind the tape automatically.
128 PAUSE
FUNCTION
Select whether to use the search button as a pause button.
OFF: Do not use as a pause button.
ON: Use as a pause button.
Item number Item name Settings
201 PARA RUN Select whether or not to use synchronized operation for two or more VTRs.
DIS: No synchronized operation.
ENA: Use synchronized operation.
Note
To use synchronized operation for two or more VTRs, set item 201 to ENA on all of the
VTRs.
Menu items in the 200s, relating to the remote control interface
Item number Item name Settings
305 SYNC GRADE When editing in phase-synchronized mode with item 004 set to ON, select the target
phase synchronization accuracy.
ACCUR: ±0 frame accuracy.
ROUGH: ±1 frame accuracy.
Menu items in the 300s, relating to editing operations
307 AUTO-DELETION
FOR
INCONSISTENT
DATA
Select what happens when an erroneous edit point is set.
MANU: A warning is given by flashing the DELETE button on the control panel.
The operator must manually delete the unnecessary edit point .
NEG&E: When inconsistent edit points are set, such as when an OUT point is before an
IN (or audio IN) point, or when too many edit points are specified, the previously set edit
point is deleted.
NEG: When inconsistent edit points are set, such as when an OUT point is before an IN
(or audio IN) point, the previously set edit point is deleted. When too many edit points
are specified, the DELETE button on the control panel flashes to give a warning.
Note
Pressing the button corresponding to an edit point to be deleted and the DELETE button
simultaneously deletes the edit point. If an erroneous edit point is set (the DELETE
button is flashing), editing is not executed.
Menu items in the 100s, relating to the control panels (continued)
129 CLIPLINK Select whether to create ClipLink log data.
OFF: Do not create.
ON: Create.
When recording, the recording starting point is made a Mark IN point and the recording
ending point is made a Mark OUT point. When editing, the edit IN point (the video IN
point or audio IN point whichever coming first) is made a Mark IN point and the edit OUT
point is made a Mark OUT point.
Note
If recording or editing is carried out when this item is set to OFF, the existing ClipLink
log data is erased.
(Continued)