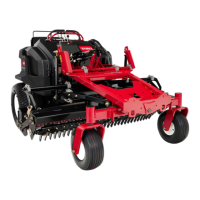
ControlValve
g415104
Figure55
1.Supportbracket4.Controlvalvebracket
2.Capscrew5.Flangenut(4each)
3.Capscrew(3each)
6.Controlvalve
RemovingtheControlValve
RefertoFigure55forthisprocedure.
1.Parkthemachineonalevelsurface,loweranyattachments,engagethe
parkingbrake,setthekeyswitchtotheOFFpositionandremovethekey
fromthekeyswitch.
2.Removethehood.
3.ReadandadheretotheinformationprovidedinGeneralPrecautionsfor
RemovingandInstallingtheHydraulicSystemComponents(page5–46).
4.Cleantheareaaroundthehydraulichose,tube,andttingconnections.
5.Labelanddisconnectorremovethehydraulichosesandtubesfromthe
controlvalve.Caporplugthedisconnectedhydraulichoses,tubes,and
ttingstopreventhydraulicsystemcontamination.
6.Removethefastenerssecuringthecontrolvalvetothevalvebracketand
removethecontrolvalveassemblyfromthemachine.
7.Ifnecessary,removethehydraulicttingsfromthecontrolvalve.Recordthe
locationsandorientationsofthettingsforassemblypurposes.
8.RemoveanddiscardalltheO-ringsfromthehydraulichoses,tubes,and
ttingsthatweredisconnectedorremoved.
9.Continuetodismantlethecontrolvalveassemblyifnecessary;referto
ServicingtheControlValve(page5–77).
FieldPro®6040
Page5–75
HydraulicSystem:ServiceandRepairs
22267SLRevA
 Loading...