Adept Cobra s600/s800 Robot User’s Guide, Rev H 11
List of Figures
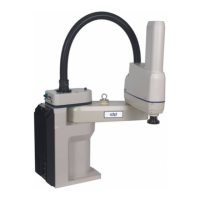
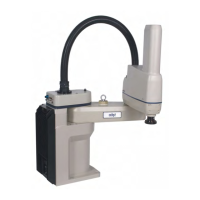
Figure 1-1. Adept Cobra s800 Robot . . . . . . . . . . . . . . . . . . . . . . . . . . . . . . . . . . . . . . . . . 15
Figure 1-2. Robot Joint Motions . . . . . . . . . . . . . . . . . . . . . . . . . . . . . . . . . . . . . . . . . . . . . 16
Figure 1-3. Adept SmartAmp AIB . . . . . . . . . . . . . . . . . . . . . . . . . . . . . . . . . . . . . . . . . . . . 16
Figure 1-4. Adept SmartController CX . . . . . . . . . . . . . . . . . . . . . . . . . . . . . . . . . . . . . . . . 17
Figure 2-1. Electrical and Thermal Warning Labels on AIB Chassis . . . . . . . . . . . . . . . . . 22
Figure 2-2. Thermal Warning Label on Underside of Inner Link . . . . . . . . . . . . . . . . . . . . 22
Figure 2-3. Warning Label on Encoder Cables . . . . . . . . . . . . . . . . . . . . . . . . . . . . . . . . . 23
Figure 3-1. Cobra s600/s800 Robot on a Transportation Pallet . . . . . . . . . . . . . . . . . . . . 35
Figure 3-2. Mounting Hole Pattern for Robot . . . . . . . . . . . . . . . . . . . . . . . . . . . . . . . . . . 38
Figure 3-3. Robot Interface Panel . . . . . . . . . . . . . . . . . . . . . . . . . . . . . . . . . . . . . . . . . . . 40
Figure 4-1. System Cable Diagram for Adept Cobra s600/s800 Robots . . . . . . . . . . . . 41
Figure 4-2. User-Supplied 24 VDC Cable . . . . . . . . . . . . . . . . . . . . . . . . . . . . . . . . . . . . . . 45
Figure 4-3. Typical AC Power Installation with Single-Phase Supply . . . . . . . . . . . . . . . . 48
Figure 4-4. Single-Phase AC Power Installation from a Three-Phase AC Supply . . . . . . 48
Figure 4-5. AC Power Mating Connector . . . . . . . . . . . . . . . . . . . . . . . . . . . . . . . . . . . . . 49
Figure 4-6. Ground Point on Robot Base . . . . . . . . . . . . . . . . . . . . . . . . . . . . . . . . . . . . . . 50
Figure 5-1. Robot Status LED Indicator Location . . . . . . . . . . . . . . . . . . . . . . . . . . . . . . . 53
Figure 5-2. Status Panel . . . . . . . . . . . . . . . . . . . . . . . . . . . . . . . . . . . . . . . . . . . . . . . . . . . . 54
Figure 5-3. Connecting Digital I/O to the System . . . . . . . . . . . . . . . . . . . . . . . . . . . . . . . 57
Figure 5-4. Typical User Wiring for XIO Input Signals . . . . . . . . . . . . . . . . . . . . . . . . . . . . . 61
Figure 5-5. Typical User Wiring for XIO Output Signals . . . . . . . . . . . . . . . . . . . . . . . . . . . 63
Figure 5-6. Optional XIO Breakout Cable . . . . . . . . . . . . . . . . . . . . . . . . . . . . . . . . . . . . . 63
Figure 5-7. Typical Startup Screen . . . . . . . . . . . . . . . . . . . . . . . . . . . . . . . . . . . . . . . . . . . 66
Figure 6-1. Lubrication of Joint 3 Quill . . . . . . . . . . . . . . . . . . . . . . . . . . . . . . . . . . . . . . . . 73
Figure 6-2. Securing Screw on SmartAmp AIB Chassis . . . . . . . . . . . . . . . . . . . . . . . . . . . 74
Figure 6-3. Opening and Removing AIB Chassis . . . . . . . . . . . . . . . . . . . . . . . . . . . . . . . 75
Figure 6-4. Connectors on AIB Chassis . . . . . . . . . . . . . . . . . . . . . . . . . . . . . . . . . . . . . . . 75
Figure 6-5. Ground Screw on AIB Chassis . . . . . . . . . . . . . . . . . . . . . . . . . . . . . . . . . . . . . 76
Figure 6-6. Installing AIB Chassis in Robot Base . . . . . . . . . . . . . . . . . . . . . . . . . . . . . . . . . 77
Figure 6-7. Location of Encoder Battery . . . . . . . . . . . . . . . . . . . . . . . . . . . . . . . . . . . . . . 79
Figure 7-1. Tool Flange Removal Details . . . . . . . . . . . . . . . . . . . . . . . . . . . . . . . . . . . . . . 82
Figure 7-2. User Connectors on Joint 1 . . . . . . . . . . . . . . . . . . . . . . . . . . . . . . . . . . . . . . . 83
Figure 7-3. User Connectors on Joint 2 . . . . . . . . . . . . . . . . . . . . . . . . . . . . . . . . . . . . . . . 83
Figure 7-4. Internal User Connectors - OP3/4, EOAPWR, ESTOP . . . . . . . . . . . . . . . . . . . 84
Figure 7-5. SOLND Connector . . . . . . . . . . . . . . . . . . . . . . . . . . . . . . . . . . . . . . . . . . . . . . 84
Figure 7-6. OP3/4 and SOLND Circuits . . . . . . . . . . . . . . . . . . . . . . . . . . . . . . . . . . . . . . . 86
Figure 7-7. Internal E-Stop Connector Circuit . . . . . . . . . . . . . . . . . . . . . . . . . . . . . . . . . 88
Figure 7-8. Solenoid Mounting Bracket With Connector and Spare Air Line . . . . . . . . 91
Figure 7-9. Solenoid Placement Using Mounting Hardware . . . . . . . . . . . . . . . . . . . . . . 92
 Loading...