Patient monitor User’s manual
Chapter 3-6
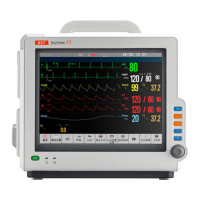
Shows system date and time.
Shows battery status icon.
Shows technical alarm messages and prompt messages.
Shows the waveforms of each physiological parameter. Label displays on
the top left corner of each waveform area. When you close or open some
waveform, the waveform area on the screen will be rearranged automatically.
It consists of various parameter areas, and shows measurement numerics for
each parameter module. Label displays on the top left corner of each
parameter area. When you close or open some parameter module, the
parameter area on the screen will be rearranged automatically.
9. Area of touch smartkeys
Shows smartkeys, these smartkeys are used to conduct some common
The position on the screen where a focus may stay is referred to as the
smartkey. Through a smartkey, you may quickly enter some menus or execute
some operations. The smartkeys of the monitor may be divided into the
An area where any parameter stays is the smartkey; you may select a
parameter area to enter a setting menu of the corresponding parameter.
Touch smartkeys (Only for AnyView A8 patient monitor)
Touch smartkeys at the bottom of the screen may be configured, through
which some functions may be quickly executed. These smartkeys vary with
different configurations.