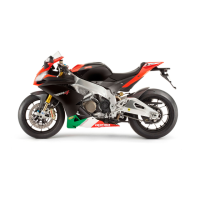
•
Then insert the tool to push the bushing
into the seat until it stops.
NOTE
IN THE EVENT OF SHAFT OR OIL SEAL REPLACEMENT, REFER TO THE TABLE AND ALWAYS
VERIFY THE CORRECT SIZING.
CLUTCH COVER AND COMPONENTS
Model Engine No. Clutch cover Shaft Oil seal
MY 2009/2010 Up to No. 2694 Seat Diam. 20 mm (0.79
in)
Diam. 10 mm (0.39) Diam. 10x20 mm
(0.39x0.79 in)
MY 2009/2010 From No. 2695 Seat Diam. 20 mm (0.79
in)
Ø 12 mm (0.47 in) Diam. 12x20 mm
(0.47x0.79 in)
MY 2011 - "V4" marking From No. 1002 to No.
1038 + From No. 7999
to No. 8784
Seat Diam. 20 mm (0.79
in)
Ø 12 mm (0.47 in) Diam. 12x20 mm
(0.47x0.79 in)
MY 2011 - "V4-A" mark-
ing
From No. 1002 to No.
1440 + From No. 8785
to No. 8922
Seat Diam. 20 mm (0.79
in)
Ø 12 mm (0.47 in) Diam. 12x20 mm
(0.47x0.79 in)
MY 2011 - "V4-A" mark-
ing
From No. 1441 onwards Seat Diam. 22 mm (0.87
in)
Ø 12 mm (0.47 in) Diam. 12x20 mm
(0.47x0.79 in)
•
Position the starting transmission gear
on the crankcase.
•
Position the gasket and the two dowel
pins in the clutch cover.
•
Insert the clutch cover, making sure to
have correctly engaged the clutch con-
trol lever and the rack shaft.
•
Screw the sixteen perimetric fixing
screws with the washers.
•
Tighten the screws working in stages
and diagonally.
•
Add engine oil up to the correct level.
Engine RSV4 Factory a-PRC
ENG - 304
 Loading...