Home
Bogen
Conference System
Nyquist C4000 Series
Bogen Nyquist C4000 Series User Manual
4
of 1
of 1 rating
146 pages
Give review
Manual
Specs
To Next Page
To Next Page
To Previous Page
To Previous Page
Loading...
71
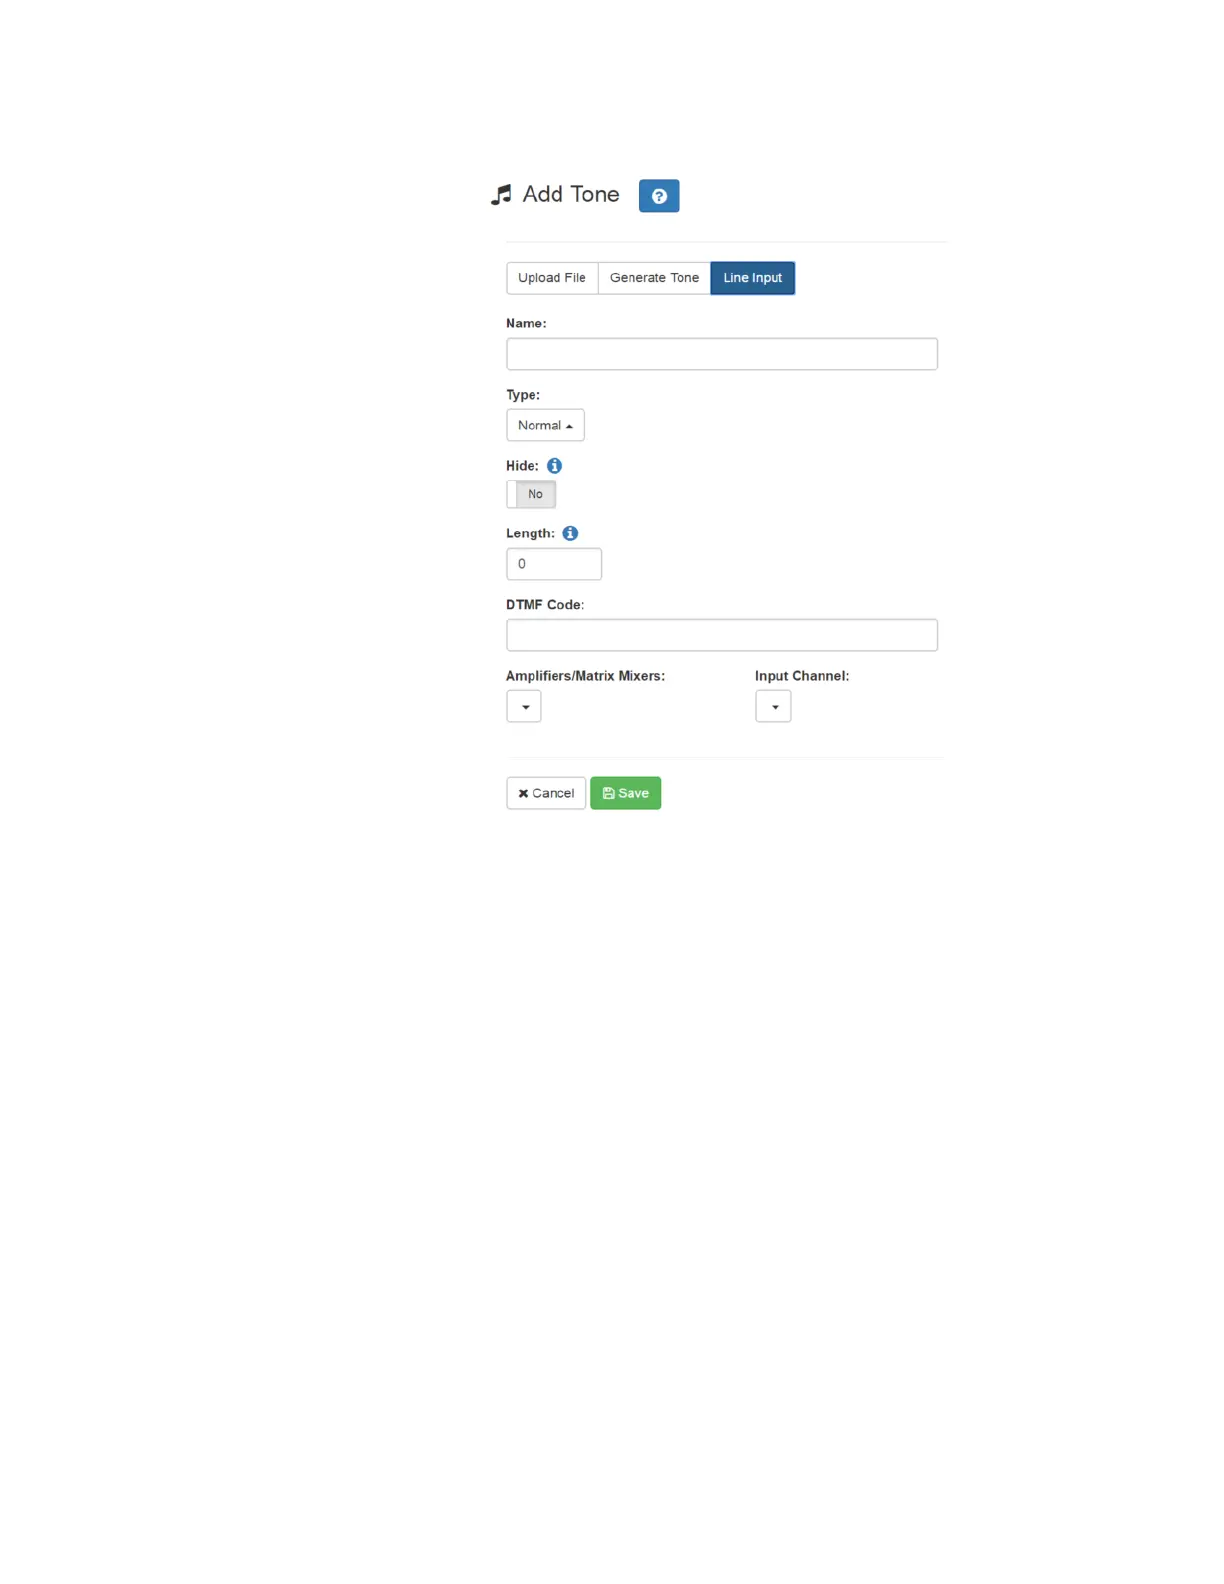
To add a line input tone:
Step 1
On the navigation bar, expand
Audio
.
Step 2
Select
T
ones
.
Step 3
On the Tones page, select the
Add
icon.
Step 4
On the Add Tone p
age, select
Line Input
.
Step 5
Complete the para
meters.
Step 6
Select
Save
.
Figure 4-10, Add T
one – Line Input
82
84
Table of Contents
Default Chapter
3
Default Chapter
3
Table of Contents
3
List of Figures
7
List of Tables
11
1 Introducing the C4000 System
13
Using the Web-Based User Interface
14
Accessing the Dashboard
14
Figure 1-1, Login Page
14
Figure 1-2, C4000 Dashboard
15
Figure 1-3, Dashboard Areas
16
Figure 1-4, Maps Pane
17
Figure 1-5, Dashboard Messages
17
Making UI Selections
18
Figure 1-6, Audio Distribution Section of Dashboard
18
Table 1-1, UI Icons
18
Getting Help
19
Figure 1-7, Help Menu
19
2 Managing Audio Distribution
21
Figure 2-1, Audio Distribution Sources
22
Figure 2-2, Line-Input Sources
23
Managing Line-Input Sources
23
Figure 2-3, Available Channels for an MMPA
24
Figure 2-4, Line Input for NQ-A4300 Audio Power Amplifier
24
Managing Songs
25
Viewing the Song List
25
Figure 2-5, Songs Page
25
Playing Songs Directly from a USB Memory Stick
26
Table 2-1, Songs Page Parameters
26
Uploading Songs from a USB Memory Stick
27
Adding Songs
27
Figure 2-6, Add Song Page
28
Figure 2-7, Adding Multiple Songs
29
Table 2-2, Add Song Page Parameters
29
Editing Song Information
30
Deleting a Song
30
Table 2-3, Edit Song Page Parameters
30
Managing Playlists
31
Viewing Playlists
31
Figure 2-8, Playlists Page
31
Creating a Playlist
32
Table 2-4, Playlists Page Parameters
32
Figure 2-9, Add Playlist Page
33
Table 2-5, Add Playlist Parameters
34
Adding Songs to a Playlist
35
Figure 2-10, Manage Playlist Page
35
Changing Song Order in a Playlist
36
Deleting a Song from a Playlist
36
Editing a Playlist
36
Deleting a Playlist
37
Using Internet Radio Services
37
Viewing Internet Radio Services
38
Figure 2-11, Internet Radio Services Permissions
38
Figure 2-12, Internet Radio Services View
38
Adding a Source
39
Figure 2-13, Add Source Page
39
Table 2-6, Internet Radio Services
39
Table 2-7, Radio Source Parameters
40
Deleting a Source
42
Managing Credentials
42
2.4.4.1 Viewing Credentials
42
Table 2-8, Credentials Parameters
42
2.4.4.2 Add Credentials
43
Figure 2-14, Add Credential
43
Table 2-9, Add Credential Parameters
43
2.4.4.3 Edit Credential
44
Figure 2-15, Edit Credential
44
Table 2-10, Edit Credentials Parameters
44
2.4.4.4 Delete Credentials
45
SOUNDMACHINE Sign up
45
Using SOUNDMACHINE Music Selection Schedules
46
Creating an Audio Distribution
46
Figure 2-16, Audio Distribution Portion of Dashboard
46
Figure 2-17, Audio Distribution Set in Cos
46
Figure 2-18, Role Permissions for Audio Distribution
47
Figure 2-19, Create an Audio Distribution
47
Table 2-11, Create an Audio Distribution Parameters
48
Figure 2-20, Audio Distribution Play Icon
49
Starting and Stopping Audio Distribution
49
Figure 2-21, Adding Scheduled Audio
50
Figure 2-22, Adding Audio-Dist Trigger
51
Figure 2-23, Audio Distribution Actions
52
Other Features and Audio Distribution
52
Audio Distribution Status
53
Figure 2-24, Audio Distribution Enabled
53
Figure 2-25, Audio Distribution Disabled
53
Figure 2-26, Audio Distribution Status
54
3 Managing Announcements
55
Starting and Stopping Announcements
55
Figure 3-1, Announcement Icon
56
Figure 3-2, Announcement Page
56
Figure 3-3, Announcement Page with Stop Button
57
Announcements, Zones, and Priorities
58
Adding an Announcement
59
Figure 3-4, Add Announcement Page
60
Table 3-1, Add Announcement Page Parameters
61
Using SSML for Text-To-Speech Entries
62
Table 3-2, SSML Formats for Text-To-Speech Entries
63
Viewing Announcements
66
Figure 3-5, Announcements Page
66
Table 3-3, Announcements Page Parameters
66
Editing Announcements
67
Table 3-4, Edit Announcement Page Parameters
68
Deleting an Announcement
69
4 Managing Alarms and Tones
71
Stopping and Starting Alarms
71
Figure 4-1, Alarm Button
72
Figure 4-2, Alarm Page
72
Starting and Stopping Tones
73
Figure 4-3, Alarm Page with Stop Option
73
Figure 4-4, Tone Icon
74
Figure 4-5, Tone Page
75
Viewing Available Tones
76
Figure 4-6, Tone Page with Options
76
Figure 4-7, Tones Page
77
Table 4-1, Tones Page Parameters
77
Uploading Tones
78
Figure 4-8, Add Tone - Upload File
79
Generating Tones
80
Table 4-2, Add Tone Page Parameters (Upload)
80
Figure 4-9, Add Tone - Generate Tone
81
Table 4-3, Add Tone Page Parameters (Generate)
82
Using Line Input for Tones
82
Figure 4-10, Add Tone - Line Input
83
Editing Tones
84
Table 4-4, Add Tone Page Parameters (Line Input)
84
Figure 4-11, Edit Tone Pages
85
Table 4-5, Edit Tone Page Parameters
86
5 Making Pages and Calls
89
Figure 5-1, C4000 Dashboard
89
Managing Calls
90
Placing Call Using Directory
90
Figure 5-2, Directory Button
90
Figure 5-3, Directory Page
91
Figure 5-4, Calling Extension
92
Placing Call Using Dial Pad
93
Figure 5-5, Dial Pad Button
93
Figure 5-6, Dial Pad
93
Figure 5-7, Page Exclusion Button
94
Using Page Exclusion
94
Figure 5-8, Paging Exclusions Page
95
Figure 5-9, Add Paging Exclusion Page
95
Deleting from Page Exclusion List
96
Using Call Forwarding
96
Figure 5-10, Call Forwarding Button
97
Figure 5-11, Call Forwarding Popup Menu
97
Launching Pages
98
Single-Zone Paging
99
Figure 5-12, Paging Single Zone
99
Figure 5-13, End Call
100
Record Page
101
Figure 5-14, Record Page Button
101
Prepend Page
102
Figure 5-15, Record Page
102
Figure 5-16, Prepend Page Button
103
Figure 5-17, Prepend Page
103
All Call Paging
104
Figure 5-18, All Call Button
104
Figure 5-19, All Call
105
Emergency All Call Paging
106
Figure 5-20, Emergency All Call Button
106
Figure 5-21, Emergency All Call
107
Facility Paging
108
Figure 5-22, Facility Page Button
108
Figure 5-23, Facility Page
108
Multi-Site All Call Paging
110
Figure 5-24, Multi-Site All Call Button
110
Multi-Site Emergency All Call
111
Figure 5-25, Multi-Site Emergency All Call Button
111
6 Managing Check-In
113
Viewing Check-In Status
113
Figure 6-1, Manage Check-In Button
114
Figure 6-2, Manage Check-In
114
Table 6-1, Color-Coded Check-In Status
114
Table 6-2, Check-In Display Options
115
Starting Check-In
116
Figure 6-3, Manage Check-In When Idle
116
6.1.1.1 Station Check-In
117
6.1.1.2 Check-In Done and Finish
117
Stopping the Check-In Process
117
Figure 6-4, Listen In, or Spy Mode, Button
118
Resetting the Check-In Process
118
Using Spy Mode
118
Configuring Check-In
119
Figure 6-5, Configure Check-In
119
Managing Exclusion and Vacancy Lists
120
Table 6-3, Check-In Configuration Options
120
7 Managing Display Messages
123
Creating a Display Message
123
Figure 7-1, Example of Priority Message in Fullscreen
123
Figure 7-2, Display Message Button
124
Figure 7-3, Display Message
125
Table 7-1, Display Message Options
126
Using Color in Display Messages
128
Table 7-2, Default Color Alias
129
Removing Messages
131
Figure 7-4, Remove Message Button
132
Figure 7-5, Remove Message
133
8 Routines and Other Tasks
135
Starting and Stopping Routines
135
Figure 8-1, Routines Button
137
Figure 8-2, Routines List
138
Figure 8-3, Routine Page
139
Viewing the Schedule for the Week
140
Figure 8-4, Routines Manager
140
Figure 8-5, Weekly Schedule Section of Dashboard
140
Manually Controlling Output Contacts
141
Figure 8-6, Schedule Page
141
Figure 8-7, Output Control Section
142
Figure 8-8, Manual Control Buttons
142
Index
143
Other manuals for Bogen Nyquist C4000 Series
User Guide
157 pages
4
Based on 1 rating
Ask a question
Give review
Questions and Answers:
Need help?
Do you have a question about the Bogen Nyquist C4000 Series and is the answer not in the manual?
Ask a question
Bogen Nyquist C4000 Series Specifications
General
Brand
Bogen
Model
Nyquist C4000 Series
Category
Conference System
Language
English