68
When the TR 52-1 remote control pedal unit is used, the machine
will automatically switch over to 2-step operation.
(See description of TR 52-1 on p. 46, 47)
Release the torch trigger
Pull back torch trigger and hold it down
I
H
I
O
Start of cycle
Gas pre-flow time
Arc ignitions with
start arc ignition I
S
End of welding
via down-slope
to crater fill current I
E
Gas post-flow-time
t
Welding with
pre-set main current I
H
Current rise via up-slope
Pull back torch trigger and hold it down
Release the torch trigger
Pull back and hold down the torch trigger once again
Release the torch trigger
t
Start of cycle
Gas pre-flow time
Current rise
via up-slope
Current drop
via down-slope
Gas post-flow-time
End of welding
Crater fill current I
E
Arc ignitions with
start arc ignition I
S
O
I
I
H
I
S
I
E
Welding with pre-set
main current I
H
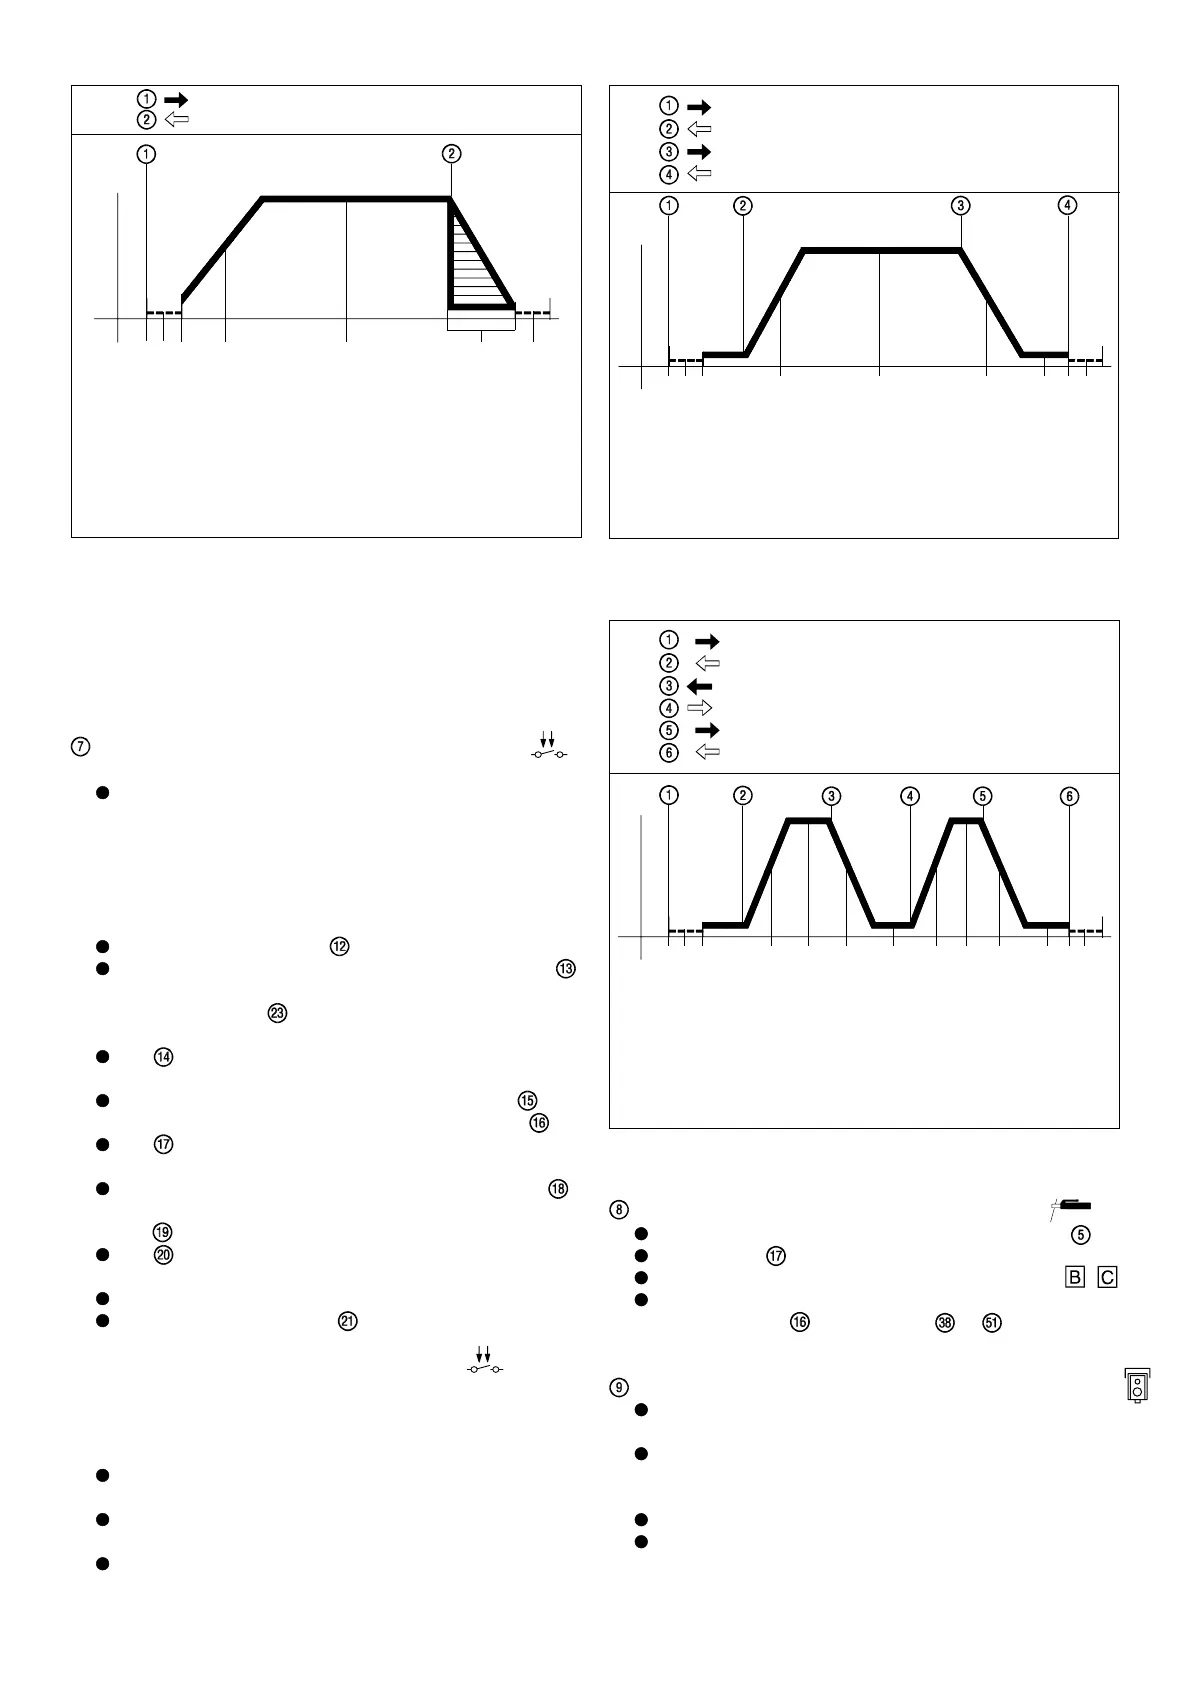
Fig. 16 Functional sequence in 2-step operating mode Fig. 17 Functional sequence in 4-step operating mode
O
I
I
S
I
H
I
E
t
I
H
I
E
Start of cycle
Gas pre-flow time
Arc ignition with
start-arc I
S
Current rise
via up-slope
Current drop via down-
slope to crater-fill current I
E
Current rise again
via up-slope
Crater-fill current I
E
Main current I
H
Gas post-flow time
Crater-fill current I
E
End of welding
Welding with pre-set
main current I
H
Current drops again
via down-slope
Pull back torch trigger and hold it down
Release the torch trigger
Push trigger forward and hold it
Release the torch trigger
Pull back and hold down the torch trigger once again
Release the torch trigger
Fig. 18 Functional sequence in 4-step operating mode, with facility for lowering the
welding current without any break in welding.
LED INDICATOR for manual electrode welding
Symbol is selected with the function selector switch
LED indicator lights up (for main current I
H
)
le courant de soudage est livré aux prises de courant ,
Le courant de soudage peut être réglé soit internement par
current regulator
, or via the dial or on the
TP3 / TP4-SP remote control unit.
CONNECTING SOCKET (10-pole) for remote control unit
Plug the remote control cable plug into the socket, the right
way round, and tighten the swivel nut
The machine automatically recognizes the fact that the
remote control unit has been plugged in - there is thus no
need for any internal/external switchover.
The desired welding current is set on the remote control unit.
The short-circuit-proof supply voltage to the remote control
units protects the electronics in the event of any damage to
the remote control cable.
LED INDICATOR for 4-STEP operation / variant 1
called up via TIG torch trigger (Fig. 17)
Field of use: manual or automatic welding operations in
which settable parameters such as gas pre-flow, start arc,
current rise time, main current, current drop time, crater fill
current and gas post-flow time are the precondition for a
fault-free welded join.
Functional sequence:
1.Pull back the torch trigger and hold it down
Gas pre-flow time elapses
The arc ignites at the start-arc current value I
s
set by dial ,
either with or without HF, depending on the position of the
HF selector switch .
(N.B. HF switches off automatically following arc ignition).
LED lights up.
2.Release torch trigger
The current rises over the set speed (up-slope, dial ) until
it reaches the value set for the main current I
H
(dial )
LED lights up.
3.Pull back and hold down the trigger once again
The current falls over the set speed (down-slope, dial )
until it reaches the value set for the crater-fill current I
E
(dial ) = END CRATER IS FILLED !
LED lights up.
4.Release torch trigger
Arc goes out
Gas post-flow time elapses
Description of 4-step operation / variant 2
This variant allows the welding current to be lowered from the
main current to the crater-fill current and back again, with no
break in welding. (Fig. 18)
Practical tips:
The functional sequence described in Fig. 18 is only possible
in the 4-step operating mode.
A current drop with no break in the welding sequence is only
possible if the main current is activated.
If the trigger is accidentally pushed forward when the
machine is in open circuit, no ignition is possible.