49
See p. 41 for ignition monitoring feature.
TIG WELDING WITH CONTACT IGNITION
(without HF)
START UP
Fit the mounted torch with a tungsten electrode and a gas
nozzle (see the instruction manual for the torch concerned).
Plug the earth cable into the current socket and latch in place
firmly.
Connect the gas hose from the machine to the gas pressure
regulator.
Plug in the mains plug.
Switch on the mains master switch -
- mains control lamp lights up.
Set HF-selector switch to the "0" position.
Shift the function selector switch into the 2-step or 4-step
position, as required; respective LED lights up.
Start arc = contact current; set to correct value using dial
(see p. 39, Pt. , dial position "0")
If necessary, connect a remote control unit (see description of
remote control operation on p. 42).
Select welding parameters (command value for main current I
H
is displayed on ammeter ).
Open the gas cylinder valve by turning it anticlockwise.
Pull back the torch trigger and release it (4-step operation)
Turn the setscrew on the underside of the gas pressure
regulator in a clockwise direction until the working manometer
shows the required flow-rate in litres/min.
Set the gas pre-flow and post-flow times on the power source.
Pull back and release the torch trigger once again
(= welding OFF)
Igniting the arc:
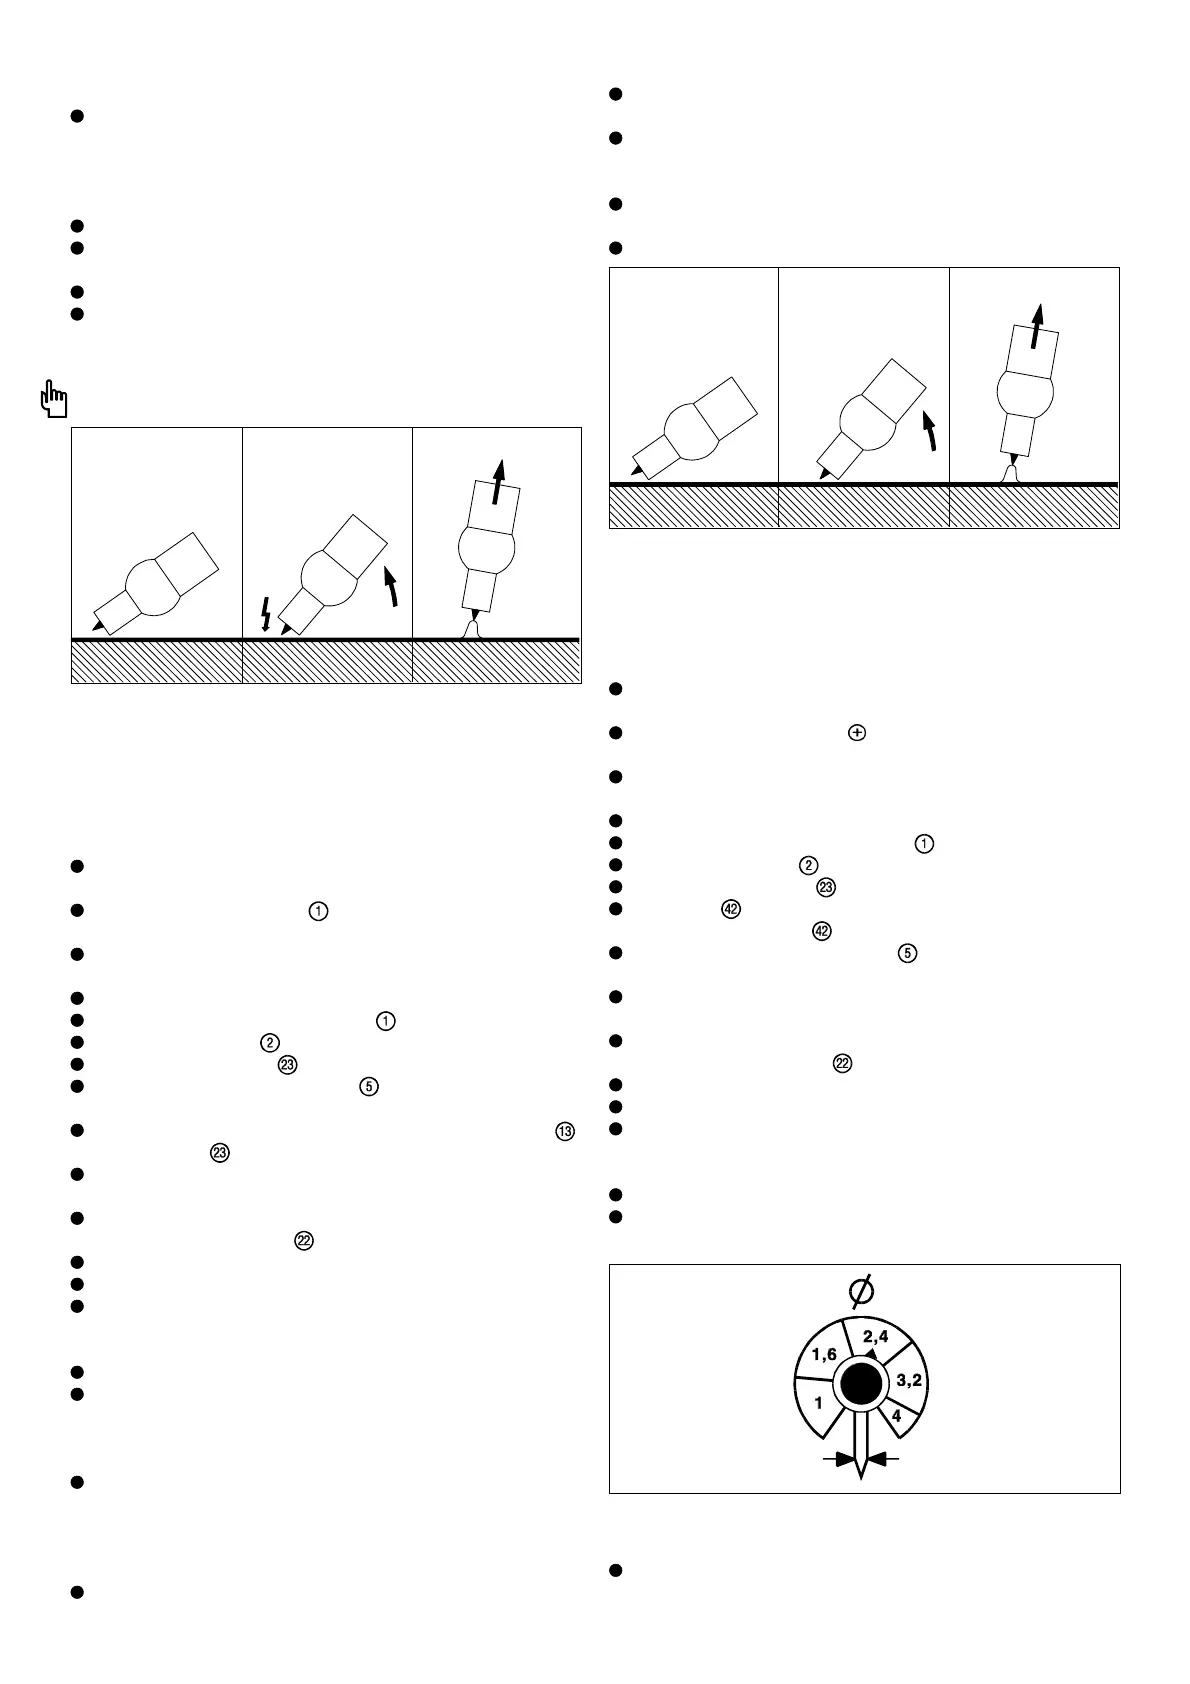
Make sure the welding current is switched off. Place the
electrode on the weld at the point where the arc is to be ignited,
tilt the torch backwards until the edge of the gas nozzle is
resting on the workpiece, leaving a gap of between 2 and 3 mm
between the tip of the electrode and the workpiece. (Fig. 39a)
Close your visor.
Fig. 38 Ignition with aid of ignition device
Igniting the arc: (with FHF5-1 ignition device)
Make sure the welding current is switched off. Place the
electrode on the weld at the point where the arc is to be ignited,
tilt the torch backwards until the edge of the gas nozzle is
resting on the workpiece, leaving a gap of between 2 and 3 mm
between the tip of the electrode and the workpiece. (Fig. 38a)
Close your visor
Switch on the welding current with the torch trigger - shielding
gas starts flowing
Arc ignites without touching the workpiece (Fig. 38b)
Move the torch into the normal position. (Fig. 38c)
Advantage: no contamination of either the electrode or the
workpiece.
IMPORTANT: After ignition, the high frequency switches off
automatically.
Igniting the arc:
Make sure the welding current is switched off. Place the
electrode on the weld at the point where the arc is to be ignited,
Fig. 40 Dial setting for ignition current for a 2.4mm diam. tungsten electrode
TIG WELDING WITH SOFT-START
("soft" contact ignition without HF)
START UP
Fit the mounted torch with a tungsten electrode and a gas
nozzle (see the instruction manual for the torch concerned).
Plug the earth cable into the current socket and latch in place
firmly.
Connect the gas hose from the machine to the gas pressure
regulator.
Plug in the mains plug.
Switch on the mains master switch -
- mains control lamp lights up.
Set HF-selector switch to the "0" position.
Set the dial to the diameter of tungsten electrode to be used
(Fig. 40). (See p. 39, Pt. for a description of Soft Start ignition).
Shift the function selector switch into the 2-step or 4-step
position, as required; respective LED lights up.
If necessary, connect a remote control unit (see description of
remote control operation on p. 42).
Select welding parameters (command value for main current I
H
is displayed on ammeter ).
Open the gas cylinder valve by turning it anticlockwise.
Pull back the torch trigger and release it (4-step operation)
Turn the setscrew on the underside of the gas pressure
regulator in a clockwise direction until the working manometer
shows the required flow-rate in litres/min.
Set the gas pre-flow and post-flow times on the power source.
Pull back and release the torch trigger once again
(= welding OFF)
Switch on the welding current with the torch trigger - shielding
gas starts flowing
Resting the torch on the edge of the nozzle, gradually tilt it
upwards until the tip of the electrode touches the workpiece
(see Fig. 39 b)
The arc ignites when the torch is raised and moved into the
normal position (Fig. 39 c)
Start welding
a)Fit gas nozzle b)Touch workpiece
to ignite arc
c) Arc is ignited
Fig. 39
a)Fit gas nozzle b)Contact-free
HF ignition
c) Arc is ignited