Preparations for Use –
CIRAS-2 Operator's Manual Version 2.04
- 18 -
Preparations for Use
Your system has been factory calibrated before shipment to you. Therefore, there is no need to perform a
calibration of your equipment prior to use.
At this point you should have installed the CIRAS-2 Remote Control Software (supplied on CD ROM) to
the computer(s) you will use to operate CIRAS-2. Both the Windows (for use with your notebook or
desktop PC) and Windows CE (factory-installed on the User Interface) versions of CIRAS-2 RCS are
virtually identical. We recommend familiarizing yourself thoroughly with CIRAS-2 in a controlled indoor
setting before taking the system into the field.
To install the software, please refer to the Getting Started section of the Operator‟s Manual on page 13.
System Preparation
Step 1. Insert 12V NiMH battery packs into main console
Step 2. Connect CIRAS-2 power supply
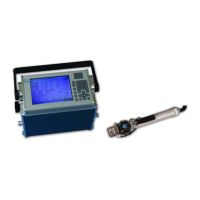
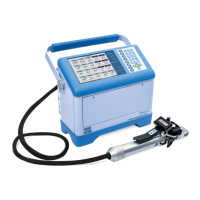
Step 3. Make Leaf Cuvette electrical and gas connections
Step 4. Connect leaf cuvette power cable to external 12V DC Power Supply
Step 5. Inspect absorber columns (desiccants, etc.) and water vapor equilibrator
Step 6. Insert CO2 cartridge
Step 7. Connect CIRAS-2/PC interface cable (optional for computer RCS control)
Step 8. Power on CIRAS-2
Step 9. Close the leaf cuvette
Step 10. Start the CIRAS-2 Remote Control Software on your PC (optional for computer RCS control)
Step 1. Insert 12V NiMH battery packs into main console
For field measurements, the 12V NiMH battery packs should be fully charged for optimal results. This is
best achieved by connecting the batteries to their respective chargers the night prior to measurements.
This ensures that the battery packs are fully charged and ready to power the console and cuvette for
several hours of field measurements, depending on temperature and LED light use. Batteries should
have arrived fully charged with your CIRAS-2 shipment.
If the batteries require charging, unscrew the threaded cover connector on the battery pack, and taking the
battery charger cable, align the battery charger connector with the three-pin battery pack connector.
Thread the cable connector clockwise to complete the connection. The battery chargers have an LED
indicator that glows red while fast-charging and green in the fully charged state. Normally, it takes
approximately 4 hours for a discharged battery to be fully charged.
The CIRAS-2 main console has two battery compartments which accept the left and right 12V NiMH
battery packs supplied with your system. Each battery pack has a thick notch (12mm) on the bottom and
thin notch (6mm) on the top, so the batteries are properly oriented with the positive/negative battery
terminals towards the bottom. Assuming the battery packs are fully charged, slide one battery into the left
battery compartment until it snaps into place. Slide the other battery into the right battery compartment.
Step 2. Connect CIRAS-2 power supply
For laboratory work the CIRAS-2 mains power supply can be used with or without CIRAS-2 battery packs.
However, please note: At least one charged 12V NiMH battery must be in place when the system
is first powered on. After CIRAS-2 is powered on, the battery may be removed if required. Running