Configuring with Web Based Management
5.5 The "Layer 2" menu
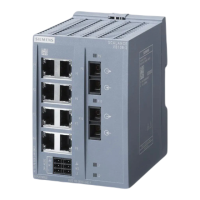
SCALANCE XB-200 Web Based Management
134 Configuration Manual, 04/2015, C79000-G8976-C360-02
●
Shows the status type of the entry in the internal port filter table. Here, static means that
the address was entered as a static address by the user.
●
Specify the use of the port. The following options are available:
– "-"
The port is not a member of the VLAN.
With a new definition, all ports have the identifier "-".
– M
The port is a member of the VLAN. Frames sent in this VLAN are forwarded with the
corresponding VLAN tag.
– U (uppercase)
The port is an untagged member of the VLAN. Frames sent in this VLAN are
forwarded without the VLAN tag. Frames without a VLAN tag are sent from this port.
– u (lowercase)
The port is an untagged member of the VLAN, but the VLAN is not configured as a
port VLAN. Frames sent in this VLAN are forwarded without the VLAN tag.
– F
The port is not a member of the specified VLAN and cannot become a member of this
VLAN even if it is configured as a trunk port.
Important rules for VLANs
Make sure you keep to the following rules when configuring and operating your VLANs:
● Frames with the VLAN ID "0" are handled as untagged frames but retain their priority
value.
● As default, all ports on the device send frames without a VLAN tag to ensure that the end
node can receive these frames.
● With SCALANCE X devices, the VLAN ID "1" is the default on all ports.
● If an end node is connected to a port, outgoing frames should be sent without a tag (static
access port). If, however, there is a further switch at this port, the frame should have a
tag added (trunk port).
1. Enter an ID in the "VLAN ID" input box.
2. Click the "Create" button. A new entry is generated in the table. As default, the boxes
have "-" entered.
3. Enter a name for the VLAN under Name.
4. Specify the use of the port in the VLAN. If, for example you select M, the port is a
member of the VLAN. The frame sent in this VLAN is forwarded with the corresponding
VLAN tag.
5. Click the "Set Values" button.
 Loading...