Do you have a question about the Vaisala Indigo500 Series and is the answer not in the manual?
Details document revision history and updates.
Lists other Vaisala documentation for related products.
Explains symbols and warnings used in the manual.
Lists registered trademarks mentioned in the manual.
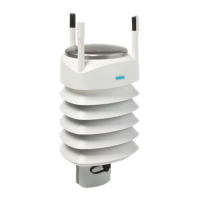
General introduction to the Indigo500 series transmitters.
Lists compatible Vaisala Indigo-series probes.
Outlines key features and available options for the series.
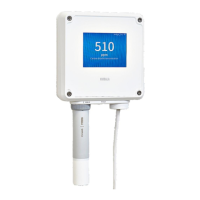
Specific features of the Indigo510 transmitter model.
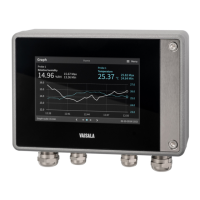
Specific features of the Indigo520 transmitter model.
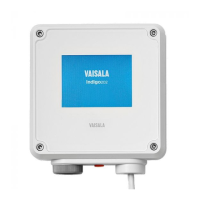
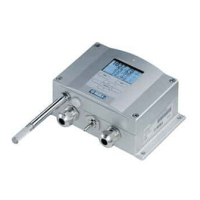
Identifies the physical components of the transmitter.
Describes available cable entry solutions and fittings.
Details the functionality of the touchscreen interface.
Explains the status indicator for non-display models.
Introduces the remote access web interface.
Describes available analog and digital outputs.
Configuration and modes for analog output channels.
Information on digital output capabilities, including Modbus.
Configuration and functionality of relay outputs.
Details the analog input functionality.
Information on the optional barometer module.
Explains the data logging feature and log types.
Describes network connectivity options.
General safety precautions and warnings.
Precautions against electrostatic discharge.
Compliance information for FCC and Canada.
Procedure for accessing the transmitter's internal components.
Overview of different transmitter mounting methods.
Step-by-step guide for standard wall installation.
Mounting procedure using an adapter plate for replacements.
Instructions for attaching the transmitter to a DIN rail.
Method for mounting the transmitter onto a pole.
General wiring instructions and connection types.
Details for connecting the PELV power supply.
Procedure for connecting AC mains power.
Steps for stripping and preparing the AC power cable.
Connecting relay output terminals.
Connecting analog output terminals.
Connecting analog input terminals.
Connecting the Ethernet port.
Connecting probe terminals and lead-throughs.
Ensuring proper sealing of cable glands.
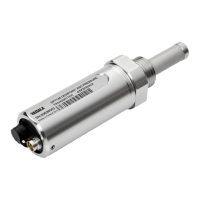
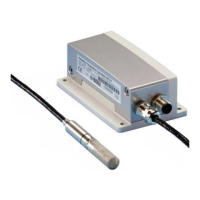
Instructions for connecting sensor probes to the transmitter.
How temperature compensation works with probes.
Describes the touchscreen interface and its main views.
View maximum and minimum values for graph data.
Describes the web interface and its main views.
Initial setup and configuration via the touchscreen.
Steps for setting up network connection on the device.
Configuring date and time settings on the touchscreen.
Setting measurement units on the touchscreen.
Enabling and configuring the screen lock feature.
Initial setup and configuration via the web interface.
Establishing connection to the web interface.
Establish connection directly from computer.
Setting up user accounts for the web interface.
Accessing the web interface with credentials.
Setting the interface language in the web browser.
Steps for setting up network connection via web interface.
Configuring date and time settings via web interface.
Setting measurement units via web interface.
Final steps after initial transmitter setup.
Procedure to reset the screen lock PIN code.
How to unlock and enter the configuration menu.
Customizing the main display screens (Home views).
Setting up analog output channels via touchscreen.
Example setup for configuring analog output channels.
Verifying analog output functionality via touchscreen.
Setting up the analog input channel via touchscreen.
Setting up relay channels via touchscreen.
Example setup for configuring relay channels.
Details on relay wiring and activation logic.
Configuring hysteresis for relay operation.
Activating Modbus communication via touchscreen.
Turning off temperature compensation via touchscreen.
Customizing the web interface's main measurement view.
Setting up analog output channels via the web interface.
Verifying analog output functionality via web interface.
Setting up the analog input channel via web interface.
Setting up relay channels via the web interface.
Verifying relay functionality via web interface.
Activating Modbus communication via the web interface.
Turning off temperature compensation via web interface.
Downloading logged measurement data from the device.
Introduction to Modbus TCP/IP communication.
Modbus unit ID mapping for transmitter and probes.
Procedures for cleaning the transmitter.
Steps for safely replacing connected sensor probes.
Process for updating the transmitter's firmware.
Resetting the device to its original factory configuration.
Common problems and their solutions.
Detailed technical specifications for the Indigo510 model.
Detailed technical specifications for the Indigo520 model.
List of compatible sensor probes and other devices.
List of available spare parts and accessories.
Information on proper disposal and recycling of the device.
Unit identifiers for Modbus communication.
List and description of Modbus function codes.
Objects used for device identification in Modbus.
Details on Modbus registers for data access.
Registers for accessing measurement values.
Registers for accessing device status information.
Examples of Modbus communication requests and responses.
Information regarding product warranty terms and conditions.
How to contact Vaisala for technical assistance.
| Product Type | Transmitter |
|---|---|
| IP Rating | IP65 |
| Weight | Approx. 300 g |
| Compatibility | Vaisala Indigo-compatible probes |
| Measurement Parameters | Humidity, Temperature |
| Measurement Range | Depends on the probe used |
| Humidity Measurement Range | 0 to 100 %RH |
| Temperature Measurement Range | Depending on the probes connected |
| Humidity Accuracy | Depending on the probes connected |
| Temperature Accuracy | Depending on the probes connected |
| Display | LCD with backlight |
| Outputs | Analog outputs |
| Communication Interfaces | RS-485, Modbus RTU |
| Enclosure Material | PC/ABS blend |
| Operating Temperature | -40 to +60 °C |
| Operating Humidity | 0 to 100 %RH |
| Power Supply | 10 to 30 VDC |
| Protection Class | Class 2 |