EasyManua.ls Logo

Wood-mizer LT70L DH - User Manual

Wood-mizer LT70L DH
159 pages
Print Icon
To Next Page IconTo Next Page
Loading...

Table of Contents

Other manuals for Wood-mizer LT70L DH

Questions and Answers

  • K
    Kristen SimpsonAug 18, 2025
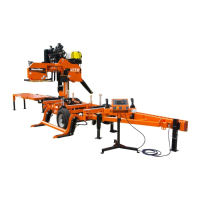
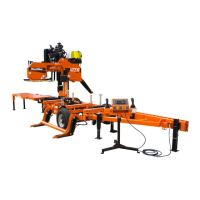
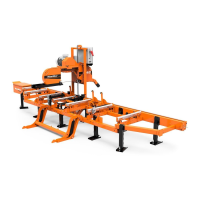
    What to do if Wood-mizer LT70L DH Saw drive belts wear prematurely or jump out of alignment?
    • J
      James DunnAug 18, 2025
      If the Wood-mizer Saw drive belts wear prematurely or jump out of alignment, it may be due to the engine/motor and drive pulleys. Align the pulleys.
  • H
    Holly BarreraAug 21, 2025
    How to fix a Wood-mizer Saw blade that does not track right on the drive wheel?
    • N
      Nancy HutchinsonAug 21, 2025
      If the Wood-mizer Saw blade does not track right on the drive wheel, the cant adjustment may be incorrect. Readjust it.
  • A
    allentravisAug 23, 2025
    Why do Wood-mizer LT70L DH Saw blades dull quickly?
    • M
      Monica BerryAug 23, 2025
      Wood-mizer Saw blades may dull quickly due to several reasons. It could be caused by dirty logs, so cleaning or debarking logs, especially on the entry side of the cut, is recommended. Another reason might be related to grinding teeth, where excessive heating softens the teeth; in this case, grind just enough metal to restore sharpness and use water/coolant while sharpening. Finally, poor sharpening techniques can also contribute, so ensure the tip is being sharpened completely.
  • C
    crawfordgilbertAug 26, 2025
    Why do Wood-mizer LT70L DH blades break prematurely?
    • G
      guzmanmadelineAug 26, 2025
      Wood-mizer Saw blades may break prematurely due to poor sharpening techniques or if the tension is too tight. In the second case, tension the blade to recommended specifications.
  • J
    Joseph ScottAug 28, 2025
    What causes wavy cuts in Wood-Mizer Farm Equipment and how to fix it?
    • A
      Amber CarterAug 28, 2025
      Wavy cuts in Wood-Mizer Farm Equipment can often be resolved by addressing the blade. Ensure the blade is properly sharpened, referring to the Sharpener Manual for detailed instructions. Other causes include excessive feed, so reduce the feed rate. Also, check and adjust the blade guides, use water lube to prevent sap buildup, and address any tooth set problems by resharpening and resetting the blade.
  • X
    xmonroeAug 31, 2025
    Why lumber is not square when using Wood-Mizer Farm Equipment?
    • M
      melissamckinneyAug 31, 2025
      Lumber that isn't square when using Wood-Mizer Farm Equipment can result from several factors. First, adjust the side supports so they are square to the bed. Next, make sure the blade is parallel to the bed rails. Also, remove any sawdust or bark between the cant and bed rails. Finally, address any tooth set problems by resharpening and resetting the blade.
  • D
    Dr. Gina SmithSep 2, 2025
    What to do if height adjustment jumps or stutters when moving up or down on Wood-Mizer Farm Equipment?
    • S
      Shannon CrawfordSep 2, 2025
      If the height adjustment jumps or stutters on your Wood-Mizer Farm Equipment, try these solutions: First, resharpen and reset the blade. Second, realign the sawmill bed rails. Third, adjust the up/down chain. Finally, replace the up/down belt if it's loose.
  • D
    dbensonSep 4, 2025
    Why are boards thick or thin on ends or middle of board when using Wood-Mizer Farm Equipment?
    • P
      pdavidsonSep 4, 2025
      If boards are thicker or thinner on the ends or middle when using Wood-Mizer Farm Equipment, it could be due to stress in the log causing it to not lay flat on the bed. After squaring the log, take equal cuts off opposing sides, alternating between the top and bottom after rotating the log 180 degrees, keeping the heart in the middle. Also, use front and rear log clamps.
  • J
    Jessica MooreSep 7, 2025
    How to prevent sawdust build up on track of Wood-Mizer Farm Equipment?
    • M
      Michael StephensSep 7, 2025
      If sawdust builds up on the track of your Wood-Mizer Farm Equipment, first, ensure you are not excessively oiling the track; avoid oiling it altogether. Second, adjust the track wipers so they firmly contact the track. Lastly, if the track is sticky, clean it with solvent and apply silicone spray.
  • C
    Christina GibsonSep 9, 2025
    Why do blades break prematurely on Wood-Mizer Farm Equipment?
    • C
      cooperkevinSep 10, 2025
      If the blades on your Wood-Mizer Farm Equipment are breaking prematurely, refer to the Sharpener Manual for proper sharpening techniques. Also, ensure that the blade tension is set to the recommended specifications.

Summary

SECTION 1 SAFETY

1.1 Safety Symbols

Explains warning symbols and signal words used in the manual.

1.2 Safety Instructions

Provides essential safety instructions for operating the sawmill.

1.3 Belt Sizes

Details belt types, sizes, and part numbers for the sawmill.

1.4 Blade Sizes

Describes blade width and length specifications for the LT70 sawmill.

SECTION 2 SERVICING THE SAWMILL

2.1 Customer and Sawmill Identification

Instructions for identifying the sawmill model, VIN, and customer number for service.

SECTION 3 SAWMILL SETUP

3.1 Sawmill Setup

Outlines the conditions and steps for setting up the sawmill on firm, level ground.

3.2 Stationary Sawmill Setup

Details the preparation and anchoring procedures for a stationary sawmill setup.

3.2.2 Sawmills with Cable Guide

Instructions for setting up sawmills that utilize a cable guide system.

3.3 Portable Sawmill Setup

Guides on setting up the sawmill on uneven ground and securing it for transport.

3.4 Middle Track Cover

Instructions for cleaning and installing the middle track cover on the sawmill.

3.5 Replacing The Blade

Step-by-step guide for safely removing and installing a new sawmill blade.

3.6 Tensioning The Blade

Explains how to properly tension the sawmill blade using the air tension system.

3.7 Tracking The Blade

Procedures for adjusting the blade to ensure it tracks correctly on the blade wheels.

3.8 Starting The Engine (or Motor)

Safety precautions and steps for starting the sawmill's engine or motor.

SECTION 4 SAWMILL OPERATION

4.1 Hydraulic Control Operation

Explains the operation of hydraulic control levers for log handling and positioning.

4.2 Loading, Turning And Clamping Logs

Detailed steps for loading, turning, and securely clamping logs onto the sawmill bed.

4.3 Up;Down Operation

Instructions for operating the up/down system to adjust the saw head cutting height.

4.4 Blade Guide Arm Operation

Guides on adjusting the blade guide arm for optimal cutting performance.

4.5 Power Feed Operation

Explains how to use the power feed system to move the carriage forward and backward.

4.6 Cutting The Log

Step-by-step guide for performing normal operations when cutting a log.

4.7 Edging

Instructions on how to edge boards to achieve desired dimensions and finish.

4.8 Optional Cutting Procedure

Discusses optional procedures for continuous cutting to maximize production rates.

4.9 Blade Height Scale

Explains how to use the blade height scale for accurate cutting depth adjustments.

4.10 Water Lube Operation

Details the function and operation of the water lube system for blade cleaning.

4.11 LT70 WIDE Lube System Operation

Specific instructions for the lube system on the LT70 WIDE model.

4.12 Preparing The Sawmill For Towing

Steps to prepare the sawmill for safe and secure transportation.

SECTION 5 MAINTENANCE

5.1 Wear Life

Lists estimated life expectancy for common replacement parts of the sawmill.

5.2 Blade Guides

Maintenance procedures for checking and adjusting the sawmill's blade guides.

5.3 Sawdust Removal

Guidelines for removing sawdust from various parts of the sawmill.

5.4 Carriage Track, Wiper & Scrapers

Maintenance steps for the carriage track, wipers, and scrapers to prevent corrosion.

5.5 Vertical Mast Rails

Procedures for cleaning and lubricating the vertical mast rails.

5.6 Drum Switches

Instructions for lubricating the drum switch contacts within the control panel.

5.7 Miscellaneous

Routine maintenance tasks including chain lubrication and alignment checks.

5.8 Brake Adjustment

Details how to adjust the sawmill's brake system for proper operation.

5.9 Drive Belt Adjustment

Guides on adjusting the drive belt tension for optimal performance.

5.10 Up;Down System

Maintenance procedures for the up/down system, including belt and chain tension.

5.11 Charging The Battery (DC Only)

Safety precautions and steps for charging the sawmill's battery.

5.12 Hydraulic System

Information on checking hydraulic fluid levels and fluid types based on temperature.

5.13 Power Feed

Procedures for adjusting the power feed chain tension and inspecting motor brushes.

SECTION 6 TROUBLESHOOTING GUIDE

6.1 Sawing Problems

Lists common sawing problems and their causes and solutions.

6.2 Electrical Problems

Addresses common electrical issues, their causes, and troubleshooting steps.

6.3 Power Feed Problems

Details issues related to the power feed system and their resolutions.

6.4 Power Feed Circuit Troubleshooting

Explains how to use LED lights on the control module for troubleshooting feed problems.

6.5 Hydraulic Problems

Covers common hydraulic system issues, their causes, and recommended solutions.

6.6 Engine;Motor and Drive Pulleys Alignment

Provides steps for aligning engine/motor and drive pulleys for optimal performance.

6.7 Power Feed Variable Feed Rate Switch Test

Describes a test to identify if the variable speed switch needs replacement.

6.8 Power Feed Preliminary Test

A test to determine if a power feed problem is mechanical or electrical.

6.9 Power Feed Mechanical Test

Procedures to test the mechanical aspects of the power feed system.

6.10 Fuse Terminal Extension Stud

Details the use of a fuse terminal extension stud for raising the saw head.

6.11 Circuit Breaker Operation

Explains the operation and reset procedure for manual reset circuit breakers.

SECTION 7 SAWMILL ALIGNMENT

7.1 Routine Alignment Procedure

Instructions for routine alignment to solve minor sawing issues, not related to blade performance.

Saw Head Tilt

Describes how to adjust the saw head tilt to compensate for log drop.

Blade Guide Arm Alignment

Procedures for adjusting the blade guide arm for proper alignment and to prevent vibration.

Blade Guides Check

Checking and measuring blade guide roller flange distance from the blade.

Blade Guide Horizontal Tilt Adjustment

Adjusting the horizontal tilt of the blade guide to prevent blade contact with the flange.

Blade Guide Vertical Tilt Adjustment

Adjusting the vertical tilt of the blade guide rollers for proper alignment.

Blade Guide Flange Spacing

Adjusting the roller flange distance from the blade for accurate cutting.

Blade Guide Level Check

Ensuring the blade guide assembly is parallel to the blade using an alignment bar.

Horizontal Alignment of Side Supports

Adjusting side supports to ensure they are square to the bed for lumber accuracy.

Clamp Stop;Stop Bolt Adjustment

Adjusting clamp stop bolts to ensure they touch the string for proper alignment.

Vertical Side Support Alignment

Ensuring side supports are vertical and at a 90° angle to the bed rails.

7.4 Complete Alignment Procedure

Comprehensive alignment procedures for the sawmill, including frame setup.

Blade Installation (Complete)

Procedures for installing new blade wheel belts and blades for complete alignment.

Blade Wheel Alignment (Complete)

Adjusting blade wheels for vertical and horizontal alignment to ensure proper tracking.

Bed Rail Adjustment (Complete)

Adjusting bed rails to ensure they are parallel and at the correct height relative to the blade.

Blade Guide Installation (Complete)

Installing blade guide assemblies and ensuring proper roller flange spacing.

Blade Guide Deflection (Complete)

Steps to achieve proper blade deflection with the blade guides.

Blade Disk Adjustment (Complete)

Adjusting the blade guide disks to the correct distance from the blade.

Side Supports Horizontal Alignment (Complete)

Adjusting side supports to ensure they are square to the bed for lumber accuracy.

Vertical Side Support Alignment (Complete)

Ensuring side supports are vertical and at a 90° angle to the bed rails.

Clamp Stop;Stop Bolt Adjustment (Complete)

Adjusting clamp stop bolts to ensure they touch the string for proper alignment.

Blade Height Scale Adjustment (Complete)

Adjusting the blade height indicator on the scale to match the actual blade-to-bed distance.

SECTION 8 SPECIFICATIONS

8.1 Log Capacity

Details the maximum dimensions of logs that can be cut on LT70 Series sawmills.

8.2 Overall Dimensions

Provides the overall dimensions for the LT70L Series sawmills.

8.3 Engine;Motor Specifications

Lists available engine/motor options, their specifications, and associated part numbers.

8.4 Chains

Lists the load capacity of the sawmill's chains according to ISO standards.

8.5 Lube System Specifications

Details the recommended oil types and specifications for the blade lubricating system.

8.6 Hydraulic System

Provides specifications for the sawmill's hydraulic system, including pump and pressure ratings.

8.7 Belt Sizes

Lists the belt sizes and corresponding Wood-Mizer part numbers for the LT70 Series.

8.8 Hydraulic Blade Tensioner Schematic

A schematic diagram illustrating the hydraulic blade tensioner components.

8.9 Hydraulic Blade Tensioner ComponentsSawdust Extractor Specifications

Lists components of the hydraulic blade tensioner and specifications for the dust extractor.

SECTION 9 HYDRAULIC INFORMATION

9.1 LT 40;70 L DH Hydraulic Schematic

A schematic diagram showing the hydraulic system layout for the LT 40/70L DH model.

9.2 LT 40;70 L DH Hydraulic Hoses

A table detailing hydraulic hose IDs, colors, lengths, applications, and part numbers.

Wood-mizer LT70L DH Specifications

General IconGeneral
BrandWood-mizer
ModelLT70L DH
CategorySaw
LanguageEnglish

Related product manuals