Section 1 - Tutorial
Setting Levels
After
you've
selected
the
proper
Config Preset for
your
setup,
the
next
thing
you'll
need
to
do
is
set
your
input
and
output
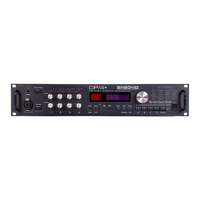
levels. These levels affect the volume
of
audio
signal
going
into
and
corning
out
of
the
DP
/ 4,
and
are controlled
by
the two rows
of
four
knobs
on
the left
hand
side
of
the
front
panel. The
top
row
controls the
input
levels for Inputs 1-4, the
bottom
row
controls the
output
levels for
Outputs
1-4.
Separate controls exist within the
DP
/ 4 for setting
the
Mix
and
Volume
of
the
individual
units (see Simple Editing later
in
this section).
To
set
the
input
level(s):
1.
With
your
connections made,
send
a signal into the DP
/4
and
slowly
tum
the
corresponding
Input
Knob(s) clockwise. The green LED above that
Input
Knob(s) will
begin
flashing as
soon
as a
signal
is detected.
2.
Continue
turning
the knob(s) clockwise until the red LED above
the
Input
Knob
begins
to
flash. This
red
LED starts to flash
when
the peak level is reached, indicating
that
clipping
is
about
to begin.
3.
Tum
the
Input
Knob back
down
(counterclockwise) just
enough
so
that
the
red
LED
no
longer
flashes. You
have
now
attained the
optimum
input
signal level.
4.
Repeat
this process for any additional inputs you have connected.
To
set
the
output
level(s):
1.
With
your
connections
made
and
the
input
level properly set,
send
a signal
into
the
DP
/ 4
and
slowly
tum
the
corresponding
Output
Knob(s) clockwise.
If
you
are
using
a
stereo
output,
use
both
outputs
1
and
2.
You
should
begin to
hear
signal corning
through
the
DP
/ 4
into
your
amplifier, mixer, etc.
2.
Continue
turning
the knob clockwise as far as you can until
you
begin
to
hear
distortion
in
the
receiver. To optimize signal-to-noise ratio,
it
is best to
set
the
output
levels
of
the
DP
/ 4 as
high
as
possible
without
distortion,
turning
down
the receiving
channel
if necessary.
3.
Tum
the
Output
Knob back
down
(counterclockwise) just
enough
so
that
distortion
is
no
longer
present.
4.
Repeat
this process for any additional
outputs
you
have connected.
Selecting Presets
After a 1 Source Config
has
been selected, the DP / 4 automatically takes
you
to
Unit
A,
and
all
four
unit
LEDs (yellow) will be lit.
At
this
point
you
can select different 4
Unit
Presets.
A 4
Unit
Preset
is a collection of 4 algorithms
and
their associated
parameters
which
are
placed
in
the
four
units
(A, B, C
and
D)
in a particular order. Think of a 4
Unit
Preset as a
way
to
load
new
effects
that
are
designed
to work well together into each of the 4 effects processors
in
the
DP
/ 4.
To
do
this, after
having
selected a 1 Source Config Preset as described above:
1.
Tum
the
Data
Entry
Knob
to view the different 4 Unit presets (there are 50 RAM
and
50
ROM
locations). The bottom line of the display shows abbreviations for
the
algorithms
included
in
that
4 Unit preset
and
how
they are routed to
each
other. Again, notice
that
the
LED above the
Select
button
begins to flash as soon as
you
begin
turning
the
Data
Entry
Knob,
indicating
that
the 4 Unit Preset
you
see displayed is
not
yet
selected,
and
you
must
press
the
Select
button
to activate it.
2.
Press
the
Select
button
to activate the
new
4 Unit Preset.
3.
Repeat
the
above
process, continuing to select various 4
Unit
Presets, to get a
sampling
of the
variety
of high-quality digital effects
tha~
the DP / 4 has to offer.
ENSONIQ DP/4 Musician's
Ma,Pual
5

 Loading...