Chapter 8
8.5. Test Procedure
!
Do not add sample while the cartridge is warming up. Wait until a
prompt appears on the screen instructing you to add the sample.
By default, a message
Add sample and wait
flashes on the screen
and a single beeping sound can be heard which signals that the
diluted plasma sample can now be added to the cartridge.
Step 10:
Ensure that no diluent is caught at the top of the diluent tube by tapping the
tube on a hard surface. Using the supplied pipette tip, puncture the foil on the
diluent tube. Extract
100 µL
platelet poor plasma from the collection tube using
the
100 µL
fixed volume pipette and supplied pipette tip. Dilute the platelet
poor plasma by aspirating into the supplied diluent tube and ensure proper
mixing by aspirating a minimum of 5 times.
!
Make sure that no diluent is caught in the lid of the diluent tube.
Step 11:
When the message
Add 100 µL sample and wait
appears on the screen,
use a
100 µL
fixed-volume pipette and the supplied pipette tip to add
100 µL
diluted plasma to the cartridge’s sample well.
i
Be sure to fill the sample well with
100 µL
diluted platelet poor plasma.
The measurement starts automatically as soon as the sample is
detected. The test progress is shown on the screen. Measurement
takes approximately 10 minutes.
If the Analyzer alerts you that an insufficient amount of sample was
placed into the sample well, repeat the measurement with a new
cartridge. Touch Cancel to terminate the ongoing test.
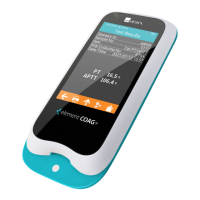
Step 12:
The test result is displayed on the screen when
the test is finished.
If a printer is connected to the instrument, touch
Print to print the test result.
Touch Done to return to the Home screen.
Step 13: Remove the used test cartridge and dispose of it properly.
65