iPECS-MG
Hardware Description and Installation Manual Issue 1.1
33
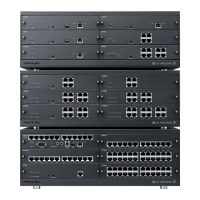
After all the boards are installed and wiring complete and before programming the System,
Switch 1-1 should be OFF and the system power turned ON to initialize the default System
database. Once the database has been initialized, Switch 1-1 should be placed in the ON
position to maintain the database and features programmed during Admin. Also, Switch 1-2
should be placed in the ON position, which connects the Lithium battery to protect the System
database and real-time clock from a power loss.
NOTE
The battery has a 10+ year life and should not require replacement during the life of the
System. If needed, replace the battery with the same or equivalent type recommended
by the manufacturer. The System will not function normally if the battery is incorrectly
replaced. Be sure to dispose of used batteries according to manufacturer instructions
and/or local government regulations.
Table 5.2.1-2 LED Indications
LED DESCRIPTION
LD1 (Blue), TMR Timer, Periodic Toggle — ON, 100msec; OFF, 100msec.
LD2 (Blue), CALL Call Task Status — ON, Call task activated; OFF, Call Task idle
LD3 (Blue), SYNC External ISDN board (PRI or BRI) Clock synchronization
ON: PLL circuit activation by External Clock from ISDN Board, iPECS-MG will be operated
based on external ISDN clock (refer to “NOTE”).
OFF: PLL activation by Internal Clock, iPECS-MG will be operated based on internal clock.
LD4 (Blue), PWR System DC Power ON Indication – ON, Power ON; OFF, Power OFF
NOTE
When several PRIB/BRIBs are installed, the default clock priority will be as follows
unless modified by the Admin (PGM301):
Boards – PRIB > BRIB2 or BRIB4 > Internal Clock
KSUs – 1’st KSU > 2’nd KSU > 3’rd KSU
Slot – Slot 1 > Slot 2 >…> Slot 18
Table 5.2.1-3 LAN Connector LED Indication
LED DESCRIPTION
1 (Green) Link Status LED – ON: Link OK, OFF: No Link
2 (Orange) Speed Status LED – ON: 100Mbps, OFF: 10Mbps