Fixed Gyro Gain does not use the Stick Override Gain
feature. Whichever of the 3 gains you select to remain in
effect moving the control stick does not affect the gain.
1. To access the GYRO System, highlight and select
GYRO SYS. in the FUNC.LIST.
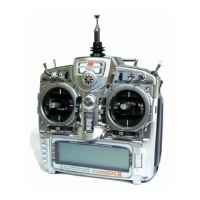
AUX2 gain settings appear in the top half of the display
while the AUX3 settings appear in the lower half of
the display. They will appear only if AUX2 and/or
AUX3 have been set to GYRO on the OUT line of the
Devic.SEL function.
2. Decide which switch will control gyro gain. The Flap
switch and the AUX2 switch are the only 3-position
switches the Gyro System can use. You can use one
switch to select the gain for both gyros, or each gyro
can use a different switch to select the gain. Typically,
one switch is used to control the gain, even when 2
gyros are used.
Highlight and select AX2 SW or FLP SW next to AUX2
and AUX3 until the desired switch is displayed next to
each. The example below shows the AUX2 switch
selected for both gyros.
3. Each gyro has 3 possible gain settings. They are
labeled 0, 1, and 2 next to CEN on the display,
with a percentage next to each (CEN stands for gyro
gain when the control stick is at center – no stick
deflection). They correspond to the positions of a
3-position switch where 0 represents the switch being
in the upper position; 1 represents the middle position;
and 2 represents the lower position. We recommend
that the 0 position (upper switch position) for each
gyro be set to zero (0%) which allows the gyro to
be turned off in flight (very useful if a gyro suddenly
becomes overly sensitive).
4. Use the Selector to highlight and select the number 0
position for each gyro and set the percentage to 0% if
not already at a 0% value.
5. Select the number 1 gain for each gyro and set it to
some moderate value. The example shows 50% gain
set for both gyros.
6. Select the number 2 gain for each gyro and set it to a
relatively high value. The example shows 85% gain set
for both gyros.
7. If Flight Modes have not been activated, skip to the
next step.
If Flight Modes have been activated in the Devic. SEL
function, a list of Flight Modes (FM0, FM1, FM2)
displays to the right of the display for each active Gyro.
The default setting for each Flight Mode is S, indicating
that the 3-position gyro switch will control the gyro gain
when in that Flight Mode. You can change the S to 0,
1, or 2 to represent the gain values associated with the
positions of the 3-position switch. For example, if FM1
is set to 0, then when in Flight Mode 1, the gain is 0%
which corresponds to the gain of the upper position of the
3-position switch. If FM1 is set to 1, the gain is 50%, and
if FM1 is set to 2, the gain is 85% when in Flight Mode 1.
Highlight and select each FM parameter and set it to S, 0,
1, or 2 to indicate if the Gyro switch will control gyro gain
while in that Flight Mode, or to assign one of the gains
to the flight Mode. The example above shows all Flight
Modes as deferring gyro gain control to the 3-position
gyro gain switch – in this case the AUX2 switch.
8. This completes the Fixed Gyro Gain setup. In the
example, the AUX2 switch selects the gain of both
gyros at the same time. The upper position of the
switch selects 0%, essentially turning the gyros off.
The middle position selects 50% for both gyros and
the lower position selects 85% gain for both gyros.
The selected gain does not change when the sticks are
moved.
Stick Override Gyro Gain is very popular with aerobatic
pilots, as it allows the pilot to instantaneously override
the gyro by moving the stick. Gyro gain decreases as
the stick is moved further from neutral and is typically
set up so that gyro gain is reduced to zero when the
stick is at full deflection. When the stick is released and
allowed to center, gyro gain is instantaneously restored.
In other words, the pilot assumes control of the channel
by moving the stick and returns control of the channel to
the gyro by releasing the stick. This helps in performing
excellent hammerheads/stall turns, as the gyro is
overridden by the Rudder stick in performing the pivot,
but instantly dampens out any “wiggle” as soon as the
pivot is completed and the Rudder stick released.
Stick Override Gyro Gain is identical to Fixed Gyro Gain
in all regards except that the control stick(s) progressively
reduces the presently selected gyro gain as the stick(s) is
moved off of center. As mentioned before, it is typically
set up so that when the stick reaches full deflection, the
gyro gain is reduced to zero.
1. To access the Stick Override Gyro Gain feature,
highlight and select GYRO SYS. in the FUNC.LIST.
2. Perform all of the steps outlined for Fixed Gyro Gain
above.
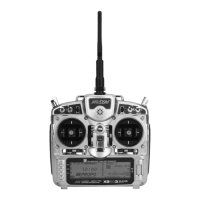
3. Scroll over to and select STICK for each gyro and
select the stick that corresponds with the control
surface being controlled by the gyro. For example,
if AUX2 is controlling the gain for the Rudder gyro,
select RUDD as the stick for AUX2. If AUX3 is
controlling the gyro for Elevator, select ELEV as the
stick for AUX3.
4. Once a stick has been selected, a new set of END
percentages appears on the display—all with a value
of 50%. These new percentages indicate the gyro gain
when the stick is moved to full deflection. If set to 0%,
the gain will be progressively reduced as the stick is
moved off center until it reaches 0% when the stick is
at full deflection.
It is recommended that all END percentages be set to
0% unless there is a specific need to do otherwise. The
default value of all END percentages is 50%. Use the
Selector to highlight and select each END percentage
and set each one to 0%.
 Loading...