Offset - (Std. Prog Mixer)
The Offset parameter defines the position of the
Master where the mixer changes directions. The Offset
automatically defaults to a channel’s center position or
0 (zero). For example, if the Rudder is the Master, the
Offset automatically defaults to the center stick position
(no rudder input). Since the Offset is at the center,
moving the rudder stick to the left of center causes a mix
in one direction while moving the rudder stick to the right
of center causes a mix in the other direction. Directions
correspond to the upper and lower percentages for Pos0
and the upper and lower percentages of Pos1. The amount
of mix and actual direction the slave moves is determined
by the Pos0/Pos1 values. The Offset applies to both Pos0
and Pos1 settings.
You can change the Offset by highlighting and selecting
Offset, then adjusting either a positive (+) or negative
(-) value. A positive percentage moves the offset in one
direction from center while a negative percentage moves
the Offset in the other direction from center.
Available Switches - (Std. Prog Mixer)
There are 3 switches you can always use to switch
between Pos0 and Pos1 settings. (If the upper and lower
settings for Pos0 or Pos1 are left at 0%, you can turn the
mixer on and off with the switch). They include the Rudder
D/R switch, Butterfly Switch, Rudder D/R switch and the
AUX4 switch. In addition, if Flight Modes are activated
in the Devic.SEL function, then 5 more switches may
be selected: Cruise, Speed, Thermal, Launch and Land,
which correspond to the 3 positions of the Flight Mode
switch.
To select a switch that will alternate between the Pos0
and Pos1 values, highlight and select the switch name
and it will toggle between Pos0 and Pos1. Set the desired
switch(es) to Pos1.
CLR Button - (Std. Prog Mixer)
Pressing the CLR button while a modifiable parameter is
selected resets the parameter to its default value.
Note: Pressing the CLR button when either the
Master or Slave is highlighted Inhibits the entire
mixer, making it no longer functional.
LIST Button - (Std. Prog Mixer)
Press the LIST button to return to the FUNCTION List, or
rotate the rotary selector until
LST appears next to LIST
and select it to return to the SYSTEM Menu.
ENT Button - (Std. Prog Mixer)
Pressing the ENT button returns to the Main Display.
TO INHIBIT A MIXER (TURN IT OFF ENTIRELY)
Highlight either the Master or Slave and press the CLR
button to completely disable a mixer.
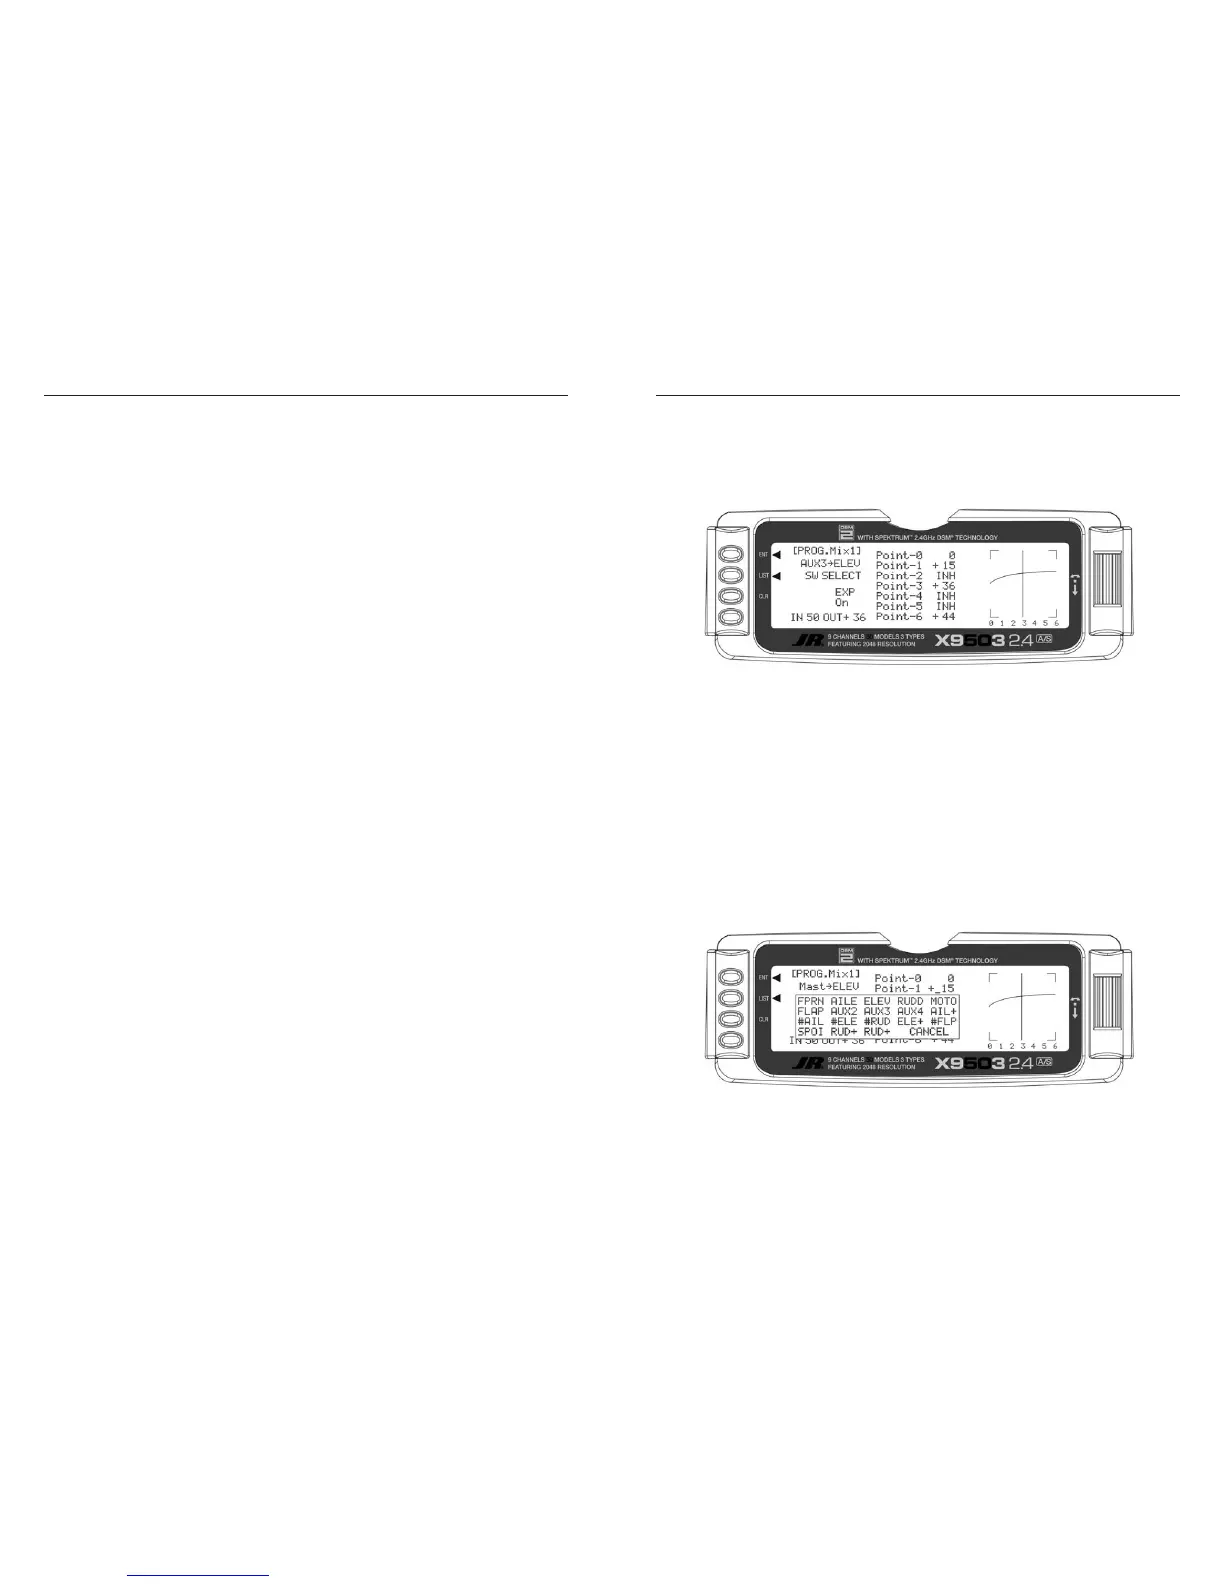
There are 2 Multi-Point Programmable Mixers in the
GLID system. They are Prog.Mix1 and Prog.Mix2. They
differ from the standard mixers in that they allow a non-
linear mix response from the Master to the Slave. This is
possible because the mixer uses 7 points to define how
the slave channel moves as the Master is moved. As the
Master comes across each point, the Slave response
can be defined in terms of deflection and direction
independent of other point settings. This results in
extreme flexibility in the movement of the Slave channel
relative to the Master channel.
Master Channel - (Multi-Point Mixer)
This is the Master channel that receives input from the
pilot. To select the Master channel, highlight and select
this parameter to obtain a list of channels. Then select the
Master channel from the list.
There are 4 channels that appear more than once. They
are Flap, Aileron, Elevator and Rudder. Since these
channels can be influenced by Dual Rate, Exponential, and
Throttle Curve settings, they appear in the list twice - once
where the D/R and EXP settings are in effect and again
where the D/R and EXP settings are ignored. The second
time they are listed, there is a special designator to
indicate that these channels can also be used as a Master
while bypassing any Dual Rate and Exponential settings
that may be associated with them. They are designated
by a “#” (pound sign) in front of the name - #FLP, #AIL,
#ELE, and #RUD. When one of these channels is selected
as the Master, all D/R, EXP and Curve settings associated
with the Master are ignored during the mixing operation.
Instead, the mixer reads only the physical position of the
stick to perform mixing.
A (+) behind the channel indicates a trim include function.
By selecting a channel with the (+), the trim lever and any
other program mixes to the master channel affects both
the master and slave channels.
 Loading...