EasyManua.ls Logo

Marantz CDR420 User Manual

Marantz CDR420
66 pages
To Next Page IconTo Next Page
Page #1 background imageLoading...
Page #1 background image
Model CDR420 User Guide
Recordable
®
CLASS 1 LASER PRODUCT
LOUKAN 1 LASERLAITE
KLASS 1 LASERAPPARAT
HD/CD Recorder

Table of Contents

Question and Answer IconNeed help?

Do you have a question about the Marantz CDR420 and is the answer not in the manual?

Marantz CDR420 Specifications

General IconGeneral
BrandMarantz
ModelCDR420
CategoryRecording Equipment
LanguageEnglish

Summary

Warnings and Cautions

Laser Safety Precautions

Safety guidelines for operating the unit safely around lasers to prevent eye injury.

Copyright Information

Important Safety Instructions

Additional Safety Information

Further safety guidelines for installation, placement, and operation of the equipment.

Installation and Connection Precautions

Guidelines for safe installation and proper connection of the unit and peripherals.

Specifications

Digital Audio System Specifications

Technical details on recording media, audio formats, bitrates, and frequency response.

Input/Output and General Specifications

Specifications for inputs, outputs, power requirements, and general operating parameters.

Introduction to CDR420

Editing on the CDR420

Package Contents

Basic Operation and Setup

Features

Immediate CD and HD Recording Features

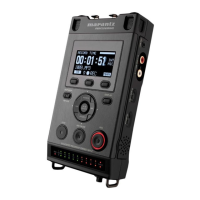
Highlights features like immediate CD burning and advantages of HD recording.

Recording, Playback, and Editing Functions

Details on core functions including recording, playback, file editing, and format conversion.

Utility Functions

Overview of various utility functions for managing the device and its settings.

Connections

Connecting Microphones and Instruments

Instructions for connecting external audio sources like microphones and instruments.

Computer and Analog Equipment Connections

Guidance on connecting to computers and other analog audio devices.

Connecting Digital Equipment

Power On Sequence

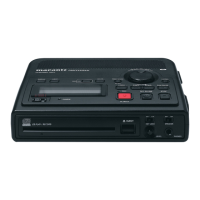
Step-by-step guide for powering up the CDR420 and its initial display sequence.

Top Panel Controls

Speaker, Microphone, and Tone Controls

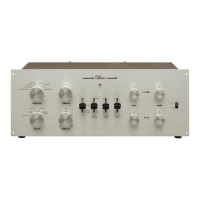
Controls for audio output level, input sensitivity, and tone shaping.

Jog Wheel and File Directory Navigation

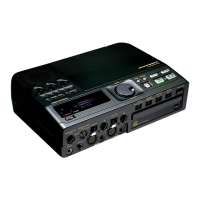
Explanation of the Jog Wheel's function for navigation and file selection.

Utility Menu Operations

Display Indicators

Display Elements and Labels

Explanation of display icons, labels, and status messages.

Level Meters and Status Lights

Description of audio level meters and status indicator lights.

Power and Standby Controls

Front Panel Controls (Detailed)

Audio Input and Level Controls

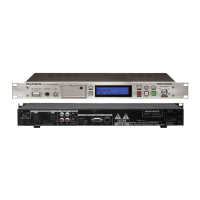
Controls for microphone, line input levels, and input selection.

Signal Processing and Output Controls

Switches for input attenuation, speaker control, eject, and output level adjustments.

CD Drive and Headphone Connections

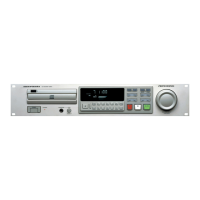
CD slot, headphone jack, and LINE OUT level control functions.

Rear Panel Controls and Connections

Audio Output Jacks

MIX OUT and LINE OUT connections for audio output.

Input and Digital Jacks

AUX IN, DIGITAL IN/OUT, and I/O (computer) connection details.

Keyboard and Power Connections

KEYB jack and DC IN power connection details.

REC LEVEL Adjustment

Setting the Recording Format

Stereo or Mono Recording

Setting Recording Channel

KBPS (Bitrate) Information

Setting Recording Bitrate

Auto Track Increment

Setting Auto Track Increment HD

Record Timer Functionality

Setting the Record Timer

Utility Menu - New CD Project

Data CD Creation

Burning files in ISO 9660 format for data compatibility.

Extra CD Creation

Burning multi-session discs with tag information for CD Text compatibility.

Audio CD Creation

Creating standard audio CDs playable on most CD players.

Adding Tracks to CD Project

Deleting Tracks from CD Project

Changing Tracks in CD Project

Burning CD Project to Disc

CD Burning Status Messages

Copying a CD

Ripping a CD

Ripping an Entire CD

Procedure to rip all tracks from a CD to the hard drive.

Ripping a Single Track

Process for ripping individual tracks from a CD to the hard drive.

Converting PCM to MP3

Date and Time Settings

Setting the Date and Time

Microphone Filters

Setting Microphone Filters

Playback Mode Options

Setting the Playback Mode

User Settings Overview

Auto Make CD Setting

Configuring whether a CD is automatically created after recording.

Auto Track Increment CD Setting

Auto Track Increment Time Setting

CD Type Selection

Audio CD Creation

Burning standard audio CDs with PCM files.

Data CD Creation

Burning data CDs with MP3 and PCM files for computer playback.

Extra CD Creation

Burning multi-session discs with tag information.

Allow Format Setting

Copy Before Edit Setting

Lock Editing Setting

Lock Record Settings

Pre-Roll Track Setting

Require Confirmation Setting

Reset Defaults Setting

Formatting the Hard Drive

Editing Audio Tracks

Navigating Within a Track

Methods for playing, scrubbing, jumping, and fine-tuning position within an audio track.

Marking Audio Segments

How to set IN and OUT points for audio segments using quick marking.

Precise Editing Navigation

Using play, jump, scrub, and jog wheel for precise navigation to edit points.

Inserting Silence into Tracks

Adding silence segments at specific points within an audio track.

Cut, Copy, Insert, Delete Operations

Exiting Edit Mode and Committing Edits

Editing Track Tags

Naming Tracks During Recording

Entering track names using the keyboard or Jog Wheel while recording.

Deleting a Track

Deleting All Tracks

Copying a Track

Splitting a Track

Converting PCM to MP3

Firmware Update Procedure

Keyboard Operation

About Compact Discs

Compact Disc Care

Guidelines for handling and storing discs to prevent damage.

Disc Cleaning Procedures

Methods for cleaning disc surfaces to ensure proper playback.

Optional Battery Supply

Power On Failure Troubleshooting

Limited Warranty Information

Related product manuals