21
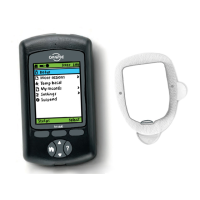
Initial PDM Setup 22 Initial PDM Setup
Extended bolus setting
Extending a bolus means that a meal bolus can be delivered over a prolonged
period of time. For an explanation of extended boluses, see page 143.
1. Select a conguration for your extended bolus:
% To specify the amount of the immediate portion of the bolus as a
percent of the total bolus.
Units To specify how many units of insulin should be delivered
immediately.
O To turn o the ability to extend a bolus.
2. Press Next.
Pod settings
e next step is to choose how much advance notice you would like about the Pod
running low on insulin or an upcoming Pod expiration.
1. Use the Up/Down button to select the insulin level at which you would like to
receive a 'low reservoir' message. is volume can range from 10 to 50 units.
Press Next.
2. Use the Up/Down button to specify how much advance warning you want
about an upcoming Pod expiration. is setting can be from 1 to 24 hours.
Press Next.
Activate Your First Pod
Congratulations! Your PDM is now ready for use. To activate a Pod now, press
Yes and skip ahead to "Fill the Syringe with Insulin" on page 26 for step-by-step
instructions for lling and activating your rst Pod. If necessary, review Chapter 1
for an introduction to the PDM's screens and screen navigation shorthand.
Tip: To adjust the PDM screen time-out and backlight time-out, see page 63.