3-2
ET 200U Distributed I/O Station
EWA 4NEB 812 6087–02b
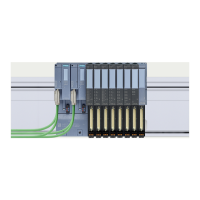
3.1 Mechanical Configuration of the ET 200U Distributed I/O Station
When installing an ET 200U distributed I/O station, snap the power supply
module, the ET 200U interface module, and the bus units into place on a
standard mounting rail according to DIN EN 50022. Plug the I/O modules
into the bus units.
Mount the rails on a metal plate that is at least 2 mm (0.08 in.) thick to en-
sure a good reference potential for the ground connection and the current
leads.
There are different installation heights depending on whether you use bus
units with screw–type or crimp snap–in terminals.
Table 3-1 lists prerequisites for installing, dismantling, and replacing the
hardware of an ET 200U station.
Table 3-1 Installing, Dismantling and Replacing the Hardware of an ET 200 Sta-
tion
Installing, Dismantling
and Replacing:
Prerequisites
I/O Modules
Put the RUN/STOP switch of the ET 200U
interface module in the STOP position.
Turn off the load power supply of the I/O
module.
Bus Units, Interface Mo-
dules, Power Supply Mo-
dules
Disconnect the power supply for the
ET 200U station.
Please note the following if you wish to pull or plug–in I/O modules under
load voltage:
Note
Pulling and plugging–in I/O modules under load voltage is permissible under
defined conditions:
The ET 200U interface module must be in the STOP position.
All bus units in a slave station must be version w 4.
Only digital or analog modules may be pulled and plugged–in under load
voltage.
Installation,
Dismantling
Mechanical and Electrical Configuration
 Loading...