Do you have a question about the Sony DPP--SV77 and is the answer not in the manual?
Read manual for printer operation and future reference.
French instructions to read manual for printer operation.
Spanish instructions to read manual for printer operation.
Covers fire/shock hazards, moisture exposure, and servicing by qualified personnel.
Notes potential distortion from proximity to equipment emitting radiation.
Space to record serial number and contact details for questions.
States compliance with FCC rules for digital devices.
Warns against unauthorized modifications and specifies use of shielded cables.
States copyright and disclaims liability for manual/software use damages.
Acceptance of terms upon opening CD-ROM package.
Instructions for customer service and notes on personal use of design data.
Details photo-realistic printing, Super Coat 2, stylus operation, and auto fine print.
Explains using the stylus for touch-sensitive LCD screen operations.
Details automatic image adjustment for clarity.
Options for Post Card and Small size prints with or without borders.
Printing images directly from inserted Memory Stick or PC card.
Choosing between glossy or texture print finish.
Details printing up to 25 Post Card or 30 Small size sheets.
Describes image processing like zoom, rotate, flip, sepia, monochrome, and drawing tools.
Highlights making calendars, cards, split images, and stickers.
Explains installing drivers for PC printing and using reader software.
How to view printer feature demonstrations.
Lists all supplied accessories like power cord, stylus, cables, and software CD-ROM.
Details printer driver and reader software for Windows and Mac.
Specifies AC power cord voltage and regional plug variations.
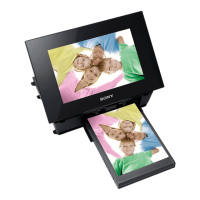
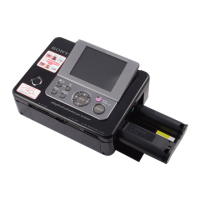
Details operation panel, power button, and media slots.
Identifies USB, VIDEO OUT, and AC IN connectors.
Explains buttons like PICTURE, INPUT SELECT, MENU, EFFECT, CREATIVE PRINT, ENTER, ALL, DPOF.
Describes the LCD display and the function of the stylus.
Explains indicators for Memory Stick/PC card, paper, and cartridge errors.
Details the paper tray lid and partition for paper size selection.
Explains print quantity, image numbers, media indicators, cursor, selection, scroll bar, and print preset indications.
Describes print cartridge, guidance, and protect indications.
Notes on potential bright spots or color shifts on the LCD.
Instructions for opening and rotating the operation panel for optimal viewing.
Recommendations for closing the panel, storing the stylus, and cleaning the screen.
Explains 'tapping' the touchscreen with the stylus to execute functions or select items.
Instructs to keep stylus in slot and use only the supplied stylus.
Selects items immediately by tapping directly on the screen.
Uses arrow buttons to move a cursor and ENTER to select.
Mentions potential restrictions on arrow or direct tapping methods.
Warns against forcing media and removing it during access.
Procedure for inserting a Memory Stick into its slot.
Instructions for safely removing a Memory Stick.
Procedure for inserting a PC card into its slot.
Instructions for safely removing a PC card.
Connects printer's VIDEO OUT to TV input for wider screen display.
Details setting video output to 'On' and cable length recommendations.
Recommends turning off power before connecting and notes TV screen operability.
Procedure for connecting the printer to a wall outlet.
Details USB connection for printing from PC and using reader software.
Explains PC mode activation and indicator lights when connected to a computer.
Advises on USB cable length and limitations with hubs or multiple devices.
Instructions for attaching a clamp filter to the USB cable.
Describes packs containing paper and print cartridges for Post Card and Small sizes.
Lists pack models and their contents for different print types.
Important advice on using correct cartridges, avoiding re-winding, and handling paper/cartridges.
Turn on the printer; POWER indicator lights green.
Pull and open the lid to access the cartridge compartment.
Firmly insert the print cartridge and close the compartment lid.
Procedure for replacing cartridge when it runs out, including using the eject lever.
Warns against touching thermal head, re-winding ink, and dust.
Advice on storing cartridges to maintain quality.
Instructions for opening the tray lid and setting the partition for paper size.
Procedure for inserting paper with printing surface up and noting protective sheet removal.
Caution against touching the printing surface.
Procedure for closing the lid and inserting the paper tray.
Handles paper feed issues, jam checks, writing on paper, and sticker paper notes.
Advice on storing print paper to maintain quality.
How to select and print individual images at full size.
Instructions for connecting the printer to a television for image display.
Tap INPUT SELECT to activate Memory Stick or PC Card indicator.
Thumbnails of stored images appear on screen after selecting input.
Tap image or use arrow keys to move cursor for selection.
How to switch between pages of images using scroll bar or arrows.
Tap image again or PICTURE to view a single image preview.
Tap preview image or PICTURE to return to thumbnails.
Note about not ejecting media during screen switching or access.
Tap ENTER or PRINT QUANTITY to select image and set copies.
Use [+] or [-] buttons to set print quantity from 0 to 30.
Tap [-] repeatedly until quantity is 0 to cancel selection.
Repeat steps to select other images and set quantities.
Press PRINT button to start printing; PRINT indicator lights.
Dialog box appears asking to print displayed or selected images.
Tap Cancel or ENTER to stop current and future prints.
Remove printed paper from outlet when printing finishes.
Covers media access, printer handling, paper ejection, sticker limits, and image display.
Print all images or DPOF preset images at once.
Explains DPOF as a format for automatic printing.
Instructions for connecting the printer to a television for image display.
Tap INPUT SELECT to activate Memory Stick or PC Card indicator.
Thumbnails of stored images appear on screen after selecting input.
Press ALL to print all images, DPOF to print preset images.
Press PRINT button to start printing.
Tap Cancel or ENTER to stop current and future prints.
Remove printed paper from outlet when printing finishes.
Press ALL or DPOF button again to return to usual mode.
Allows editing, adjusting, or adding special filters to images.
Details Edit, Adjustment, Filter, and Tool functions with page references.
Procedure for saving images with selected effects, including destination selection.
Notes on write protection, saving images, and not removing media during Effect mode.
Procedure to print images with added drawings, stamps, or characters.
Option to tap MENU to change settings during editing.
Allows enlarging, reducing, rotating, or flipping images.
Details procedures for Zoom, Move, Rotate 90°, and Mirror functions.
Tap Back to return to the main Effect menu for further options.
Allows adjusting brightness, color depth, tint, and sharpness of images.
Lists Brightness, Color Depth, Tint, and Sharpness options.
Tap Back to return to the main Effect menu.
Tap slider parts or arrows to adjust Brightness, Color Depth, Tint, and Sharpness.
Notes that display reflects adjustments after tapping Back.
Applies filters for monochrome, paint, or sepia tone.
Lists Paint, Sepia, Monochrome, and Normal filter options.
Tap Back to return to the main Effect menu.
Explains effects of Paint, Sepia, Monochrome, and Normal filters.
Tap Back to return to the main Effect menu.
Allows adding freehand drawings, stamps, or characters to images.
Details Pencil, Color, Weight, Stamp, Type, and Size tools.
Explains Redraw, Done, and how tapping again exits the Tool sub menu.
Procedure for exiting the Tool menu, saving edits, or canceling.
Procedure to print images with added drawings, stamps, or characters.
Notes on print cartridge changes, media removal, and write protection.
Selects the pencil tool to draw freehand line art on the image.
Choose line thickness and color for drawings.
Procedure for drawing lines and using Redraw to erase.
Mentions potential restrictions on line length or number.
Tap ENTER to fix the drawing to the image; it cannot be deleted afterward.
Repeat steps to draw additional line art.
Tap Pencil tool button to release mode; then use other tools or exit.
Selects the stamp tool to paste stamps onto images.
Choose a stamp, tap image area to place it; it appears as a black silhouette.
Use [+] or [-] to make stamps larger or smaller.
Use Redraw to erase; use arrows to move the stamp.
Tap ENTER to fix the stamp; it cannot be moved or deleted afterward.
Repeat steps 3-6 to paste same or different stamps.
Tap Stamp tool button to release mode; then use other tools or exit.
Selects the type tool to input characters onto images.
Shows character input box, color/font selection, and keyboard layout.
Toggle between Symbolic and Alphanumeric input screens.
Use Caps for capitals and Font options to change typeface.
Tap Font Color to select desired color for input characters.
Use Delete key or specific method for deleting characters before/within the input line.
Tap on preview area to paste the line of input characters.
Use [+] or [-] to make characters larger or smaller.
Use Redraw to erase; use arrows to move characters.
Tap ENTER to fix characters; they cannot be moved or deleted afterward.
Tap Type tool button to release mode; then use other tools or exit.
Enables making cards, calendars, split images, stickers, and index prints.
Lists Card, Calendar, Split Images, Sticker, Index Print, and Exit options with descriptions.
Mentions using the Tool menu for drawings/stamps/characters on most Creative Prints.
Tap PICTURE to display preview; tap again to return to previous screen.
Set copies and press PRINT to print the created image.
Tap Exit or CREATIVE PRINT to leave menu; save if prompted.
Tap Save to save the image; prompts for Yes/No and destination.
Notes on write protection and not removing media during saving.
Add greeting and message to images for original cards.
Choose Postcard Size or Small Size for card prints.
Choose a template from available designs for the selected paper size.
Preview template; tap areas to enter greeting, images, or characters.
Select a greeting from a list and choose its color.
Tap character input area to enter own characters; see page 42 for details.
Insert media, tap image area, select image from thumbnail list.
Modify image size, position, angle, and brightness.
Tap Done to see final preview; repeat for multiple image areas.
Perform procedures from page 45 after checking preview.
Add calendar to images for original calendars.
Choose Postcard Size or Small Size for calendar prints.
Choose a calendar template for the selected paper size.
Preview template; set calendar and add images to respective areas.
Set year, month, and day for the calendar start.
Choose colors for days, e.g., Sunday in red.
Create prints with 4, 9, or 16 split images.
Choose Postcard Size or Small Size for split prints.
Choose a template for arranging split images.
Preview template; tap image areas to select images.
Select and adjust images for each split image area.
Perform procedures from page 45 after checking preview.
Add frames to 9 split images for stickers; uses Small size paper only.
Choose a template for 9-split image stickers.
Preview template; select frames for image areas.
Tap image area, select frame, then select and adjust desired image.
Repeat steps to add framed images to other areas.
Use Split Images menu for borderless stickers.
Create an index print of all images on Memory Stick or PC card.
Choose Postcard Size or Small Size for index prints.
Option to add a title (On) or no title (Off) for the index print.
Choose image alignment pattern (e.g., 10x8).
If Title is On, enter title using character input screen.
Check preview and press PRINT button.
Tap CREATIVE PRINT to exit the menu.
Access settings, screen setup, slideshow, and image deletion.
Lists Set Up, Screen Setup, Slideshow, Delete Image, and Exit.
Tap Exit or MENU to return to the previous screen.
Change printing preferences like Auto Fine Print, date print, finish, and set clock/beep.
Tap MENU then Set Up to access preferences.
Green mark indicates selected setting; asterisk (*) for default.
Prints image with recorded date data; requires DCF format.
Corrects images automatically for better quality; does not work from computer.
Enables or disables warning and operation sound beeps.
Choose Border, Borderless, Glossy, or Texture finish.
Allows setting the internal clock to record image save dates.
Step-by-step guide to set day, month, year, hour, and minutes.
Items displayed in gray cannot be changed.
Enable (On) or disable (Off) video signals to TV.
Use slider to adjust LCD screen contrast level.
Access Video Output and Display Contrast settings.
Perform slideshow of images from Memory Stick or PC card.
Tap MENU, then Slideshow; select switch time (Quick/Slow) and Enter.
Tap anywhere on screen or any button to stop.
Images switch with random patterns; time may vary; not available in Creative Print/Edit.
Delete specific images from Memory Stick or PC card.
Format the Memory Stick, deleting all files.
Notes on write protection, DPOF protected images, and not deleting in Creative Print/Edit.
Display thumbnail list, select image, then confirm deletion.
Confirm deletion, then exit Menu.
Tap Format Memory Stick in step 3, then confirm formatting.
Print images from computer, view/transfer media via software.
Microsoft Windows 98/98SE/Me/2000 Professional.
CPU, RAM, Hard disk space, Port, and Drive requirements.
Limitations with USB hubs, multiple devices, or multiple printers.
Install software from CD-ROM to computer's hard disk.
Steps for installing USB driver using Add New Hardware Wizard.
Choose to search automatically or specify location.
Dialog box to specify the driver location.
Insert CD-ROM, check drive, and click Next to start installation.
Click Finish to complete installation; may prompt for OS CD-ROM.
Verify installation via Device Manager in System Properties.
Run Setup.exe from CD-ROM, select language, and proceed.
Specify installation folder, default is C:\Program Files\Sony\DPPSV77.
Select Local printer or Network printer.
Select manufacturer and model; browse for DPPSUSB.inf file.
Select language folder and WIN98 subfolder on CD-ROM.
Ensure DPPSUSB.inf is selected and confirm model name.
Select SonyDPPUSB1 port for the printer connection.
Set printer name, default is Sony DPP-SV77.
Click Finish to complete setup; printer added to Printers window.
Specific steps for installing on Windows 2000 as Administrator.
Turn on printer, connect via USB, wait for driver installation.
Insert CD-ROM, double-click Setup.exe, select language.
Specify installation folder; default is C:\Program Files\Sony\DPPSV77.
Click Next, Finish; software installed, Readme displayed.
Procedure to remove software via Add/Remove Programs.
Delete printer from Printers window.
Steps to change DPP-SV55 USB driver to DPP-SV77 driver.
Select DPP-SV55 printer, update driver, browse for DPP-SV77 driver.
Display list of drivers, select driver you want.
Browse for CD-ROM drive containing DPP-SV77 driver files.
Click Next until Finish; restart if prompted or adjust in System Properties.
Run Setup.exe from CD-ROM after driver transition.
View Memory Stick/PC card as a drive on computer.
Restrictions: edit on computer, no saving to media, no 'Open' via other apps, no execution files.
Print images from computer using application's Print command.
Select printer, paper size, and orientation.
Options for Post Card (borderless/bordered) or Small size prints.
Select Portrait/Landscape; set Graphics tab and Device Options.
Set print range (All/Pages) and number of copies.
Click Print to start; click Cancel to stop.
Click Stop or Cancel button on the printing dialog box.
Access Printers window, double-click printer icon, select document, click Stop/Cancel.
Advise against cancelling job if paper is loaded to prevent jams.
Print images from Macintosh using printer software.
Mac OS 8.5.1/8.6/9.0/9.1.
USB port, RAM, Hard disk space, CD-ROM drive.
Limitations with USB hubs, multiple devices, or multiple printers.
Insert CD-ROM, select language folder, double-click Setup Program, click Install.
Click Uninstall in step 6 to remove software.
Print images from computer using application's Print command.
Select Chooser, then Sony DPP-SV77.
Choose paper, margin, resolution, overcoat, orientation.
Options for Post Card (borderless/bordered) or Small size prints.
Select Portrait/Landscape; set print range and copies.
Specify pages to print and number of copies.
Click Print to start; click Cancel to stop.
Covers operating voltage, power cord care, liquid/object entry, disassembly, and handling.
Avoid vibration, high humidity, dust, direct sunlight, extreme temperatures, and electromagnetic fields.
Ensure adequate room around printer for ventilation to prevent overheating.
Advise turning off printer for an hour if moisture condensation occurs.
Remove consumables, use original packaging or similar material for transport.
Use soft dry or slightly damp cloth; avoid solvents.
Refer to page 11 for LCD screen cleaning instructions.
Warns against duplicating currency, securities, licenses, and copyrighted materials.
Printer supports Memory Stick and PC card (ATA type II).
Supports ordinary and MagicGate Memory Sticks; MagicGate features not fully supported.
Use write protect switch to prevent accidental erasure.
Slide switch left to enable reading, writing, and deleting data.
Slide switch right to prevent writing or deleting data.
Only 3V PC cards supported; do not insert other types.
Avoid dropping, bending, liquids, high humidity, extreme temps, dust, and magnetic fields.
Use supplied labels; store in original case for protection.
Do not remove media or turn off power during access; avoid compact flash/Smart Media issues.
Check AC power cord connection.
Insert media, check PC input indicator, use INPUT SELECT.
Set TV input to VIDEO, check Video Output setting.
Check cartridge, paper, thermal head overheating, or paper jams.
Image damaged, incompatible format, or JPEG file issues.
Damaged files, no images, or incompatible DCF format.
Use computer for files exceeding 999.
Notes on printing entire area, preview quality, and potential vertical stretching.
Some PCMCIA ATA adaptors may not be compatible.
Follow correct procedures; check error messages for indicator lights.
Turn printer off and on, wait for motor to stop.
Turn off printer, remove jammed paper from outlet or tray.
If paper cannot be removed, contact Sony dealer.
Sublimation dye transfer, 403 dpi.
256 levels per color, approx. 16.7 million colors.
Post Card and Small sizes, approx. 90s/60s per sheet.
USB, VIDEO OUT, Memory Stick, PC Card slots.
JPEG (various subsampling), BMP.
999 files.
3.2-inch STN display, 120/240V AC power.
5-35°C operating temp, dimensions provided.
Approx. 2.4 kg mass, accessories listed on page 7.