OXY5500 Operator’s Manual v
LIST OF FIGURES
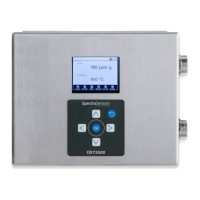
Figure 1–1. OXY5500 analyzer . . . . . . . . . . . . . . . . . . . . . . . . . . . . . . . . . . 1-5
Figure 1–2. Inside cabinet view . . . . . . . . . . . . . . . . . . . . . . . . . . . . . . . . . . 1-5
Figure 1–3. Standard fiber-optic oxygen sensors fittings. . . . . . . . . . . . . . . . . 1-6
Figure 1–4. OXY5500 probe tips . . . . . . . . . . . . . . . . . . . . . . . . . . . . . . . . . 1-7
Figure 1–5. Trace oxygen probe schematic . . . . . . . . . . . . . . . . . . . . . . . . . . 1-7
Figure 1–6. Principle of dynamic quenching of luminescence by
molecular oxygen . . . . . . . . . . . . . . . . . . . . . . . . . . . . . . . . . . . 1-8
Figure 2–1. Analyzer mounting locations . . . . . . . . . . . . . . . . . . . . . . . . . . . 2-4
Figure 2–2. AC/DC power connections . . . . . . . . . . . . . . . . . . . . . . . . . . . . . 2-7
Figure 2–3. Analyzer connections. . . . . . . . . . . . . . . . . . . . . . . . . . . . . . . . . 2-8
Figure 3–1. Main menu screen. . . . . . . . . . . . . . . . . . . . . . . . . . . . . . . . . . . 3-1
Figure 3–2. Warning: Timestamp reset. . . . . . . . . . . . . . . . . . . . . . . . . . . . . 3-2
Figure 3–3. OXY5500 Software Menu Map . . . . . . . . . . . . . . . . . . . . . . . . . . 3-3
Figure 3–4. Main Menu - Sensor selected . . . . . . . . . . . . . . . . . . . . . . . . . . . 3-3
Figure 3–5. Sensor Options. . . . . . . . . . . . . . . . . . . . . . . . . . . . . . . . . . . . . 3-4
Figure 3–6. Main menu screen - Measurement Settings selected . . . . . . . . . . . 3-5
Figure 3–7. Message window - Stop measurements during configuration . . . . . 3-5
Figure 3–8. Measurement Settings screen. . . . . . . . . . . . . . . . . . . . . . . . . . . 3-6
Figure 3–9. Main menu screen - Measurement selected . . . . . . . . . . . . . . . . . 3-7
Figure 3–10. Main menu screen - Device Settings selected . . . . . . . . . . . . . . . . 3-8
Figure 3–11. Main menu screen - Digitals selected . . . . . . . . . . . . . . . . . . . . . 3-8
Figure 3–12. Message window - Stop measurements during configuration . . . . . 3-9
Figure 3–13. Main menu screen - Analogues selected . . . . . . . . . . . . . . . . . . 3-10
Figure 3–14. Message window - Stop measurements during configuration . . . . 3-10
Figure 3–15. Initial screen - Self-check . . . . . . . . . . . . . . . . . . . . . . . . . . . . 3-11
Figure 3–16. Message window - Stop measurements during configurations . . . 3-12
Figure 3–17. Sensor Type and Sensor Constants - Sensor Type menu
selected for editing . . . . . . . . . . . . . . . . . . . . . . . . . . . . . . . . . 3-13
Figure 3–18. Example calibration certificate: Calibration data and
sensor constants. . . . . . . . . . . . . . . . . . . . . . . . . . . . . . . . . . . 3-14
Figure 3–19. Calibration Data screen . . . . . . . . . . . . . . . . . . . . . . . . . . . . . . 3-15
Figure 3–20. Calibration Data screen - changing the pressure unit . . . . . . . . . 3-16
Figure 3–21. Message window - Sensor type change resets RATA . . . . . . . . . . 3-17
Figure 3–22. Calibration button in the Sensor Options window . . . . . . . . . . . . 3-18
Figure 3–23. Message window - Stop measurements during configuration . . . . 3-18
Figure 3–24. Calibration settings screen . . . . . . . . . . . . . . . . . . . . . . . . . . . . 3-19
Figure 3–25. Calibration temperature screen . . . . . . . . . . . . . . . . . . . . . . . . 3-20
Figure 3–26. Calibration screen . . . . . . . . . . . . . . . . . . . . . . . . . . . . . . . . . . 3-21
Figure 3–27. Sensor Options screen. . . . . . . . . . . . . . . . . . . . . . . . . . . . . . . 3-22
Figure 3–28. Message window - Stop measurements for calibration. . . . . . . . . 3-23
Figure 3–29. Pressure for RATA Calculation . . . . . . . . . . . . . . . . . . . . . . . . . 3-24
Figure 3–30. Relative Accuracy Test Audit (RATA) Screen. . . . . . . . . . . . . . . . 3-25
Figure 3–31. Measurement Settings screen - Temperature compensation. . . . . 3-26
 Loading...