Do you have a question about the Topcon Apollo ISOBUS UT and is the answer not in the manual?
Outlines settings needed for tanks, width, speed, calibration factors, and alarms.
Navigates to Tank Settings from Seeder Settings Menu.
Defines parameters like number of tanks, capacity, type (granular, liquid, NH3), and drive type.
Details settings for electric motor drive: selection, pulses, RPM, gear ratio, soft start, sensors.
Details settings for actuator drive: encoder teeth, clutch, style (Zeromax, generic).
Configures dither, soft start, and soft stop for proportional valve operation.
Configures settings for regulator valve drive: sensitivity, valve modes, controller settings.
Configures settings for proportional valve drive: dither, start/stop, PWM, controller response.
Adjusts sensitivity, valve closing, and reverse polarity for regulator valve.
Configures valve start/stop, dump valve, and Min/Max PWM.
Defines wheel factor as distance traveled per pulse from the wheel sensor.
Guides through automatic calibration process for the wheel factor.
Navigates to Fan Settings from Seeder Settings Menu.
Navigates to Geometry Settings from Seeder Settings Menu.
Navigates to Speed Settings from Seeder Settings Menu.
Determines application rate by selecting speed source: Wheel, Manual, or tractor ECU (ISO).
Enables monitoring for blocked head sensors and sets sensor type and number.
Assigns encoders to seeder components based on harness connections using ECU Setup menu.
Navigates to Product Settings Menu to configure up to 16 products.
Sets product name, tank number, density, and preset rates.
Configures calibration factor, INC/DEC increments, and product type (Seed/Fertilizer).
Explains why tanks must be calibrated for accurate seeding at the proper rate.
Notes that NH3 tanks have preset calibration values entered manually from flow meter tag.
Steps to manually enter a calibration factor when the value is known.
Navigates to Product Settings and then selects Cal. Factor.
Covers automatic calibration overview, speed source, and initial factor entry.
Step-by-step guide for calibrating a single granular tank.
Toggles between Set Rate and Actuator Extension target percentage for calibration.
Explains that Estimated Weight increases and how to proceed when sufficient product is collected.
Measures bucket weight and enters it to complete calibration.
Steps to select and switch on multiple tanks for calibration.
Notes that up to four products can be calibrated simultaneously.
Positions calibration buckets under metering rollers for each tank.
Starts calibration and monitors estimated weight increase in buckets.
Measures collected product weight and enters actual weight for each tank.
Displays old factors, new factors, percentage difference, and save status.
Sets status to save or ignore new calibration factors for each product.
Notes that liquid tanks must be calibrated one at a time.
Steps to calibrate a liquid tank, including product selection and bucket placement.
Starts the calibration process for a liquid tank.
Measures collected volume and enters it to complete calibration.
Allows saving or rejecting the new calibration factor for a liquid tank.
Verifies tank and wheel calibrations by simulating seeder function over a defined distance.
Steps to enter required area and initiate the area test.
Alarms provide warnings for malfunctioning seeder system functions.
Navigates to Alarm Settings Menu and enables/disables all alarms.
Fan alarms use pressure sensors to monitor fan pressure and speed.
Defines Fan Press. Low/High and Fan Speed Low/High alarms.
Sets the alarm point values for enabled fan alarms.
Tank motor alarms activate on power supply faults or jamming.
Enables Tank Motor Sensor alarms and Tank Motor Jam alarms.
Shaft alarms trigger on no signal from metering shaft sensor or sensor movement.
Enables Shaft # Stopped alarms, with default setting as Enabled.
Gear alarms trigger if calculated gear ratio differs from drive setup value.
Enables Tank Gear # alarms, where # denotes the tank number.
Triggers Tank # Low alarm when product level falls below the sensor.
Triggers Tank # Empty alarm when the last grain is calculated to pass metering rollers.
Pressure sensors in liquid/NH3 tanks measure pressure and trigger alarms.
Configures Tank # Press. Low and Tank # Press. High alarms based on set points.
Enables Task Controller, factory reset, ISOBUS display switching, and firmware upgrade.
Navigates to Factory Upgrade screen via Advanced Settings.
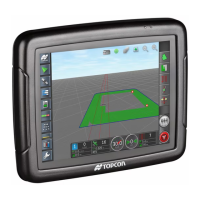
Describes how to operate the Apollo ISOBUS UT seeder.
Accesses Tank Fill options and selects tanks for filling.
Accesses the diagnostics screen for a runtime view of seeder operation.
Defines three error levels: Error/fault, Warning, and Information.
| Category | Farm Equipment |
|---|---|
| Manufacturer | Topcon |
| Model | Apollo ISOBUS UT |
| Display Size | 12.1 inches |
| Touchscreen | Yes |
| Power Supply | 12V DC |
| Operating Temperature | -20°C to 60°C |
| Protection Rating | IP65 |
| Type | ISOBUS Universal Terminal |
| Operating System | Linux |
| Connectivity | ISOBUS, USB, CAN |