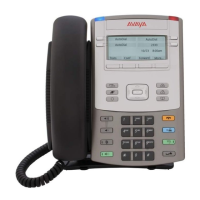
When the search is complete, the message Search Completed
Found Device(s) appears.
10. If the name of your headset appears in the Found box, proceed
to step 15.
If your headset is not displayed in the Found box, select your
headset from the list.
11. Press the Right navigation key one or more times to highlight
the Found box. Press the Enter key to start the edit mode.
12. Press the Down navigation key to open the Found list. Press
the Up/Down navigation key to scroll and highlight your headset.
13. Press the Enter key to select the headset and close the list.
Press the Enter key to exit edit mode.
14. Press the Right navigation key one or more times to highlight
the Pair button (next to the Pair Device item) and press the Enter
key.
A dialog box appears, with the prompt Enter PIN#.
15. Use the telephone dialpad to enter the PIN for the wireless
headset and press the Enter key.
Check your headset documentation to find the headset PIN or
passkey. Often, the PIN or passkey is 0000.
16. If the headset is successfully paired with your IP Deskphone,
proceed to step 17. To verify that the pairing is successful, ensure
that the headset appears in the list next to the Paired item. If pairing
is successful, the message Pair completed also appears at the
bottom of the screen.
If the headset is not successfully paired with your IP Deskphone, an
error message appears at the bottom of the screen. If an error
message appears:
• Confirm that the wireless headset is still in search/pair mode.
Table continues…
Configuring the Avaya 1140E IP Deskphone
August 2017 Avaya 1140E IP Deskphone with SIP Software User Guide 82
Comments on this document? infodev@avaya.com

 Loading...