2002 Buell S3T: Engine 3-19
HOME
Grinding Valve Faces and Seats
After installing valve guides, reface valve seats to make them
concentric with guides.
Valve face angle is 45° for both intake and exhaust valves. If a
valve refacing grinder is used, it must be adjusted exactly to
this angle. It is important to remove no more metal than is
necessary to clean up and true valve face. Install a new valve
if grinding leaves the valve edge (the margin) with a width of
less than 1/32 in. (0.8 mm). A valve with too thin a margin
does not seat normally, burns easily, may cause pre-ignition
and can also lead to valve cracking. Valves that do not clean
up quickly are probably warped or too deeply pitted to be
reused. Replace the valve if end of valve stem shows uneven
wear. After valves have been ground, handle with care to pre-
vent damage to the ground faces.
The valve seats may be refinished with cutters or grinders.
Cut seats to a 46° angle or grind seats to a 45° angle. Valve
seat tools and fixtures are available commercially. Seat each
valve in the same position from which it was removed.
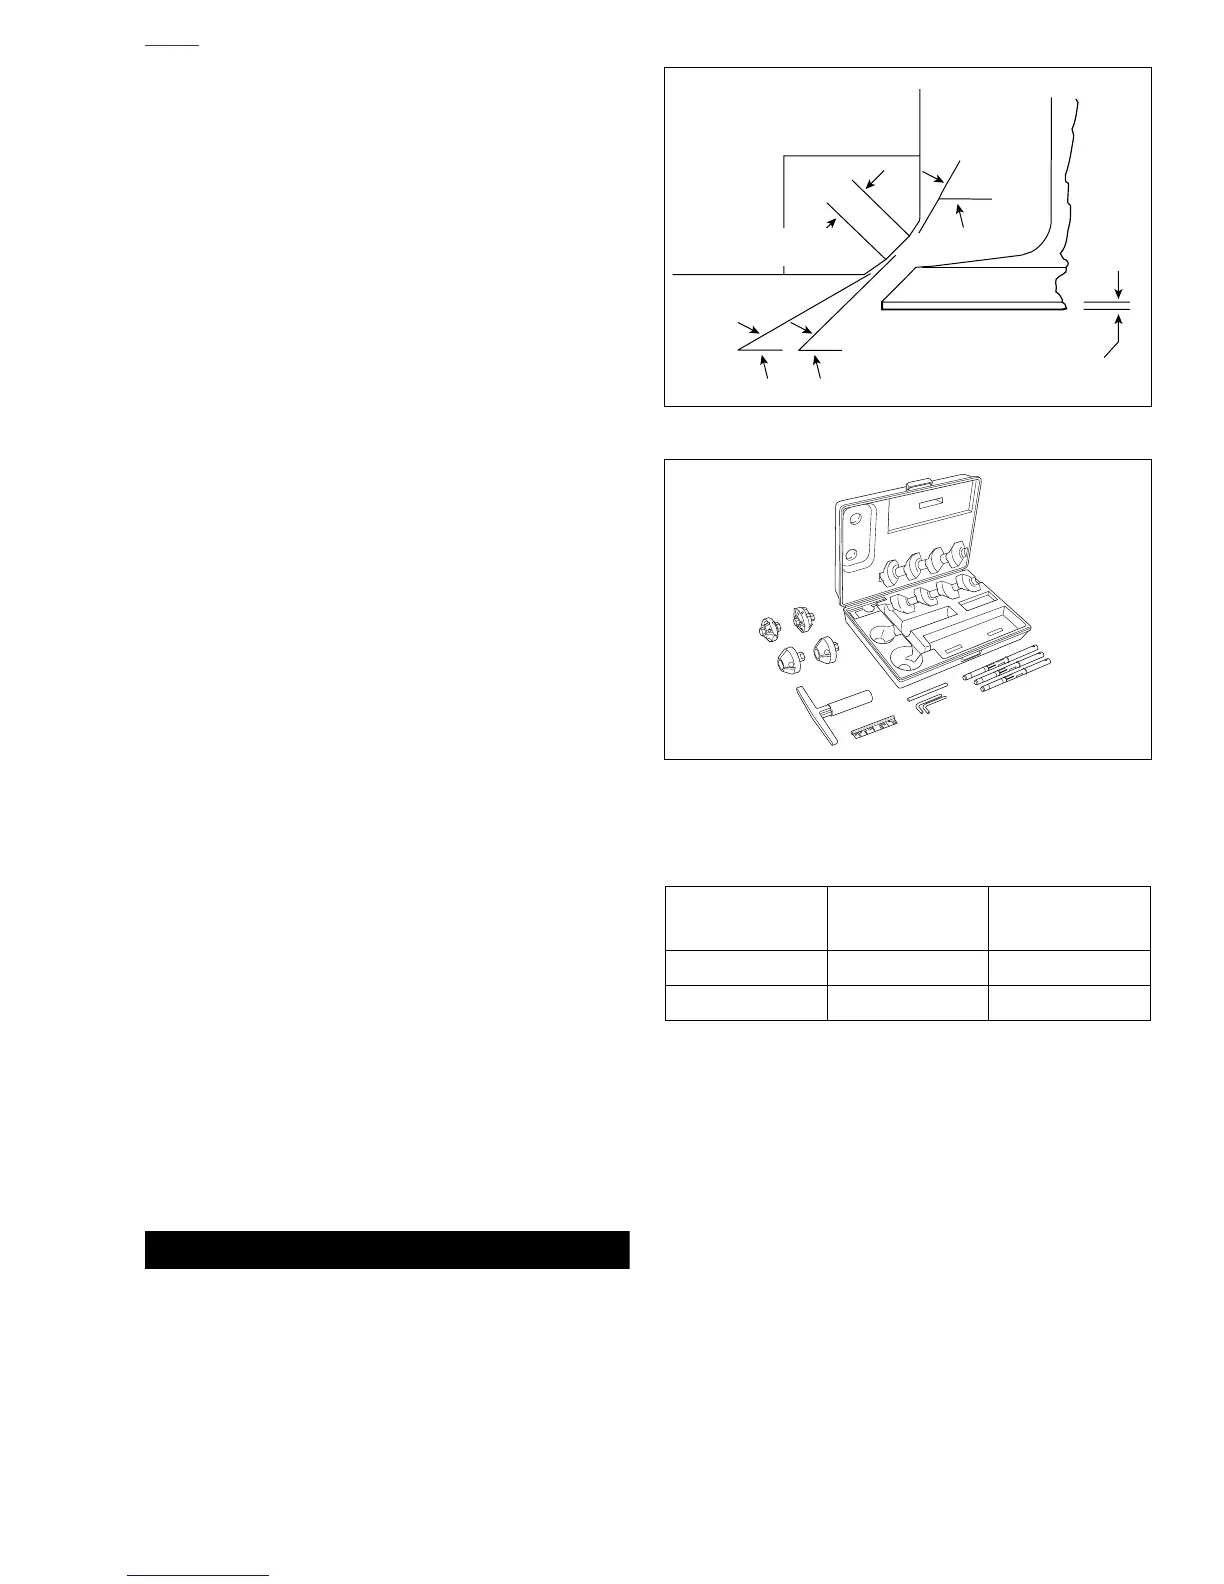
The correct 3-angle valve seat angles are shown in Figure 3-
21. Use NEWAY VALVE SEAT CUTTER SET (Part No. HD-
35758) to cut the seats. Always grind valves before cutting
seats.
1. Cut 46° (or grind 45°) valve seat angle first. Use cutting
oil to avoid chatter marks. Cut or grind only enough to
clean up the seat.
2. Apply a small amount of lapping compound to the valve
face. Rotate valve against seat using VALVE LAPPING
TOOL (Part No. HD-96550-36A).
3. See Figure 3-21. Check the contact pattern on valve
face. It should be 0.040-0.062 in. (1.016-1.575 mm)
wide, and its center should be positioned 2/3 of the way
toward the outside edge of face.
4. If valve seat pattern is too close to the stem side of valve
face, cut 60° angle in order to raise seat. If pattern is too
close to the edge of valve face, cut 31° angle in order to
lower seat.
5. After cutting either or both 31° or 60° angles to position
seat, final cut 46° (or grind 45°) seat angle to obtain
proper 0.040-0.062 in. (1.016-1.575 mm) width.
6. Recheck valve seat width and location with lapping com-
pound as described in Step 2.
7. To achieve a smooth even finish, place a piece of 280 grit
emery paper under the cutter head and rotate cutter.
CAUTION
Do not grind valve to shorten. Grinding will remove the
case hardening and expose the stem’s mild steel core
resulting in rapid end wear.
8. See Figure 3-23. Wipe valve seats and valve faces
clean. Measure valve stem protrusion.
a. If valve stem protrudes more than 2.031 in.
(51.587 mm), replace valve seat or cylinder head.
b. If valve stem protrusion is acceptable, valves and
seats are ready for lapping.
Replacing Valve Seats
Replacing a valve seat is a complex operation requiring spe-
cial equipment. If the seat is loose or is not fully seated in the
head, then seat movement will prevent the proper transfer of
heat from the valve. The seat surface must be flush with (or
below) the head surface. See 3.1 SPECIFICATIONS for valve
seat-to-cylinder head fit.
To remove the old seat, lay a bead of weld material around
the inside diameter of the seat. This will shrink the seat out-
side diameter and provide a surface for driving the seat out
the port side.
Figure 3-21. Valve Seat Angles
Figure 3-22. Valve Seat Cutter
Table 3-4. Neway Valve Seat Cutters
VALVE SEAT 60° CUTTER
31° AND 46°
CUTTERS
Exhaust Part No. 205 Part No. 622
Intake Part No. 293 Part No. 642
Head
Valve
46° Cutting
45° Grinding
Seat
31°
0.040-0.062 in.
(1.016-1.575 mm)
60°
Margin
b0169x3x














 To Next Page