DMP 128 Plus • Installation 4
Installation
This section describes the installation of the DMP 128 Plus and covers the following topics:
• DMP 128 Plus Models
• Mounting
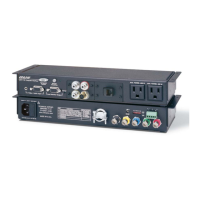
• Rear Panel Features and Cabling
• Front Panel Features
• Hardware Reset Modes
DMP 128 Plus Models
Model Description
DMP 128 Plus 12x8 ProDSP Processor
DMP 128 Plus C 12x8 ProDSP Processor with Acoustic Echo Cancellation (AEC)
DMP 128 Plus C V 12x8 ProDSP Processor with AEC and VoIP
DMP 128 Plus AT 12x8 ProDSP Processor with Dante
DMP 128 Plus C AT 12x8 ProDSP Processor with AEC and Dante
DMP 128 Plus C V AT 12x8 ProDSP Processor with AEC, VoIP and Dante
Mounting
The 1U high, full rack width, 8.5 inch deep DMP 128 Plus mounts in the following manners:
• Rack mounting — Attach the DMP 128 Plus to a standard 19-inch rack shelf. The
following Underwriters Laboratories (UL) guidelines pertain to the installation of the
DMP128 Plus in a rack:
• Reduced air flow — Install the equipment in the rack so that the amount of air
flow required for safe operation of the equipment is not compromised.
• Mechanical loading — Mount the equipment in the racks so that uneven
mechanical loading does not create a hazardous condition.
• Circuit overloading — When connecting the equipment to the supply circuit,
consider the effect that circuit overloading might have on overcurrent protection
and supply wiring. Consider equipment nameplate ratings when addressing this
concern.
• Reliable earthing (grounding) — Maintain reliable grounding of rack-mounted
equipment. Pay particular attention to power supply connections other than direct
connections to the branch circuit (such as the use of power strips).
• Under-furniture mounting — Mount the DMP 128 Plus under the surface of a desk,
table, or podium.
• Free-standing — Attach the four rubber feet provided with the device to the bottom of
the DMP 128 Plus in the four corners and place the unit on furniture as desired.
NOTE: To mount the DMP 128 Plus using an Extron mounting kit, see the instructions
provided with the kit.